Guide: Installing the Test Bed for development use
Track |
|---|
This guide walks you the installation a new Test Bed instance for development purposes.
What you will achieve
At the end of this guide you will have a fully functioning Test Bed installation. This Test Bed instance may be used as:
A demo instance for you to evaluate whether the Test Bed is a good fit for your needs.
A local development instance, on your workstation or a shared environment, on which you can experiment and prepare the test suites and test services needed by your project.
This guide acts as a counterpart to the Test Bed’s production installation guide.
What you will need
About 30 minutes.
A text editor.
A web browser.
A machine with at least a dual core CPU, 4 GBs of RAM and 30 GBs of free storage. This machine should also be able to access the internet (for software installations).
The target machine OS should support linux-based Docker containers (meaning that it should be running Windows 10/11, Linux or MacOS).
Administrator privileges on the target machine.
A basic understanding of networking (e.g. ports) and be comfortable using a command prompt.
Note
Installing on Windows Server: When installing on old Windows operating systems or Windows Server, linux-based containers are not supported. In this case you could still install the Test Bed through podman using commands and the podman client. Installing from source is also possible although not advised given the extra complexity of manual configuration and management.
How to complete this guide
Completing the installation’s steps involves the preparation of your installation script and the execution of commands on a command line interface.
Steps
Carry out the following steps to complete this guide.
Step 1: Install required tools
Note
Using Kubernetes: The Test Bed can also be installed on Kubernetes via Helm chart or manifest files as described in the production installation guide. Using Docker is however simpler and better suited for development, and will be the approach considered in this guide.
The first step is to ensure that Docker is installed on the machine that will host the Test Bed. If you already have Docker ensure it is at least at version 17.06.0, otherwise you can follow Docker’s online instructions to install or upgrade it.
Once your installation is complete, you will be able to test it using the docker --version command. This should provide output as follows:
> docker --version

Docker version 23.0.5, build bc4487a
To complete your Docker setup you will also install Docker Compose, a tool for defining and running multi-container Docker
applications (such as the Test Bed). You can check whether your Docker installation already includes Docker Compose by issuing the
docker compose version command that should give output as follows:
> docker compose --version
Docker Compose version 2.17.3
The minimum version of Docker Compose you need is 2.0.0. If you don’t have Docker Compose already installed follow its installation guide to set it up.
Note
Use of Docker Compose: It is not strictly necessary to use Docker Compose for a Test Bed installation although it is highly advised given the simplifications it offers.
Step 2: Define the Test Bed’s configuration
First off create a folder on the machine you will install the Test Bed on. For the purpose of this guide lets assume this is:
/workspace/testbed
Within the testbed folder create file docker-compose.yml with the following contents:
volumes:
   gitb-repo:
   gitb-dbdata:

services:
   gitb-redis:
      image: isaitb/gitb-redis
      container_name: itb-redis
      restart: unless-stopped
   gitb-mysql:
      image: isaitb/gitb-mysql
      container_name: itb-mysql
      restart: unless-stopped
      volumes:
       - gitb-dbdata:/var/lib/mysql
      healthcheck:
       test: "/usr/bin/mysql --user=root --password=$$MYSQL_ROOT_PASSWORD --execute \"SHOW DATABASES;\""
       interval: 3s
       retries: 50
   gitb-srv:
      image: isaitb/gitb-srv
      container_name: itb-srv
      restart: unless-stopped
      environment:
       - CALLBACK_ROOT_URL=http://localhost:8080/itbsrv
      ports:
       - "8080:8080"
   gitb-ui:
      image: isaitb/gitb-ui
      container_name: itb-ui
      restart: unless-stopped
      ports:
       - "9000:9000"
      environment:
       - THEME=ec
      volumes:
       - gitb-repo:/gitb-repository
      depends_on:
       gitb-redis:
         condition: service_started
       gitb-mysql:
         condition: service_healthy
       gitb-srv:
         condition: service_started
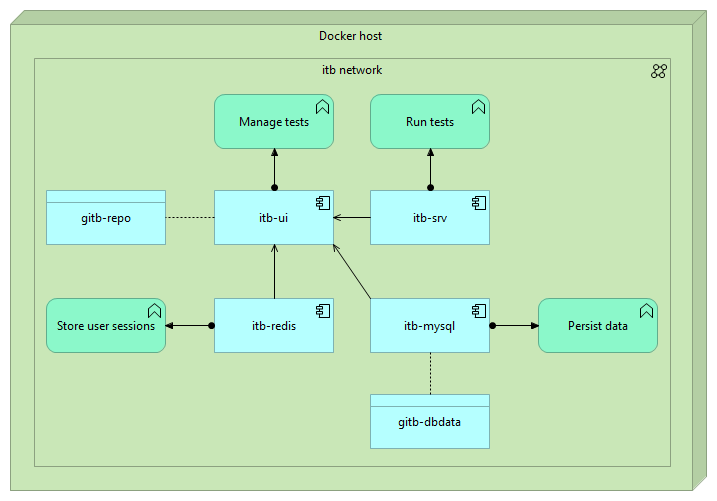
This is a YAML file that defines the components you will install as well as their configuration. The contents of this file represent an example configuration from a development
environment running on your localhost. It specifies how the Test Bed’s components are to be setup, specifically:
Two volumes named
gitb-repoandgitb-dbdataare defined to persist the Test Bed’s data. These are defined so that other components can be removed or replaced without data loss.itb-redisis a cache server used for user session management.itb-mysqlis the Test Bed’s database.itb-srvis the Test Bed’s backend test engine that executes tests.itb-uiis the Test Bed’s frontend that users access.
The following table summarises the configuration options specific to the Test Bed that you should be aware of and potentially adapt for your installation:
Component |
Section/Property |
Description |
|---|---|---|
|
|
The base address for test engine call-backs. |
|
|
This is the port mapping for the Test Bed’s test engine on the local machine. |
|
|
The key specifying the UI theme to use. |
|
|
This is the port mapping for the Test Bed’s user interface and APIs on the local machine. |
The full set of configuration properties supported by the Test Bed are listed here.
Note
Using themes: The THEME variable determines your Test Bed’s look and feel. You can use
the built-in ec (European Commission) or gitb (default) theme, or create and specify your own.
Apart from these options, the docker-compose.yml file uses Docker Compose properties such as restart: unless-stopped that ensures containers are always
running unless explicitly stopped. In addition, you may have noticed that the itb-mysql container definition includes a healthcheck to allow the itb-ui
container to only start after the database is ready to accept connections. For a detailed description of such options and a better understanding of the docker-compose.yml
file you can check out the Docker Compose file reference.
Note
Installing a production Test Bed instance: The configuration provided in this section is minimal and meant to provide development flexibility. When installing a Test Bed instance for production use you need to consider numerous additional points (see Guide: Installing the Test Bed for production use).
Installing on a remote server
The configuration we saw in the previous section assumes that you are setting up a developer instance on your local workstation. This approach allows for minimum setup hassle and highest efficiency while developing.
In case you are setting up a development instance on a remote server, you need to make some minor adjustments to your configuration to ensure a fully working installation. These relate to how you access the Test Bed on the remote server, taking into account its address (or domain name), ports and reverse proxy mappings (if a proxy is setup). These points are discussed in more detail in the production installation guide but in brief you would need to configure the following:
Property
CALLBACK_ROOT_URLonitb-srv, to allow the Test Bed to receive remote callbacks.Property
TESTBED_HOME_LINKonitb-ui, to specify the home link for the Test Bed’s frontend.Property
AUTHENTICATION_COOKIE_PATHonitb-ui, in case you use a reverse proxy and map the Test Bed’s frontend to a specific path.
As an example, consider that you are deploying the Test Bed on a remote server with IP address 10.0.0.1, without going
through a proxy, and using the default port mappings. In this case you need to adapt docker-compose.yml as follows:
services:
   ...
   gitb-srv:
      ...
      environment:
       ...
       - CALLBACK_ROOT_URL=http://10.0.0.1:8080/itbsrv
   gitb-ui:
      ...
      environment:
       ...
       - TESTBED_HOME_LINK=http://10.0.0.1:9000
   ...
In case you are using a proxy on the remote host and exposing the Test Bed over HTTP on port 80, using paths /itb and /itbsrv
for the itb-ui and itb-srv components respectively, your configuration would be as follows:
services:
   ...
   gitb-srv:
      ...
      environment:
       ...
       - CALLBACK_ROOT_URL=http://10.0.0.1/itbsrv
   gitb-ui:
      ...
      environment:
      ...
       - TESTBED_HOME_LINK=http://10.0.0.1/itb
       - AUTHENTICATION_COOKIE_PATH=/itb
   ...
In addition, to this configuration you would also need to ensure your reverse proxy is configured appropriately to expose the Test Bed’s components.
Step 3: Install the Test Bed
Open a command prompt to the testbed folder (i.e. where you have your docker-compose.yml file). In this issue the docker compose up -d command
from which you should see the following output:
docker compose up -d
...
Creating itb-srv ...
Creating itb-redis ...
Creating itb-mysql ...
Creating itb-srv
Creating itb-redis
Creating itb-srv ... done
Creating itb-ui ...
Creating itb-ui ... done
What this does is to first download all required Test Bed images (as well as the images they build upon) and then start up all services. The names
you see (e.g. itb-srv) can be used to refer to individual containers (e.g. to inspect logs).
To ensure the Test Bed has completed its initialisation check the logs of itb-srv and itb-ui. For itb-srv issue docker logs -f itb-srv
for which you should see output completing as follows:
> docker logs -f gitb-srv

...
19/06/2026 15:36:51 INFO  c.g.t.c.TestbedServiceContextListener - [] Started ITB test engine (itb-srv) - release 1.29.5
 _____ _______ ____                       _
|_   _|__   __|  _ \                     | |
  | |    | |  | |_) |  _ __ ___  __ _  __| |_   _
  | |    | |  |  _ <  | '__/ _ \/ _` |/ _` | | | |
 _| |_   | |  | |_) | | | |  __/ (_| | (_| | |_| |
|_____|  |_|  |____/  |_|  \___|\__,_|\__,_|\__, |
                                             __/ |
                                            |___/
You can exit the log display by issuing a CTRL-C. To check itb-ui issue docker logs -f itb-ui for which the output should complete as follows:
> docker logs -f itb-ui

...
19/06/2026 15:36:52 INFO  hooks.PostStartHook - Started ITB frontend (itb-ui) in production mode - release 1.29.5 (2026-06-19 09:35:19)
 _____ _______ ____                       _
|_   _|__   __|  _ \                     | |
  | |    | |  | |_) |  _ __ ___  __ _  __| |_   _
  | |    | |  |  _ <  | '__/ _ \/ _` |/ _` | | | |
 _| |_   | |  | |_) | | | |  __/ (_| | (_| | |_| |
|_____|  |_|  |____/  |_|  \___|\__,_|\__,_|\__, |
                                             __/ |
                                            |___/
Once again exit the log display by issuing a CTRL-C. You should now have a fully functioning Test Bed installation.
Alternative installation with Docker commands
If you have experience with Docker and prefer working with Docker commands directly you can also use them to install the test bed. The commands to execute (in sequence) would be as follows:
docker network create itb-net

docker create -v /var/lib/mysql --name itb-dbdata ubuntu

docker create -v /gitb-repository --name itb-repo ubuntu

docker run --name itb-mysql --net=itb-net -d --restart=unless-stopped \
--volumes-from itb-dbdata \
isaitb/gitb-mysql

docker run --name itb-redis --net=itb-net -d --restart=unless-stopped isaitb/gitb-redis

docker run --name itb-srv --net=itb-net -p 8080:8080 \
-e CALLBACK_ROOT_URL=http://localhost:8080/itbsrv \
-d --restart=unless-stopped \
isaitb/gitb-srv

docker run --name itb-ui --net=itb-net -p 9000:9000 --volumes-from itb-repo \
-d --restart=unless-stopped -e THEME=ec \
isaitb/gitb-ui
Note that the advised way to install the Test Bed is nonetheless to use Docker Compose, as it offers a better way to manage your configuration and automates most manual tasks.
Step 4: Test your installation
To test your installation log into the Test Bed using the default administrator account.
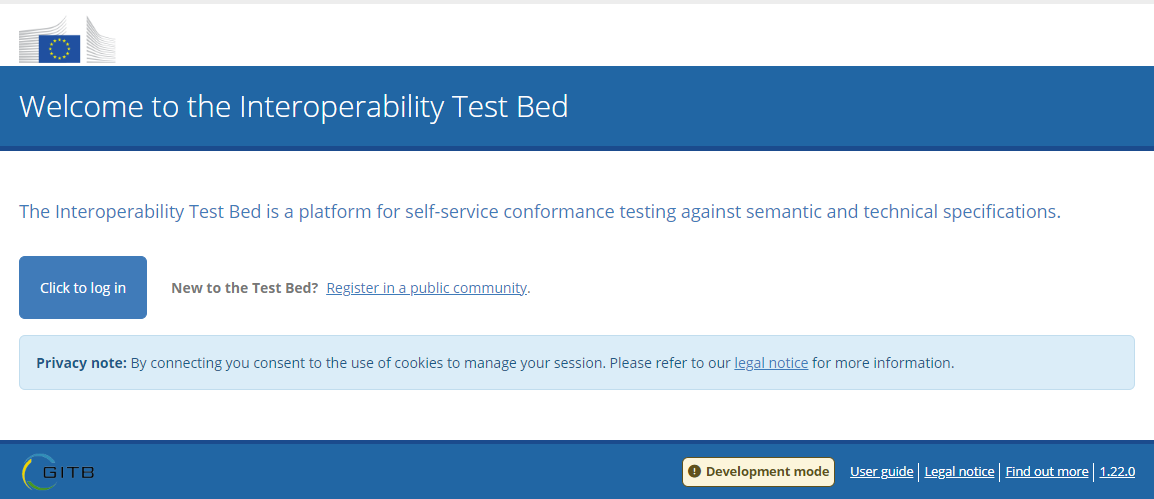
Open a browser window and navigate to http://localhost:9000 (assuming Docker is running natively on your localhost). You
should be greeted with the Test Bed’s welcome page:
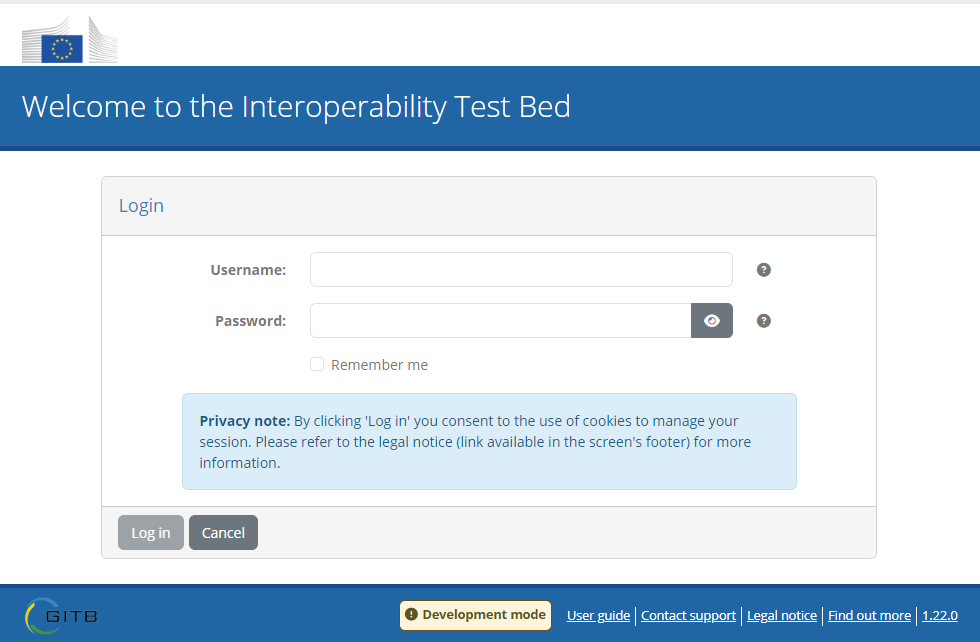
You can now also try to log into the Test Bed using the default administrator account. To do this click on the Click to log in button at which point you should see the Test Bed’s login page:
The default administrator’s account is admin@itb which is set with an automatically generated password at startup. The value for this password is printed
in the itb-ui container’s logs that can be inspected using command docker logs -f itb-ui:
...
###############################################################################

The one-time password for the default administrator account [admin@itb] is:

b1afbc39-8ad7-49f4-a9d9-0bcec942aef4

###############################################################################
...
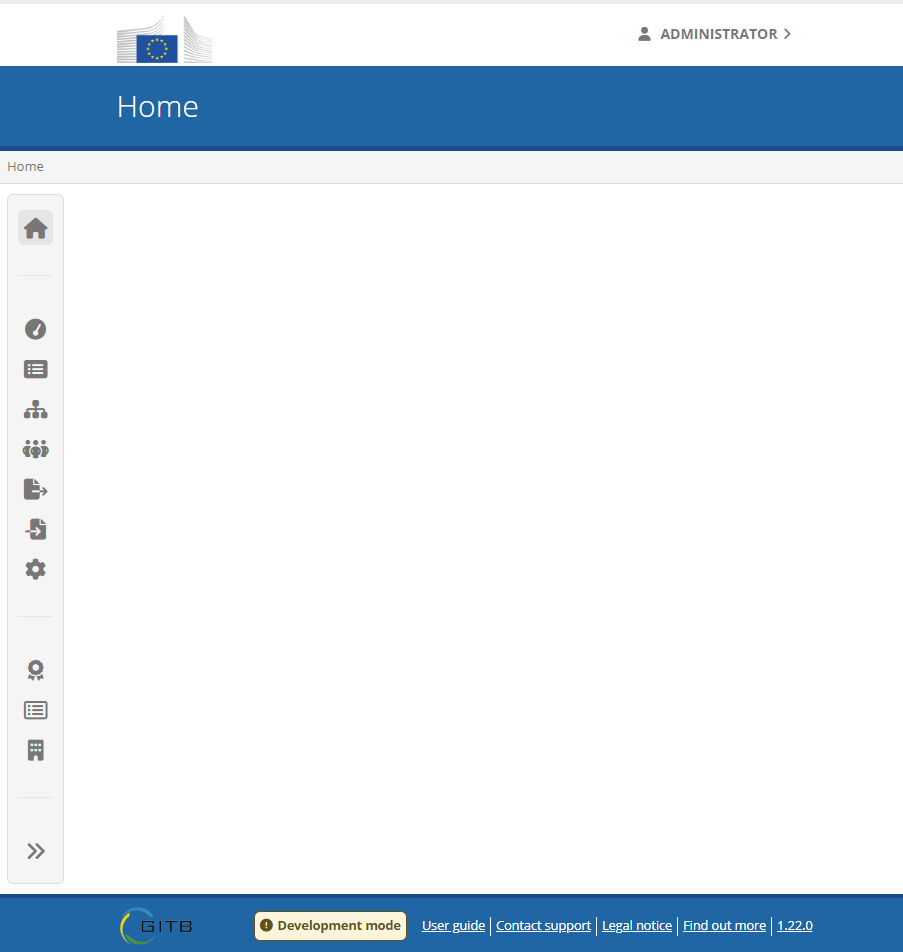
Providing the listed password in the login form will prompt you to replace it, following which you should be greeted with the Test Bed’s home page and the startup configuration wizard:

This wizard will walk you through a series of steps to help you get started with the Test Bed. These include setting up samples for experimentation, and activating the Test Bed’s REST API, which are both strongly advised if you are new to the Test Bed and want to streamline your development.

Note
Feedback survey: At the end of the configuration wizard you will also be invited to complete a brief feedback survey. Although not mandatory, we would greatly appreciate if you could take 2 minutes to complete this. Doing so helps us get a better idea of our users and supports the Test Bed’s continued development.
Once you complete the wizard you will see the Test Bed’s currently empty home page. You can eventually replace this by specifying default and community-specific landing pages.
If during the configuration wizard you chose to import the available samples, this will create a domain (including the specifications and tests) and community (including the organisation to test with). You can access these be selecting respectively the Domain management and Community management entries from the menu.

If you would like to already try the sample tests, you can select the created community, followed by selecting the sample organisation, and then selecting to Manage tests. All samples are designed to work without further configuration so you can already start running tests.
As a final step in your installation, you should check that all Test Bed components are functioning as expected. Already having logged in and arrived at the home page, you know that most core components are working well. To ensure that all services that are not immediately obvious are also functioning as expected, visit the service health dashboard by following the relevant menu entry.
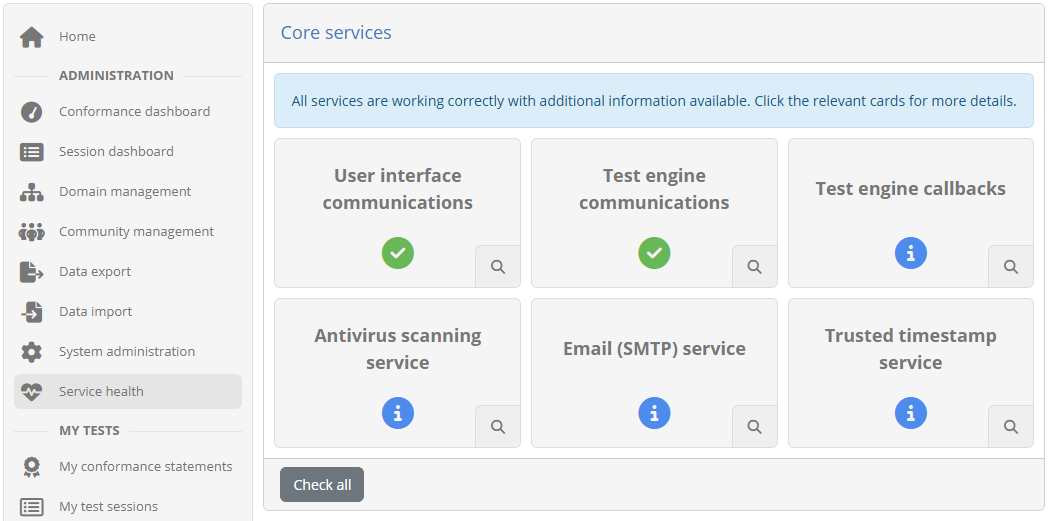
If all status cards displayed here appear as successful or only with information messages, you know that all components are working correctly.
Note
Development mode: You will likely notice a Development mode notice in the interface’s footer. This highlights that this is a simplified instance that should not be used in production. For a production installation check Guide: Installing the Test Bed for production use.
Step 5: Manage the Test Bed
An optional additional step would be to experiment with managing your new Test Bed instance.
Managing the Test Bed is done as with any set of Docker containers. In fact, as we are using Docker Compose, management is actually simpler as you don’t need
to treat individual components. The following list provides a set of commands that you would eventually be using. Note that when using the
docker compose command you need to do so from the folder that contains the docker-compose.yml file:
Action |
Command |
|---|---|
Create and run the Test Bed |
|
View a component’s log file (e.g. |
|
Stop the Test Bed |
|
Start the Test Bed |
|
Delete the Test Bed (keeping all data) |
|
Delete the Test Bed (removing all data) |
|
Obtain the latest Test Bed version |
|
If you have a running Test Bed and want to update it to the latest release you would use a combination of the above commands as follows:
docker compose pullto get any latest versions but not make any changes.docker compose downto remove the previous containers but keep your data.docker compose up -dto create new containers based on the latest downloaded versions (reusing your previous data).
A detailed description on updating a Test Bed instance to the latest release is provided in Guide: Updating the Test Bed.
Summary
Congratulations! You have now completed your Test Bed installation for development use. In doing so you also installed Docker, Docker Compose
and created a docker-compose.yml file to configure and automate your Test Bed’s installation and management.
See also
With a running Test Bed you are now free to start using it to configure your testing strategy and execute tests. Concerning the Test Bed’s use make sure to check out the user guide (for Test Bed administrators). This contains detailed information on how to create your domain, specifications and test suites, as well as register the organisations and users that will be using them to test.
Given that this is a development instance, it is likely that you will eventually want to publish your setup to a production environment. If this is the case keep in mind that you can export your full setup from your development instance and then import it to production. Details on how to do this are provided in the administrator user guide.
In terms of using the Test Bed, the next logical step would be to create your first test suites. For help on this you have the following options:
Follow the guides on GITB TDL that will provide you step-by-step instructions to create your first test suites (see Guide: Creating a test suite and Guide: Basic test case messaging).
Skip the step-by-step guides by downloading the test suite archives. You can use either the basic test suite created in Guide: Creating a test suite (download here), or a more complete version created in Guide: Basic test case messaging (download here).
Refer to the GITB TDL documentation to get the complete details on how to create test suites.
To address advanced and domain-specific testing needs you may want to extend the Test Bed’s capabilities through separate GITB test services. Check out the GITB test services documentation on how to implement these and get started quickly using the available templates.
For more information on the Docker and Docker Compose tools, commands and properties used in this guide, check out the Docker online documentation.
Finally, in terms of further guides that would be of interest you should consider:
Guide: Installing the Test Bed for production use for step-by-step instructions on how to install a production Test Bed instance.
Guide: Updating the Test Bed for step-by-step instructions on how to update your Test Bed instance when new releases become available.
Guide: Defining your test configuration for step-by-step instructions on how to setup your test configuration in the Test Bed. Alternatively you can always refer to the Manage test configuration section from the Test Bed’s user guide.