Guide: Getting started (for developers)
Track |
|---|
This guide outlines what you need to know to start developing test cases for use in the Test Bed. The target audience is a project’s test developers, i.e. the technical staff developing the test cases and test services needed to realise the project’s conformance testing needs.
This guide does not go into too many details, focusing rather on positioning key concepts so that you know how everything fits together. Once this guide is completed you may use the Test Bed’s developer documentation (check the See also section) to go further into details and support your development.
Note
Test Bed versus standalone validators: The focus of this guide is conformance testing on the complete Test Bed platform through scenario-based test cases. If your needs are rather to create a standalone validator to support your specification(s) you should refer to the XML, RDF, JSON or CSV validation guide as appropriate.
What you will achieve
At the end of this guide you should have an overview of the concepts involved when developing tests, the technologies used and the best approach to organise your work. You should be able to start implementing your first test cases and be more comfortable when going into the more detailed developer documentation.
What you will need
About 30 minutes.
A basic understanding of XML, SOAP web services and web application development (to understand discussed concepts, not for hands-on exercises).
How to complete this guide
The best way to approach this guide is to read through it starting from the Overview section, as it is designed to build up your understanding of different concepts as it progresses. The main concepts involved are addressed in the Topics section which can also be individually looked up as a brief summary per case.
In all sections links are provided to elaborate introduced concepts if you would like to check further details and examples. This additional documentation is the GITB Test Description Language (TDL) reference and the GITB test services documentation, which are summarised by the current guide.
Test Bed overview
The Test Bed is a complete web platform used to facilitate and manage the conformance testing of IT systems. The particular focus is on technical and semantic specifications, ensuring that tested systems conform to requirements and can interoperate consistently with conformant peer systems.
The following diagram illustrates the high-level operation of the Test Bed, in which the highlighted elements represent the system being tested and its tester:
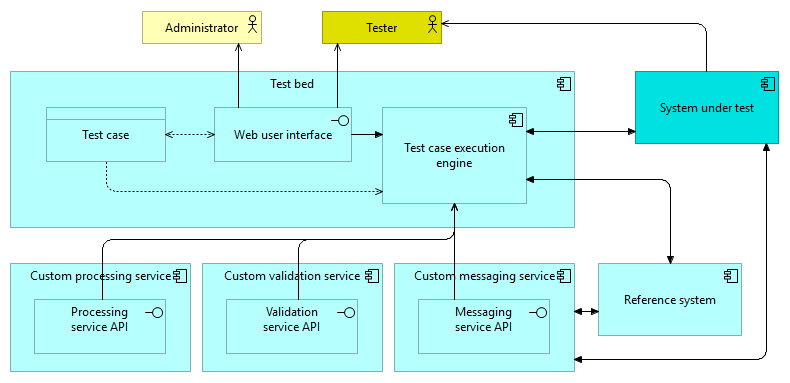
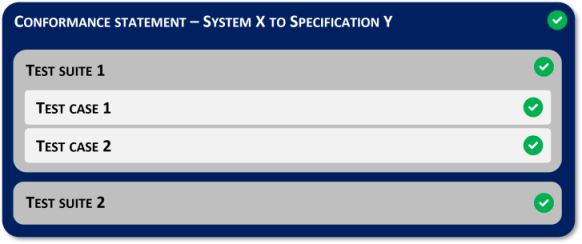
Testing is organised in test suites, collections of one or more test cases, that define the scenarios to test for. Such test cases link to specifications and are assigned to systems under test once these are configured to claim conformance to them. The management of specifications and their test cases, organisations and their users, as well as the execution of tests and subsequent monitoring and reporting, take place through the Test Bed’s web user interface.
Test cases are authored in the GITB Test Description Language (TDL), an XML-based language that allows the definition of the steps to successfully complete and the involved actors, one of which is always realised by the system under test with others either being simulated or realised by other actual systems. Test steps can vary from validation and messaging to arbitrary processing, manipulating and evaluating the test session’s state, either per step or by checking the overall session’s context. A good example of the latter is ensuring conversational consistency by validating that a received message corresponds to an earlier request.
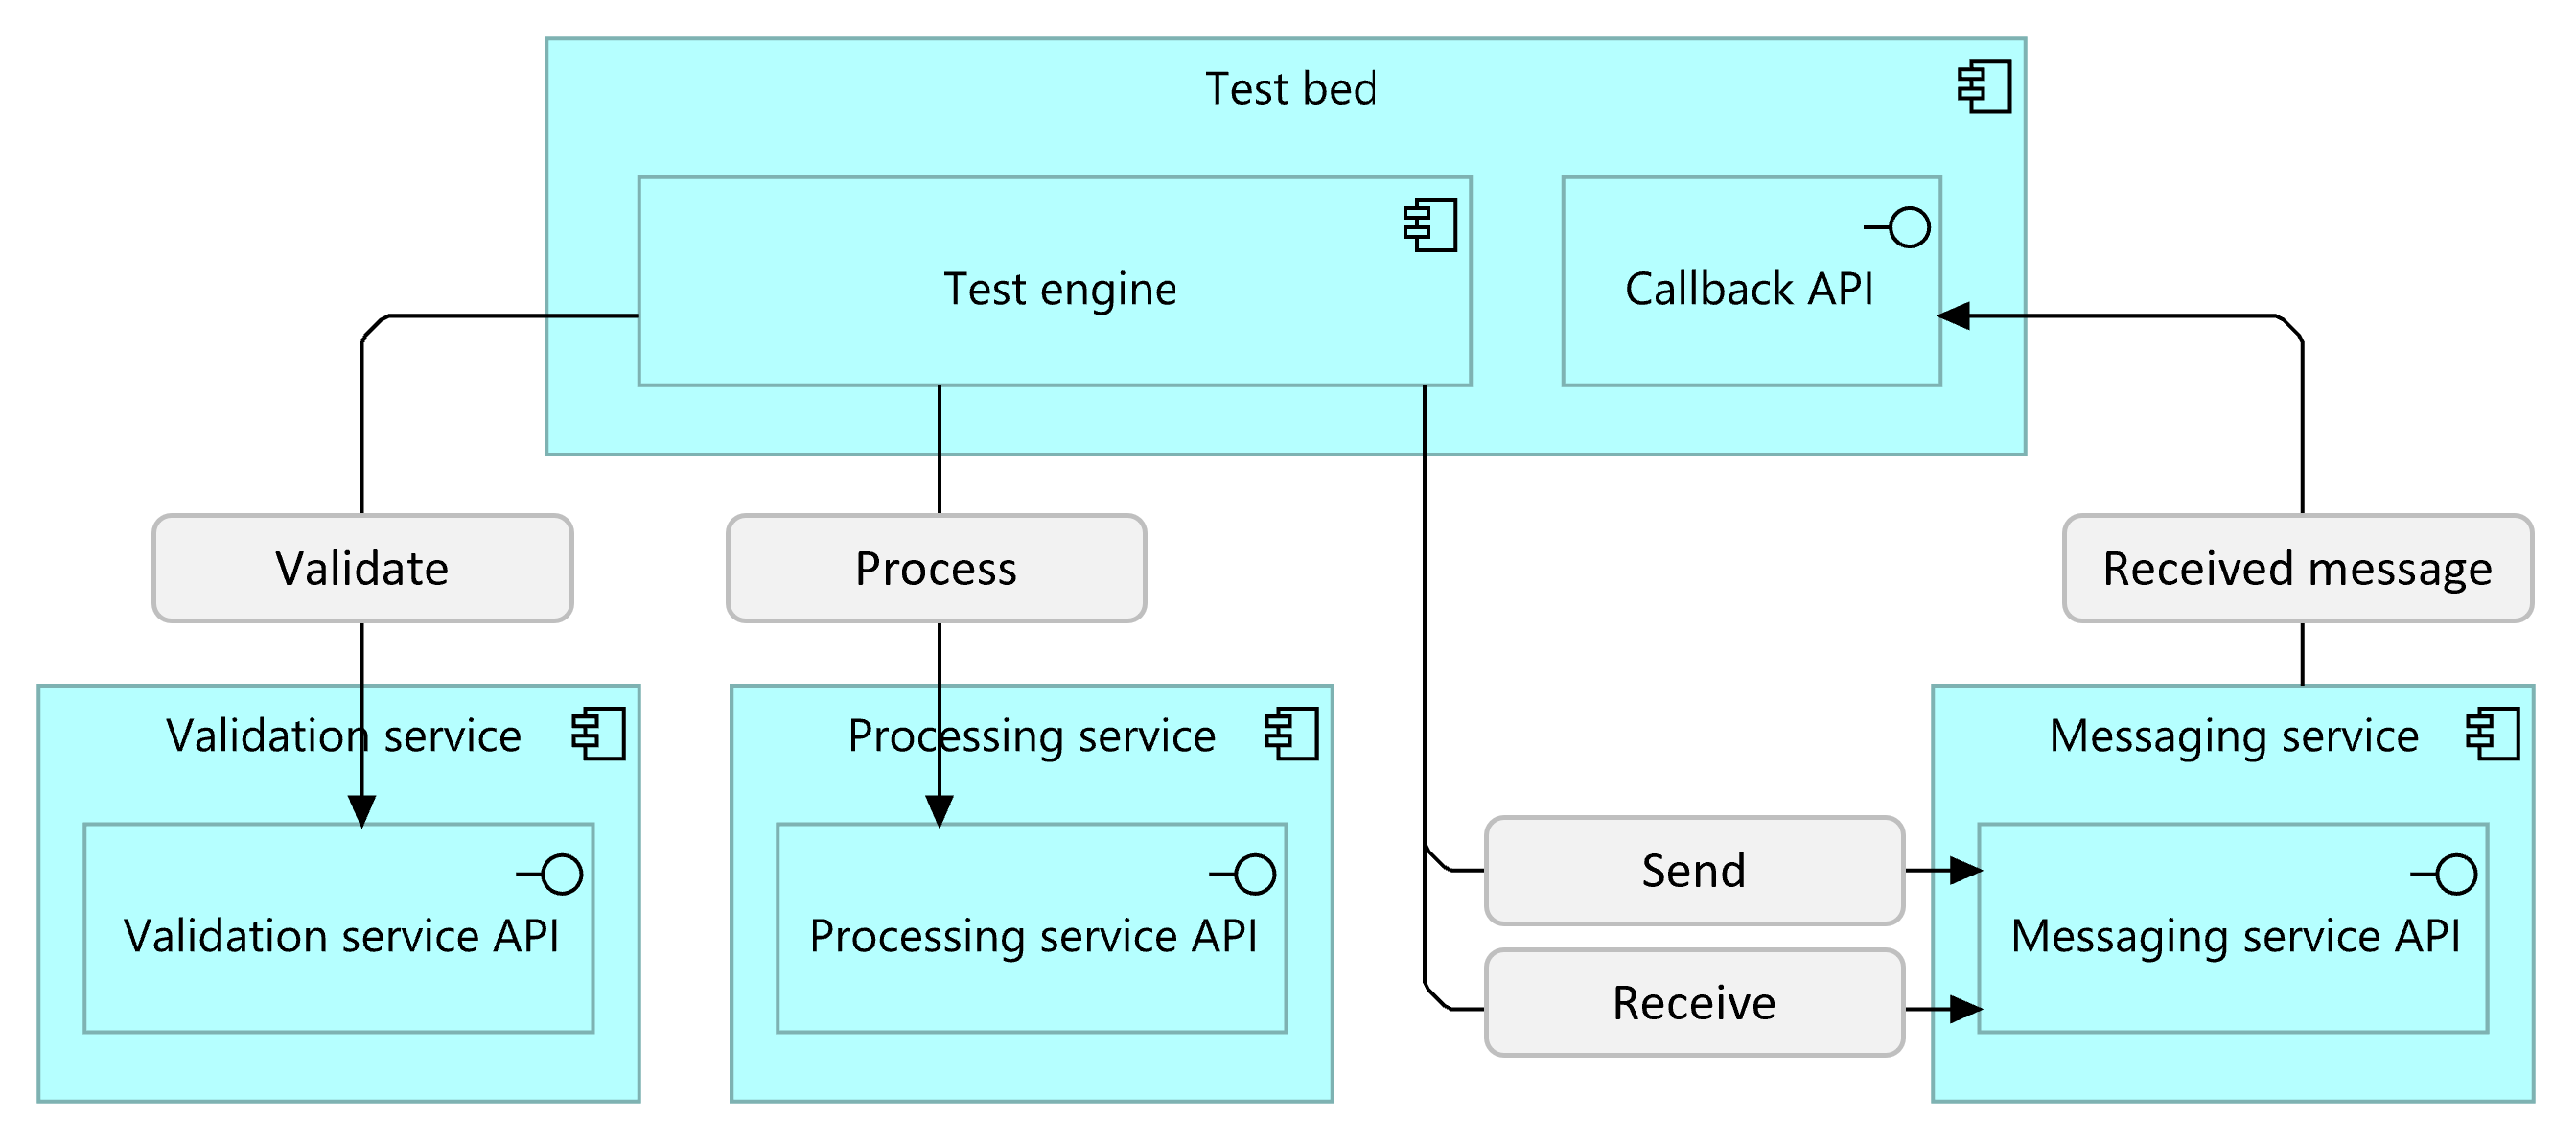
Each step’s operation takes place using the Test Bed’s built-in capabilities but, if needed can delegate to external components. This is where the Test Bed shines, in its ability to include custom and independent processing, messaging and validation extensions to address missing capabilities or domain-specific needs, by means of exchanges over a common web service API (the GITB service APIs). In using such extensions the Test Bed acts as an orchestrator of built-in and externally provided capabilities that make it flexible enough to accommodate most conformance testing needs.
Your role as test developer
As a test developer your role is to implement the conformance testing scenarios to realise your project’s needs. In doing so the bulk of your work will be split between:
Working in XML to create your test cases using the GITB Test Description Language (TDL).
Working in your programming language of choice to develop test services implementing the GITB service APIs, used by your test cases for project-specific actions not covered by the TDL’s built-in capabilities.
These aspects are covered in the guide’s topics listed below.
Topics
The topics that follow address the key concepts involved when developing your project’s tests.
The GITB Test Description Language
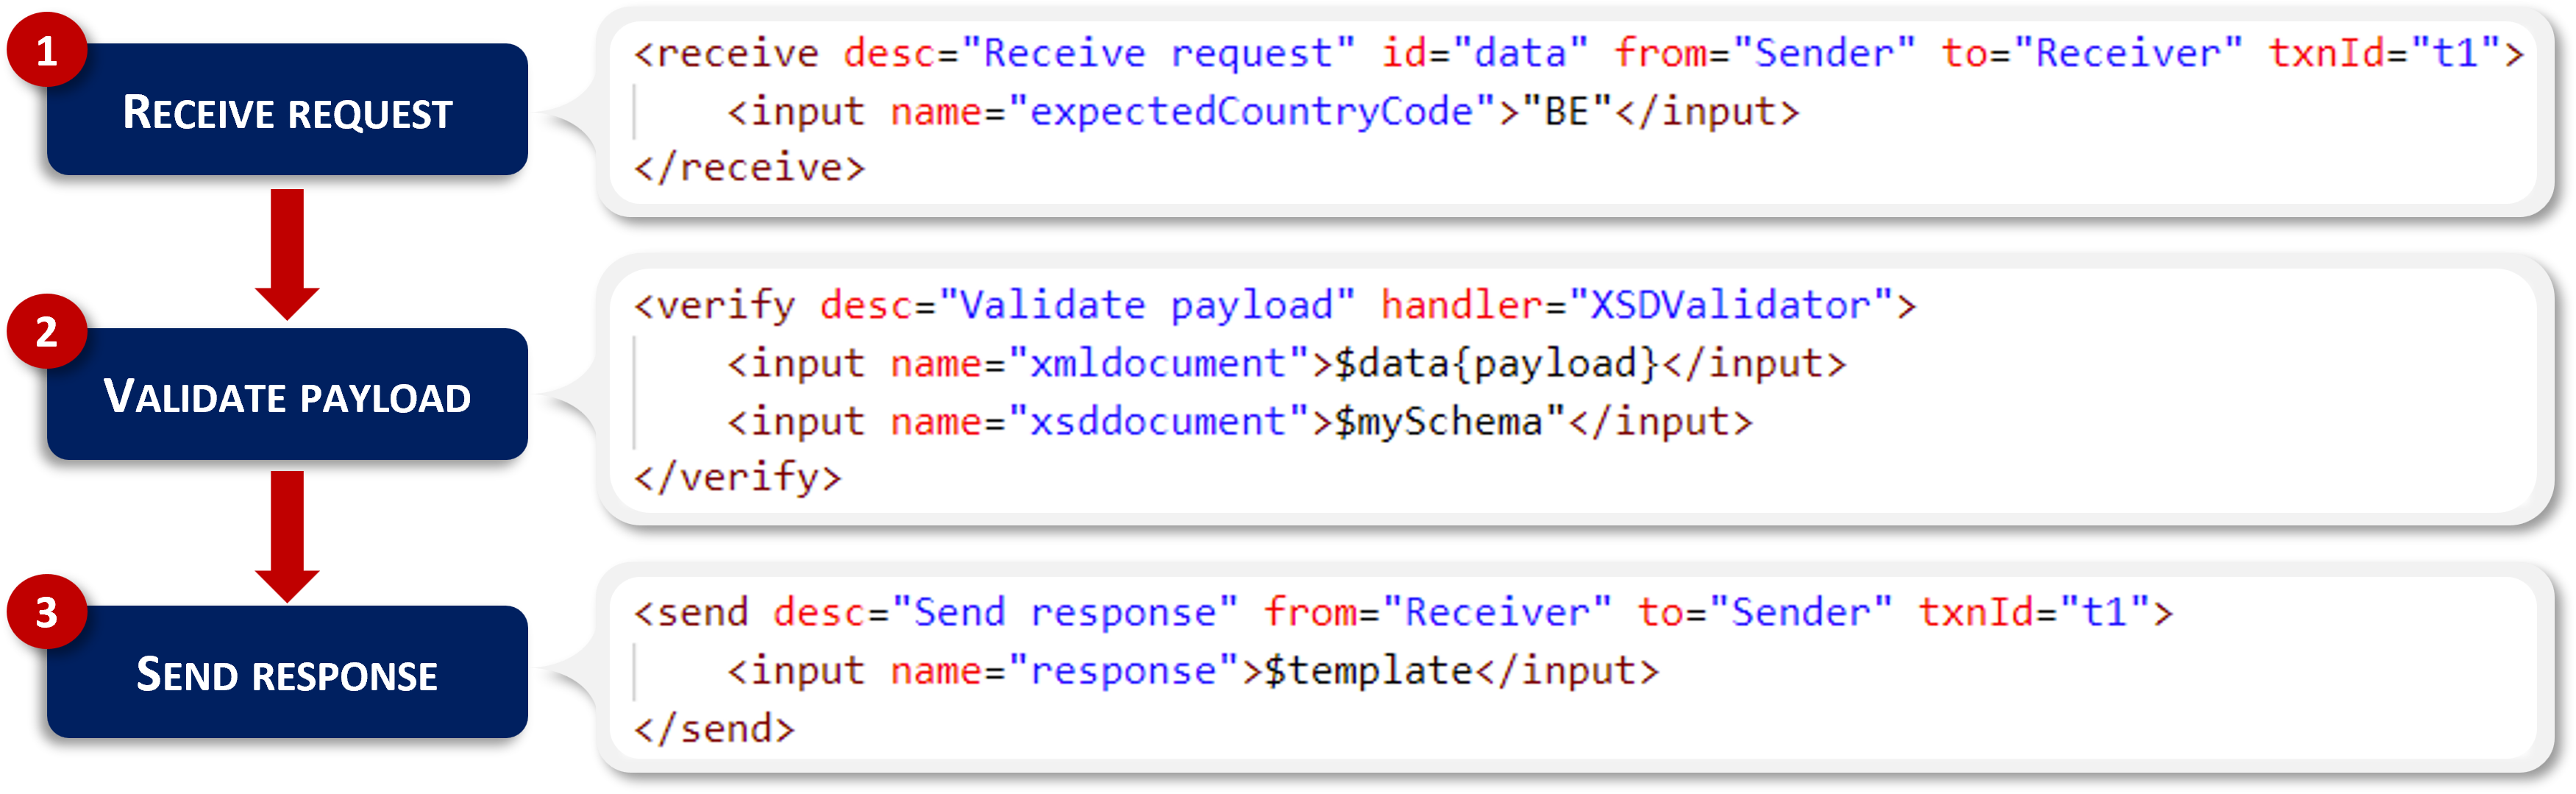
The GITB Test Description Language (TDL) is an XML-based language that is used to define test cases. The main part of a test case is its listing of test steps that are processed by the test engine when executing test sessions. Various types of steps are supported including the exchange of messages, validation, control flow, user interaction and basic processing. The test engine has built-in capabilities for common tasks (e.g. validation of XML content or generation of UUIDs) but also supports custom extensions in case some specific processing is necessary.
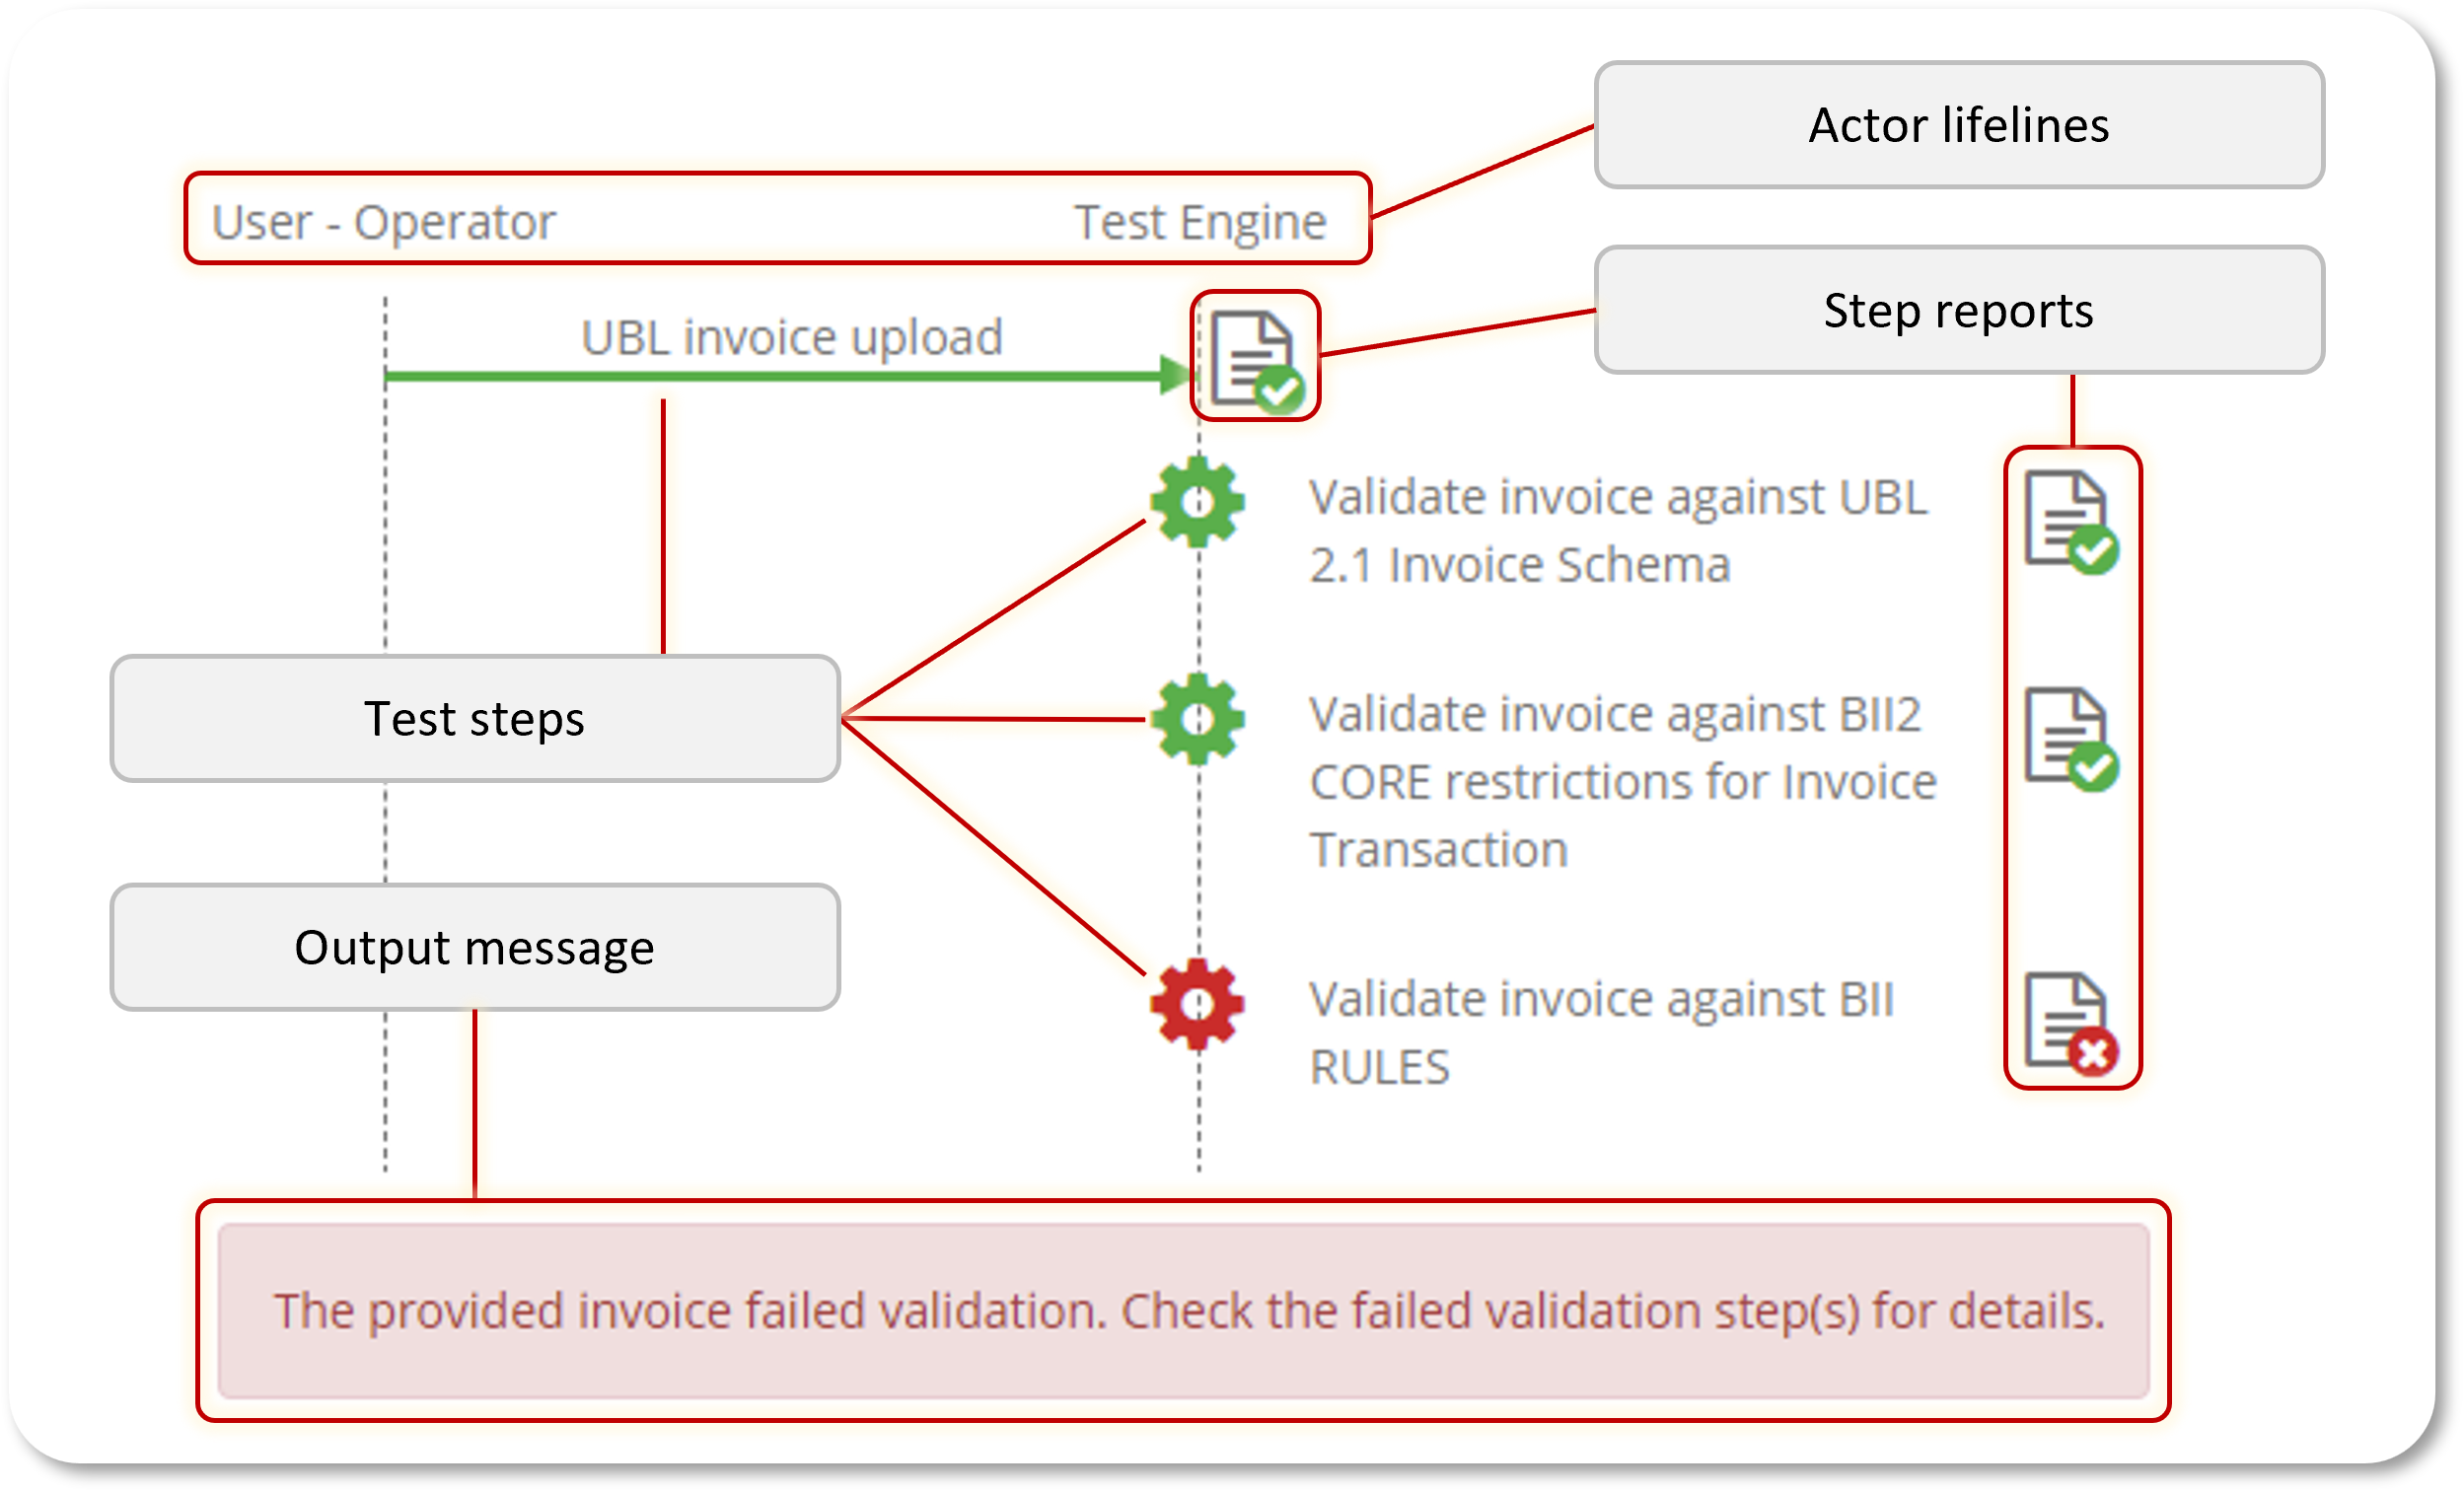
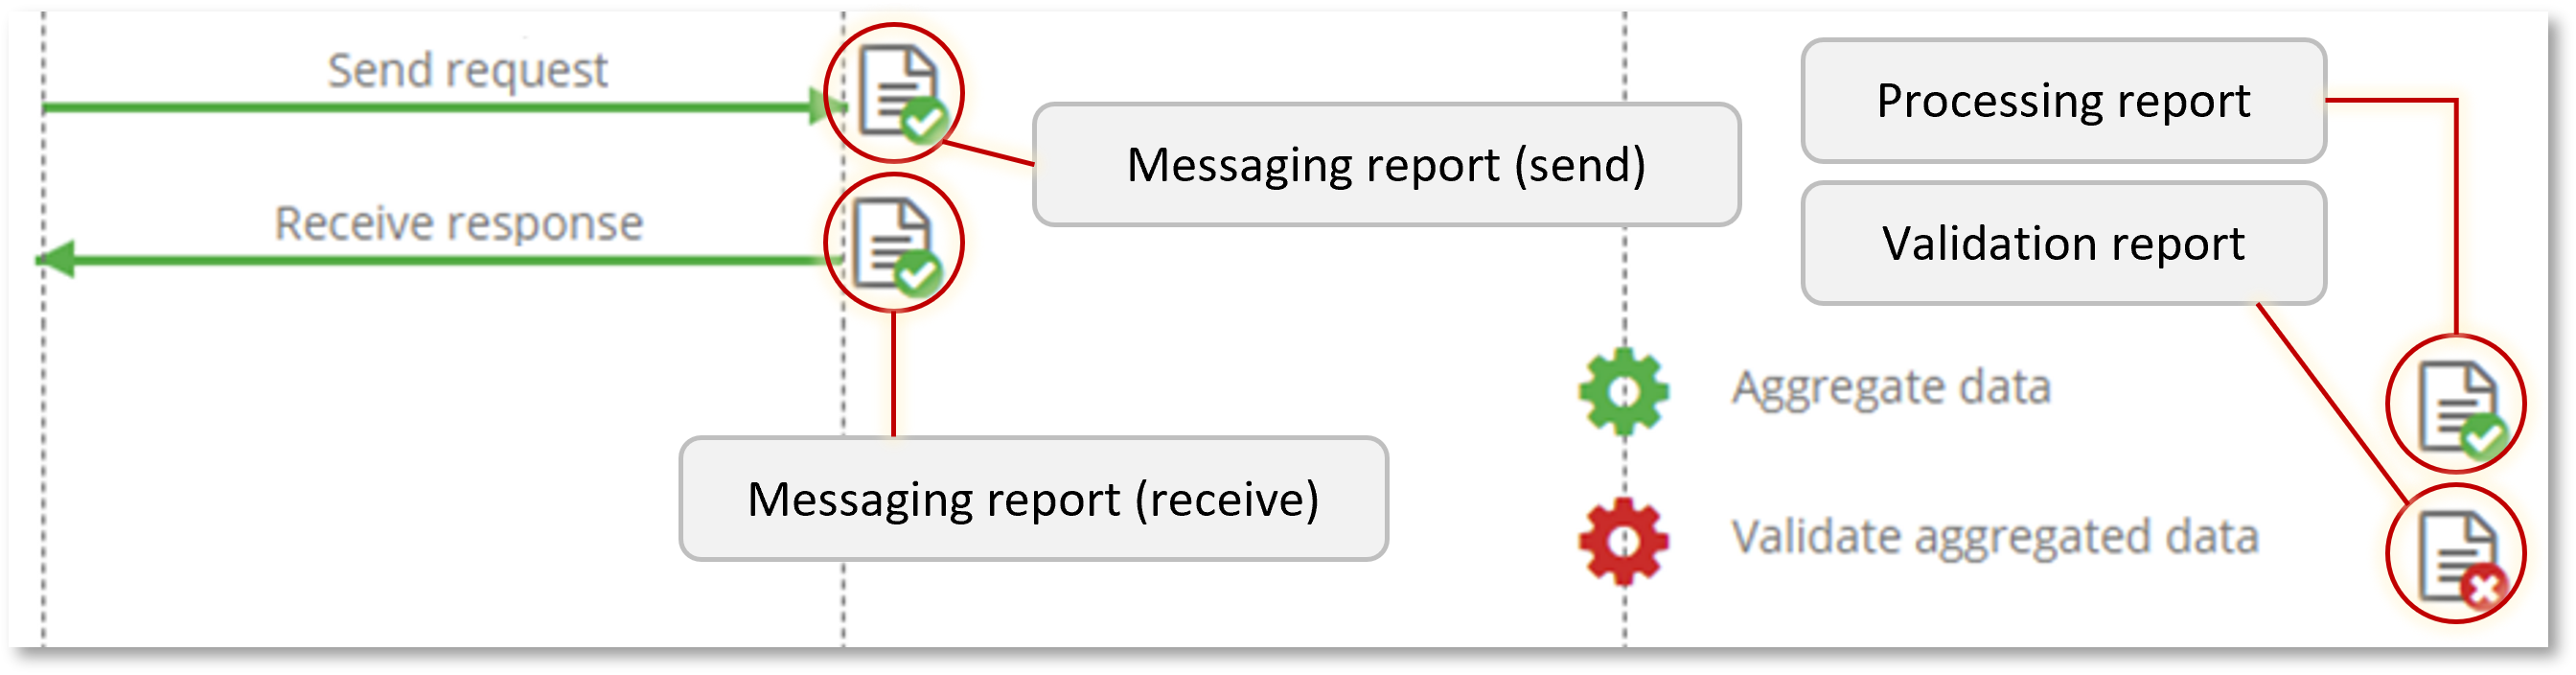
When using a test case on the Test Bed, its test engine will parse the test case’s XML content to determine its defined steps. Most of these are visible to users and, once the test session starts, will be used to visualise the test session’s progress. A test case is illustrated in a manner similar to a UML sequence diagram, displaying lifelines for the test case’s actors and messages for the different steps. While executing, the diagram is updated to highlight the steps’ progress as well as to include controls to view produced reports. Upon completion, an optional output message may also be displayed as a user-friendly summary.
Most test cases involve the sending and receiving of messages to and from the system being tested to ensure it reacts as specified. In these exchanges the Test Bed acts as a simulated counterpart by either generating and sending messages, or receiving messages sent by the tested system. These exchanges are typically complemented by verification steps to ensure that exchanged messages are valid and consistent in terms of the overall conversation. To allow such consistency checks, the test engine maintains for the duration of the test session a session context, a map of key-value pairs that represents the session’s accumulated state. You may for example generate a message with a specific identifier that you then expect to be referred to in the system’s response. Such consistency checks are important as they allow you to not only check messages syntactically but also in terms of content based on the scenario being tested and the session’s progress.
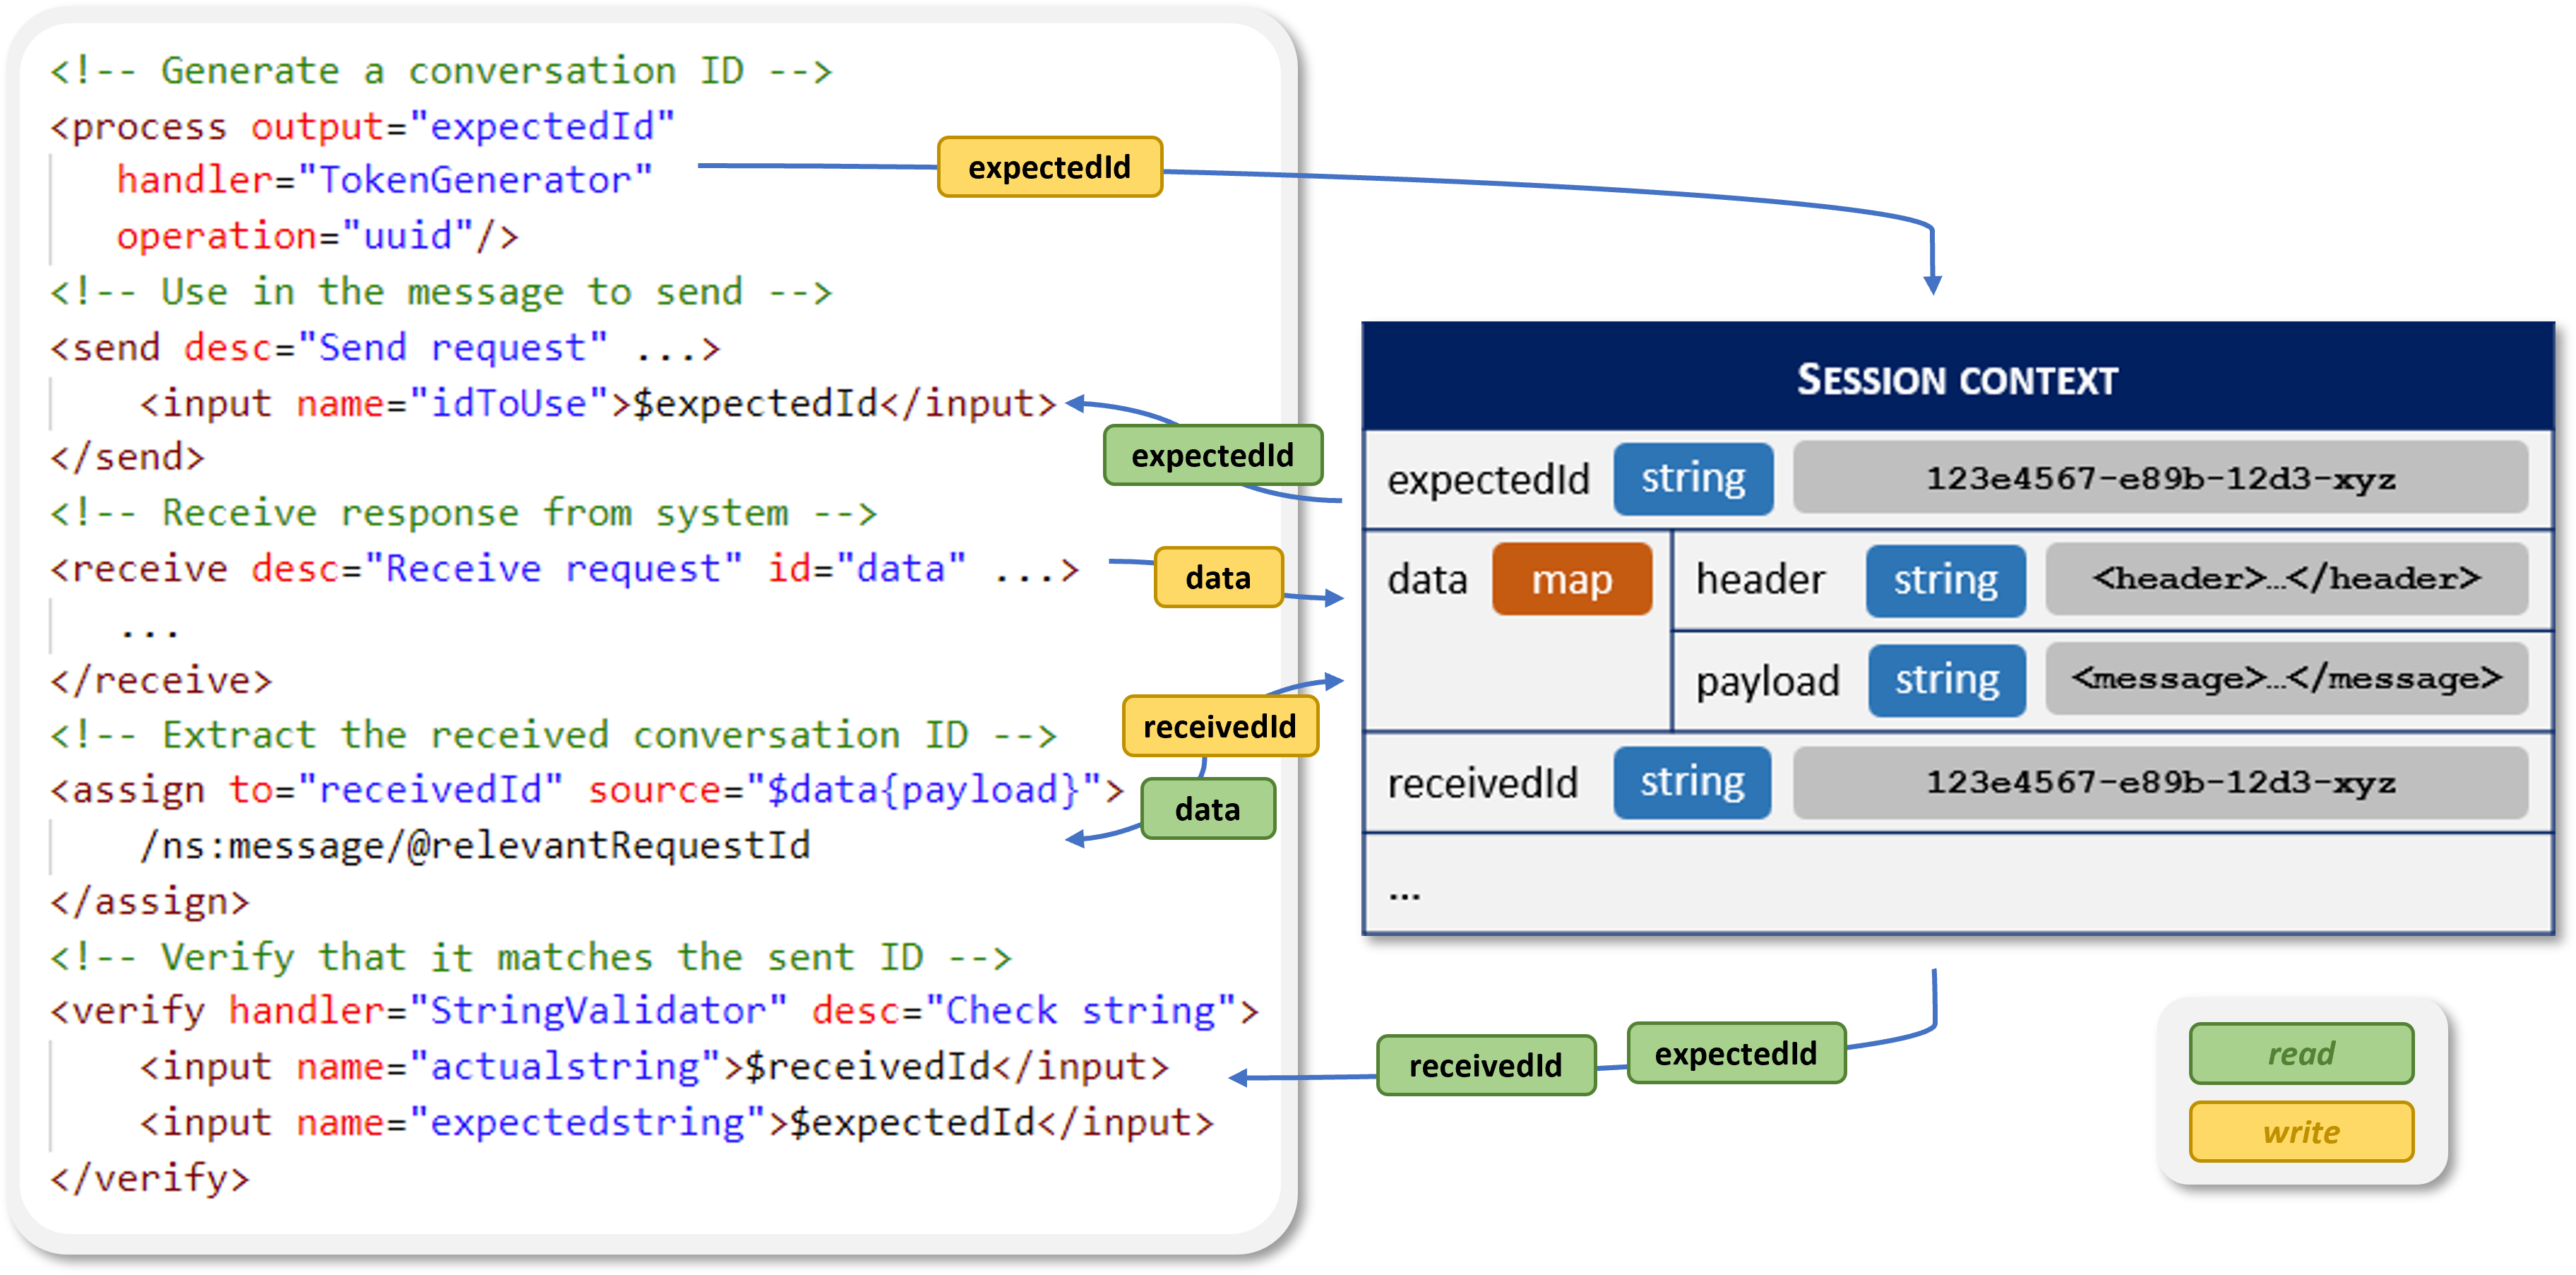
To make simple data manipulations the GITB TDL uses XPath as its expression language. Such expressions are supported in most TDL steps and although limited compared to a full programming language cover most testing needs you will come across. Within these expressions you may also refer to variables in the session’s context, that range from variables created via the processed steps, built-in variables for checking the steps’ progress, as well as configuration parameters. This last case, using configuration parameters, allows you to define configuration at various levels, that is provided by you, your users, or even by automated processes before launching tests. Four different configuration scopes are supported by the GITB TDL:

The purpose of these scopes is summarised as follows:
Level |
Description |
Provided by |
|---|---|---|
Relates to a complete domain and applies to any and all test cases. Such values are typically treated as high-level constant configuration values to ensure portable test cases. |
Administrators. |
|
Relates to an organisation as a whole and applies to all its systems and their conformance statements. |
Users and administrators. |
|
Relates to a system as a whole and applies to all test cases defined for it in its linked conformance statements. |
Users and administrators. |
|
Relates to a specific conformance statement, i.e. a specific system testing as an actor of a selected specification. This is most fine-grained level of configuration. |
Users and administrators. |
The ultimate goal of a test case is to ensure that all its steps succeeded, meaning that there were no technical errors reported and that all verification checks were successful. In that case the test case itself is marked as successfully passed. Once all test cases linked to a system’s conformance statement are passed the system is considered as having successfully completed its conformance testing for the given specification.
In terms of packaging, test cases are defined as XML documents that need to be packaged as a test suite to be uploaded to the Test Bed. A test suite is a simple ZIP archive that groups together related test cases into one bundle. Apart from the test case files, this archive contains the test suite definition file (also a XML document) as well as any resources (e.g. XSDs, templates, sample data) that are imported as needed by test cases.
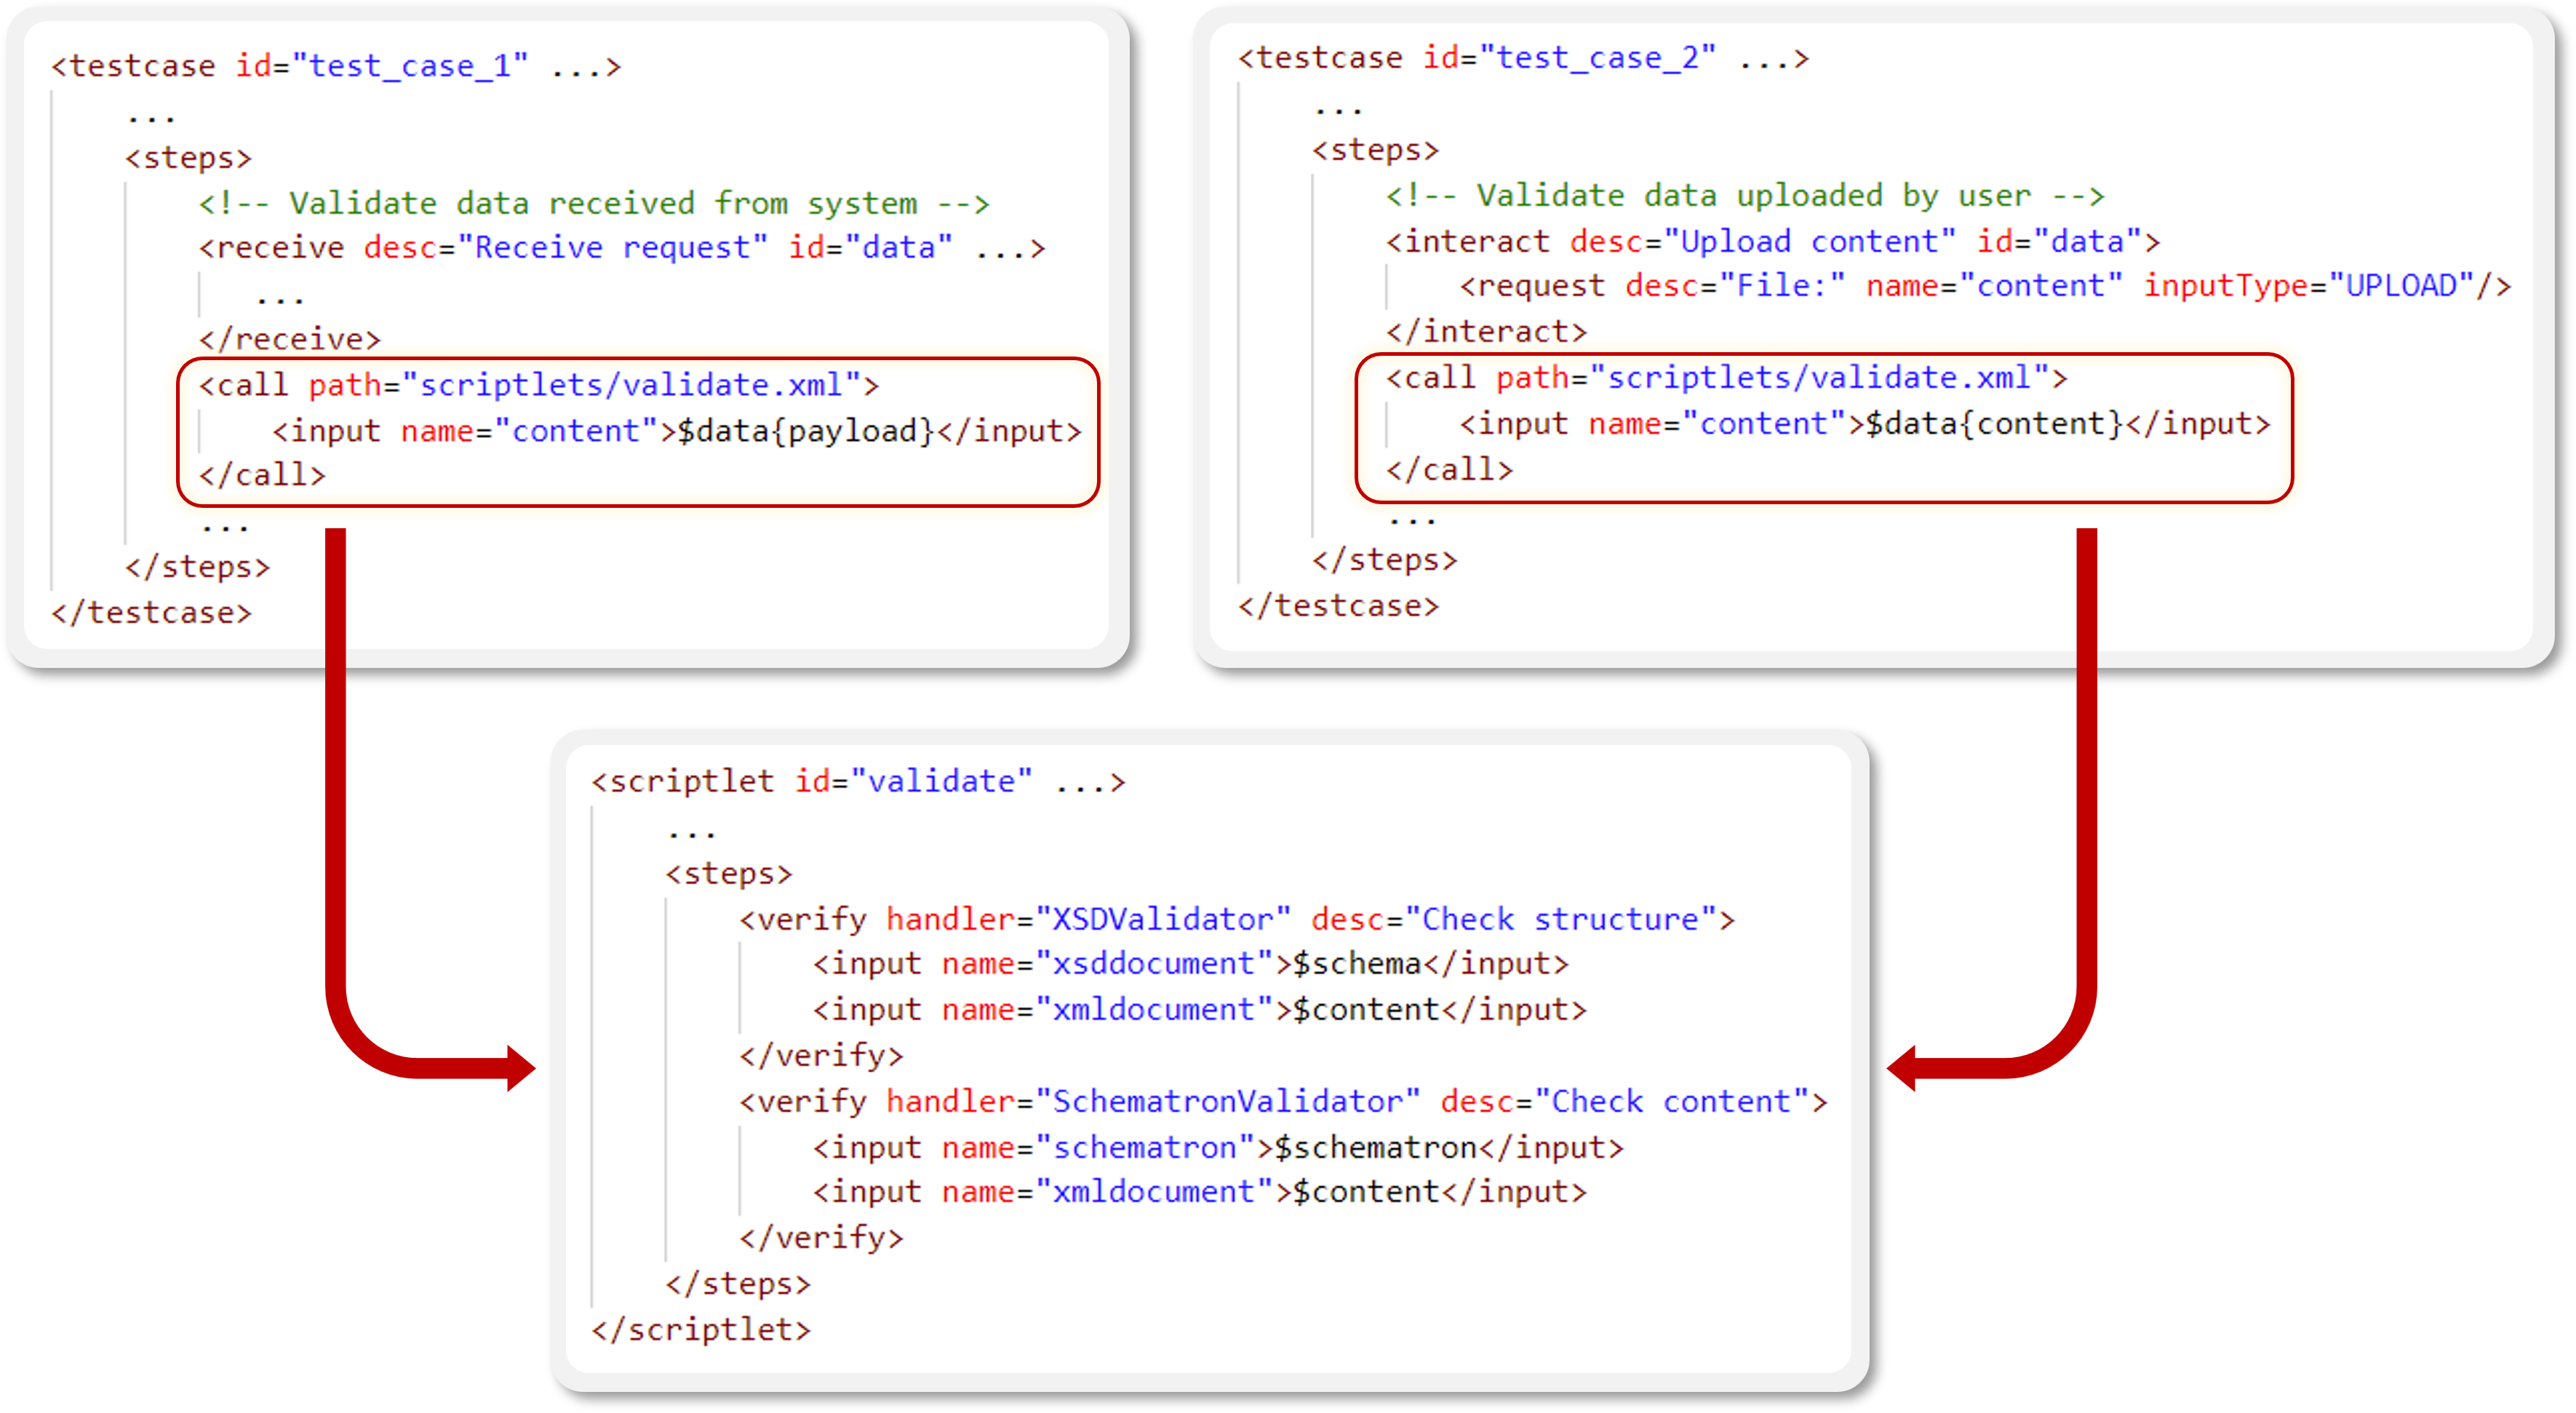
As your conformance testing design expands to include several test suites with multiple test cases, you may find you have testing logic that repeats. This could vary between certain messages that need to always be exchanged as a set, to a series of validations that apply to all messages. To simplify the reuse of such testing logic, the GITB TDL foresees the concept of scriptlets, reusable sets of steps with optional inputs and outputs similar to functions, that can be called to be included in test cases. Scriptlets are also defined as distinct XML files packaged in the test suite’s ZIP archive.
Note
Sharing resources across test suites: A test suite’s resources (scriptlets, documentation, or any other resource) can also be shared across test suites. If it simplifies their management, such shared resources can even be added in special test suite archives without test cases that only serve as shared resource holders to be referenced from other test suites’ test cases.
Putting together a test suite archive basically means creating a ZIP archive of all its resources:
The test suite XML file.
Test case XML file(s).
Scriptlet XML file(s).
Supporting files (e.g. documentation, validation artefacts, test data).
The naming and placement of these files in the ZIP archive is arbitrary. When a test suite archive is uploaded to the Test Bed it will scan all included XML documents to see if they are test suite, test case or scriptlet files and treat them as such. The only thing you need to take care of is to provide correct references as follows:
The test case identifiers listed in the test suite definition. These need to match the identifiers listed in the test cases’ root XML elements.
The path to look up resources for scriptlet calls, artifact imports and documentation, which should be relative to the root of the test suite archive.
Note
Looking up resources from other test suites: You may also refer to resources included in other test suites. In this case you specify the
relevant’s step’s from attribute to match the target test suite’s identifier, with the path provided being the resource’s relative path
within this other test suite.
The following example presents a sample test suite archive structure that nicely organises related files. Again, this specific structure is not required; follow any approach that makes sense to you but try to keep it consistent:
test_suite.zip
├── test_cases
│   ├── test_case_1.xml
│   └── test_case_2.xml
├── scriptlets
│   ├── scriptlet_1.xml
│   └── scriptlet_2.xml
├── resources
│   ├── file_1.json
│   └── file_2.txt
└── test_suite.xml
Once a test suite is packaged it can be uploaded to your Test Bed instance at which point it will be validated and made available for testing.
The GITB test services
The GITB Test Description Language provides you with the basic building blocks to define your testing logic. In doing so you may find at times that you are limited by the available steps and the test engine’s built-in capabilities, either because of missing technical features or because your project needs to do some domain-specific processing. This brings us to one of the key features of the Test Bed, the possibility to extend it to carry out pretty much any kind of task you require. This is made possible through custom GITB test services, service implementations running separately from the Test Bed that realise the SOAP APIs needed to be integrated in test cases.
There are three kinds of services you can use to extend the Test Bed, each used in a specific way:
Validation services accept a set of inputs to carry out a validation and return a validation report. This validation is triggered by means of the GITB TDL’s verify step.
Processing services accept a set of inputs and produce a set of outputs. Such processing is triggered through the GITB TDL’s process step.
Messaging services are used to implement the sending and receiving of messages for a given messaging protocol using a set of inputs and returning a set of outputs. This is achieved by means of the GITB TDL’s send and receive steps.
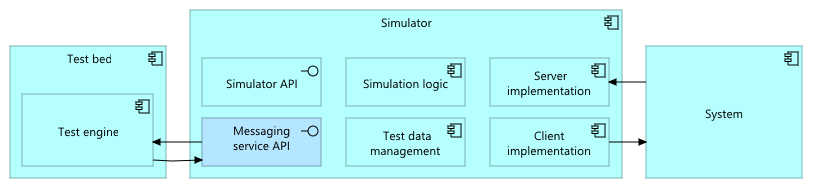
You may use any framework or technology stack to develop these services; the only requirement is that they implement the expected API(s) and, when deployed, are available to the Test Bed. You may choose to develop a simple web application to expose one or more services, or even add implementations for these APIs to existing components you may have. For example if you already have a simulator to trigger test messages you can simply extend it to implement the Test Bed’s messaging service API to allow it to be used in test cases.
Note
Starting from the service template: The Test Bed’s GITB test services documentation uses Java and the popular Spring Framework in its examples. It also provides a service template based on these technologies and packaged as a Maven Archetype to help you get started.
Verification, processing
and messaging steps define their implementation by means of their handler
attribute. The value of this attribute can either be a fixed string value from the list of build-in handlers
or, in case of a custom service implementation, a URL. In the latter case, this URL needs to resolve to the service’s WSDL file.
<!-- The built-in "StringValidator" is used to compare two text values. -->
<verify handler="StringValidator" desc="Validation (built-in)">
  <input name="actualstring">$aString</input>
  <input name="expectedstring">'expected_value'</input>
</verify>

<!-- A custom validation service is used. -->
<verify handler="https://path.to/service?wsdl" desc="Validation (custom)">
  <input name="inputToValidate">$aString</input>
</verify>
When using a custom service as a step’s handler, it is always best to provide its address via configuration. The best way to do so is to define in the Test Bed a domain parameter, the value of which is set to the service’s WSDL address. By referring to this parameter in your tests you avoid hardcoding addresses and can freely move your tests from one environment to another.
<!-- Look up the service address from the domain's configuration. -->
<verify handler="$DOMAIN{serviceAddress}" desc="Validation (custom)">
  <input name="inputToValidate">$aString</input>
</verify>
Note
Service endpoint address: The address to be used for web service calls is the one listed in the WSDL’s endpoint information. Make sure this is correctly set to cater for Docker networking or intermediate proxies.
Custom test services, and the steps that are used to trigger them, are flexible in that they can receive any number and type of inputs and produce any kind of output, as well as failures if something goes wrong. You can manage whether such steps are presented in the test execution diagram, for which a report icon will be displayed once completed that allows you to see the step’s outputs and report.
You have complete control in the implementation of a service to determine the returned outputs and whether they will be presented to users, stored in the session’s state or both. You are also not limited in how you implement the service as long as you respect its API. For example a processing service may not return outputs but rather send an email alert based on the inputs it receives from the test case.
The most common custom test service implemented by a project is a messaging service used to send and receive messages. Even if you feel that you are covered by the Test Bed’s built-in messaging implementations you will almost always be best served by an implementation specific to your project. This is because each project is bound to have its own specificities on communications, if only at the level of security configuration (authentication, SSL setup etc.). In addition, if you support asynchronous communications you will likely need some logic to match received messages with ongoing test sessions. In general, when implementing your messaging service keep in mind the following key points:
When a session starts, your service’s initiate operation is called. The main thing to do here is to create your own session identifier and return it to the Test Bed. This will allow you to keep track of which calls correspond to which test session.
The send operation (triggered by the send step) is simple as you would use the provided inputs to directly do an actual “send” action for your messaging protocol.
The receive operation (triggered by the receive step) is a bit more nuanced. When you get a receive call this means the the test session is waiting to receive a message from the tested system. The inputs here would typically inform the service of what kind of message is expected to satisfy this step. Considering that actual messages will be received separately, you need to update your tracked session state to be able to determine whether a given message should be reported to a test session. If this is the case you will signal this by calling the Test Bed’s callback notification API.
The finalize operation is called by the Test Bed to notify you that a session has completed, giving you the chance to make any necessary clean-up actions.
Note
Validators for XML, RDF, JSON and CSV: If you feel tempted to implement a custom validation service for XML, RDF, JSON or CSV content don’t. The Test Bed has built-in XML validation capabilities as well as generic XML, RDF, JSON and CSV validators that you can reuse for your project.
Combining test cases with test services
In the previous sections we have gone through the purpose of the GITB Test Description Language (TDL) to author your test cases, and the GITB test services to make your own extensions to the test bed’s capabilities. A typical decision to make now is how to balance development effort between these two.
Consider for example the creation of test messages to be sent by the Test Bed to the system being tested. The GITB TDL already provides templating capabilities through which you can define a template file with placeholders, import it and then reference it with the actual values to use to produce the resulting message. This can be fine for simple cases but could quickly get cumbersome if you’re not only replacing placeholders but need to e.g. dynamically add complete data blocks based on certain parameters. You can still do this in GITB TDL but it would probably be easier to simply pass these parameters to a separate service that will, in code, generate the test message. This could be a processing service for the specific purpose of generating test messages or even part of the messaging service that will also do the actual sending.
Another example is when you want to make a series of message exchanges that you would prefer to not show in the test execution diagram to hide technical details.
One approach, if possible, would be to set such steps as hidden, but you may alternatively choose to completely remove them from the test cases. To achieve this
you could have your messaging service carry out multiple exchanges as part of a single
send or receive
step. In the end, what actually happens when your custom service is triggered is completely up to you. You choose what outputs you want to return, and you decide
when to notify the Test Bed of incoming messages.
Ultimately, you will find that on many occasions you have the choice of either implementing certain logic in the test cases’ XML or in custom services. If your development team is more comfortable working with code rather than XML you could opt for more logic in code, versus more logic in XML if your team is less technical. In addition, if you find that you are spending too much time tweaking complex XML you could find it simpler to decouple such logic into your custom services. You decide how you want to balance such work according to your team’s skills and preferences.
Development setup
Getting started with developing your tests is simple. The Test Bed provides a developer installation guide with a Docker compose script to install an instance on your workstation. All the Test Bed’s Docker images are on the public Docker Hub, meaning that any Docker installation will have by default access to download them.
You would then start building test cases focusing typically on message exchange scenarios, using built-in capabilities and/or custom test services. Step-by-step guides are available for both simple messaging and more complex scenarios based on custom services. In the latter case you can also refer to further information in the GITB test services documentation, and use the provided Maven Archetype to help you get started.
When it comes to authoring your test cases, you can use the XML editor of your choice. In doing so it could be interesting to configure your editor with the GITB TDL XSDs to enable simple syntax validation and intellisense. Follow the GITB TDL reference documentation to see how to define your tests and eventually package your test suite as a ZIP archive, ready to be uploaded to the Test Bed. For any custom test services you can use your IDE of choice, first testing locally and then deploying them separately or as Docker containers in the Test Bed’s Dockerised service. Regarding test suite updates you can also follow these instructions to setup and streamline your workflow by using the Test Bed’s REST API rather than manually uploading updates.
While setting up your environment don’t neglect to include the supporting components you need (system reference implementations, communication software), as well as any utilities to simplify your development (e.g. a generic mock server to record and respond to service calls). Using basic utilities like mock servers and tools to make HTTP requests is a great way to test your work in a controlled manner before integrating with the actual messaging software and systems to be tested.
Once your test suite is uploaded, the Test Bed will validate it in depth to detect problems such as invalid references, bad expressions or illegal constructs that go beyond simple XSD validation. If you would like to validate your test suites before uploading them to the Test Bed you can also use the standalone GITB TDL test suite validator via its web UI or SOAP API.
Use our MCP server in your AI agent
If as part of your development setup you are using an AI agent such as Claude Code, Cursor or GitHub Copilot, you will be pleased to know that we provide official support through the Interoperability Test Bed MCP server. Our MCP server includes tools to guide your agent through our official documentation and examples, while detailing best practices and common workflows. Using our MCP server in your agent enables you to work on any Test Bed task via natural language prompts, letting your agent do the heavy lifting for you.
To configure your agent, simple add the itb-mcp server a stateless HTTP server available at https://www.itb.ec.europa.eu/mcp
(no need for API keys or authentication headers). For more details, configuration instructions per agent and
example prompts to get you started, check out our dedicated guide on AI-powered test development.
Moving to production
Once you have reached an initial milestone for your development you can deploy your setup to the production Test Bed. In doing so, the most complicated step is to make sure that any custom test services and supporting components are also deployed and made accessible. Setting these up is the responsibility of your project as you need to foresee the necessary server(s) to host them (be it on the public cloud or a private data center). The Test Bed team can of course help here to explore the most appropriate options for your project.
With your supporting services in place the rest is simple. The Test Bed team will create for you a community and make you its administrator. From this point you can add your configuration in two ways:
Prepare your complete configuration (community, domain, test suites) on your development environment, make a full export and then import it in your production community.
Create manually your community and domain configuration on the production Test Bed and then import only your test suite archives (as you did for your development).
Keep in mind that once you import or create your setup on the production Test Bed instance this is still not accessible to your users. You have the opportunity to test that everything works as expected and only open up testing (either by creating your community’s user accounts or enabling self-registration) when you are ready.
Note
Using your own Test Bed instance in production: As an alternative to the above, you may also choose to deploy the Test Bed on your own infrastructure and configure it for production use. To guide you through this you can follow the Test Bed’s production installation guide.
Staying up to date
The Test Bed continuously evolves with new releases based on user feedback and the Test Bed team’s own experience. If at any point you feel that a feature is missing, be it from the GITB TDL, test services, or the Test Bed software itself, don’t hesitate to share this with the Test Bed team:
Via email to DIGIT-ITB@ec.europa.eu.
Via GitHub by posting an issue on the Test Bed’s GitHub repository (requires logging into your GitHub account).
New releases always ensure backwards compatibility, both for test suites and test services, so you can always feel free to update to the latest one available. The update process simply involves pulling the Test Bed’s latest Docker images and restarting, as explained in the Test Bed’s update guide.
Once a new release is published the Test Bed team will notify your project’s management, focusing especially on any feature requests originating from your project that are now available. Nonetheless, it is always a good idea to subscribe for automated release notifications to ensure you never miss an update. You can do so:
Via the Interoperable Europe Portal, by subscribing to the Test Bed solution and selecting to be notified of releases.
Via GitHub, by activating release notifications from the Test Bed’s GitHub repository.
Using nightly builds
Alongside official releases, the Test Bed team also maintains a nightly build channel to make available to you new features as they are developed. Using this channel can be very helpful if you request a feature that you would like to use as early as possible during your test development, such as a new type of built-in validator. Even if you have a temporary workaround, you would likely want to avoid using it to develop your test cases as you would need to revisit them once the next release is out. Switching to the Test Bed’s nightly builds you can have this feature available in a few days, and already use it in your test cases knowing that the next release will include it. As an added benefit, this allows you to give immediate feedback to the Test Bed team to further fine-tune the new feature.
To switch to the nightly build channel, adapt your docker compose file to point to images’ nightly tags:
services:
   gitb-redis:
      image: isaitb/gitb-redis:nightly
      ...
   gitb-mysql:
      image: isaitb/gitb-mysql:nightly
      ...
   gitb-srv:
      image: isaitb/gitb-srv:nightly
      ...
   gitb-ui:
      image: isaitb/gitb-ui:nightly
      ...
With this change in place do as usual a docker compose pull, followed by a docker compose up -d to download and use the latest images. Once you have switched to
the nightly tags, you can switch back to fixed releases or the latest tag when these have been updated for the next release. In practice, you can always have your development
environment point to the nightly tags.
Once you launch the Test Bed using a nightly build, its version information displays as a snapshot of the next expected release and includes the software’s build timestamp
(in yyyy-MM-dd HH:mm:ss format):

This information is also included at startup in the Test Bed’s log for container gitb-ui:
...
19/06/2026 15:36:52 INFO  hooks.PostStartHook - Started ITB frontend (itb-ui) in development mode - release 1.29.5-snapshot (2026-06-19 11:25:43)
 _____ _______ ____                       _
|_   _|__   __|  _ \                     | |
  | |    | |  | |_) |  _ __ ___  __ _  __| |_   _
  | |    | |  |  _ <  | '__/ _ \/ _` |/ _` | | | |
 _| |_   | |  | |_) | | | |  __/ (_| | (_| | |_| |
|_____|  |_|  |____/  |_|  \___|\__,_|\__,_|\__, |
                                             __/ |
                                            |___/
Note
Docker tags: At any given time you will find on the Docker Hub the following types of tags:
Release tags (e.g.
1.17.0): These are the Test Bed’s fixed official releases.The latest tags (
latest): The tags corresponding always to the latest official release.The nightly tags (
nightly): The tags, updated daily, reflecting the Test Bed’s current development branches.
A final point regarding the nightly builds is on how to be aware of the changes they include. Typically the Test Bed team will inform you when a feature of interest is available, providing also limited documentation so that you can start using it before the official documentation gets updated (which happens at release time). Aside from this you may also refer to the latest changes via the commits published to the Test Bed’s development branch on GitHub.

If you are already using a nightly build for your development and want to see if there are available updates, you can check the commit
timestamps against your instance’s build timestamp. As mentioned previously you can find this on the UI as well as the gitb-ui container’s logs.
Once you’ve spotted a potential commit of interest you may always request additional information from the Test Bed team, who would be happy to provide further details and, if needed, examples.
Summary
Congratulations! You have just completed the Test Bed’s on-boarding guide for developers. In doing so you got an overview of how the Test Bed works and was introduced to its key technical concepts, the GITB TDL and its supporting test services. You also saw how to set up your development environment, move eventually to production, and stay informed of new Test Bed releases.
See also
The key documentation to consider following this guide is the Test Bed’s developer documentation:
The Test Bed’s installation guide for development use.
If you would like to experiment with developing test cases you may follow the step-by-step tutorials on:
Regarding your development and workflow setup, and in case you use AI agents, make sure you configure our agent to use our MCP server. Full instructions, examples and guidance are available in our AI-powered test development guide.
Finally, aside from conformance testing you may be interested in using the Test Bed’s reusable components to define standalone validators for different types of specifications. In that case you are invited to check:
The XML validation guide using XML Schema and Schematron.
The RDF validation guide using SHACL shapes.
The JSON validation guide using JSON Schema.
The CSV validation guide using Table Schema.