Guide: Creating a validator plugin
Track |
|---|
This guide walks you through the process of creating a custom plugin for a XML, RDF, JSON or CSV validator.
Custom plugins are a feature of the Test Bed’s validators, allowing them to be extended with arbitrary validation logic that may not be possible using the relevant syntax’s normal validation tools. Plugins receive standard inputs from their core validators and produce a validation report that includes their result and individual findings. This report is then merged with the main report before being returned to the validator’s user.
What you will achieve
At this end of this guide you will have created a simple validator plugin to extend your validator. The plugin itself will be generic enough to be used with any kind of validator. As part of this guide you will:
Create a new Java project using Apache Maven to develop, build and package your plugin.
Author the code to carry out the plugin’s logic, handling inputs received from the core validator and producing a result.
Include the plugin into a validator’s configuration to start using it.
What you will need
About 30 minutes.
The Java Development Kit (JDK), minimum version 11.
Apache Maven, minimum version 3.
Your preferred IDE or text editor.
A basic level of experience developing in Java.
Access to the internet.
An understanding of how to configure and use the Test Bed’s validators. If you are new to these you should check the XML, RDF, JSON or CSV validation guide, depending on the type of syntax you would be interested in validating. Custom plugins are an advanced validator feature so you should first have an understanding of the basics.
How to complete this guide
This guide will lead you step-by-step through the process of creating a validator plugin as a Java library. Although the plugin will be generic and usable by any validator, we will be considering the case of a JSON validator to make things specific.
The guide’s steps should be followed in sequence as they represent the logical steps to follow in your development. One exception here is the first step (Step 1: Understand how validator plugins work) which can be considered also as a general purpose introduction to plugins that can be independently referred to.
The sample plugin resulting from this guide is also available on GitHub from where you can
clone and directly build it. You may also download here the
packaged JAR archive that you can directly use in a validator’s configuration.
Steps
Carry out the following steps to complete this guide.
Step 1: Understand how validator plugins work
Note
This is an optional step to help you understand how validator plugins work. If you are not interested in the details you can skip this and proceed with the more practical steps that follow.
Custom plugins are an advanced feature of the Test Bed’s validators that allow you to extend a validator’s basic capabilities with additional verifications that are typically not possible through each syntax’s validation technology (e.g. JSON Schema for JSON validation). Plugins are meant as complementary extensions to the validator’s core verification that contribute one or more additional items to the validator’s overall validation report.
An overview of how plugins are used within validators is provided by the following diagram.

For a validator’s domain to include one or more custom plugins, the plugin packages (JAR files) need to be present in the domain’s resources, and its configuration needs to be adapted to reference them. Once a plugin is configured, the validator will call it through a standard interface, passing it several inputs and receiving a validation report as output. The interface used is the GITB validation service API, that defines a validate operation to carry out an arbitrary validation. This operation allows any number of inputs to be passed, which in the case of custom plugins depend on the validator’s type.
The following table lists the inputs passed to plugins per type of validator (all values are always passed as strings). Note how most inputs are the same regardless of validator type, with certain additional inputs in the case of the CSV validator.
Input |
XML |
RDF |
JSON |
CSV |
Description |
|---|---|---|---|---|---|
|
✓ |
✓ |
✓ |
✓ |
The absolute and full path to the input provided to the validator. |
|
✓ |
✓ |
✓ |
✓ |
The validation domain relevant to the specific validation call. |
|
✓ |
✓ |
✓ |
✓ |
The validation type of the domain that is selected for the specific validation call. |
|
✓ |
✓ |
✓ |
✓ |
The absolute and full path to a temporary folder for plugins. This will be automatically deleted after all plugins complete validation. |
|
✓ |
✓ |
✓ |
✓ |
The locale (language code) to use for reporting of results (e.g. “fr”, “fr_FR”). |
|
✓ |
true or false depending on whether the input should be considered as having a header row. |
|||
|
✓ |
The character to use as the field delimiter. |
|||
|
✓ |
The character to use for the quote character. |
Note
The inputs provided by validators to their plugins are also listed in each validator’s README in their respective GitHub repository (see here for the XML, RDF, JSON and CSV validators).
Concerning the plugin’s output, this is returned as a TAR validation report, the standard report that all validation services are expected to return. Although plugins are not meant to be used in a standalone manner as fully-fledged validators, using the TAR format allows us to reuse a standard structure that conveys all the information we would need.
A plugin’s JAR includes one class to act as the plugin’s entry point. This class implements the com.gitb.vs.ValidationService
interface that is foreseen by the validation service API and handles the provided inputs to return the resulting report. It is the
fully qualified name of this class that is configured alongside the relevant JAR location in the validator’s domain configuration
file, to have the plugin included in the validation process.
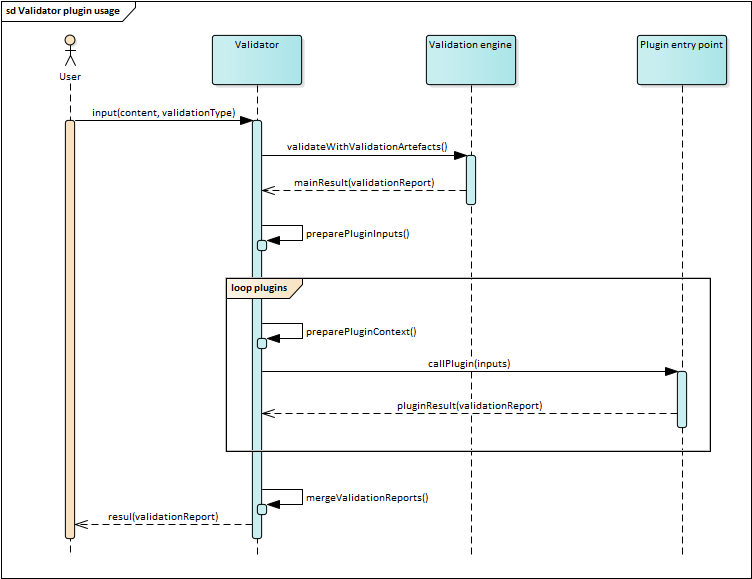
Each plugin is considered as an independent black box when it comes to its execution. Before calling a plugin, the validator ensures that the plugin is fully self-contained by loading its resources in a separate plugin-specific classloader. This means that no classes or dependencies of the validator itself will affect the plugin, and vice-versa, that no resources from the plugin will be inadvertently considered by the core validator. To achieve this, a validator plugin must be packaged as an all-in-one JAR, i.e. a JAR that includes within itself all resources from third-party dependencies. The plugin’s classloader will only contain the resources included in its own JAR file.
Note
Practical details on how to develop the plugin are provided in Step 3: Create your plugin’s project and Step 4: Develop the plugin’s logic. Including the plugin in a validator’s configuration is discussed in Step 5: Package the plugin.
Step 2: Define what the plugin should do
The first obvious step is to determine what our plugin will do to extend our validator. To make things specific we will consider a JSON validator, and specifically the fictional EU Purchase Order specification that we saw in the JSON validation guide. The core validation against this specification is based on JSON Schemas, the standard technology used to validate JSON.
As an extension of this specification we will now consider a new requirement on the size of the validated content. Specifically, we want to check the size (in bytes) of the input and return a result as follows:
Return an error if it is more than 10KB.
Return a warning if it is more than 1KB and less than 10KB.
Return an information message if it less than 1KB.
Checking the size of the received content in this way is something JSON Schema cannot do. As such, this is a perfect use case for a validator plugin, considering that plugins are not meant to replace what can be achieved by JSON Schema (and generally speaking the validation technology of the given syntax), but rather add further checks that would otherwise need a fully custom validator.
The overall goal is to have the configured JSON Schema validations take place as normal, but add to them the plugin’s check which will contribute one item to the resulting overall report.
Step 3: Create your plugin’s project
We will be creating the plugin as a Java 11 project built with Maven. The project name, artifactId and groupId can be anything you please but for this tutorial we consider the following values:
Name:
sample-pluginGroup ID:
eu.europa.ec.itb.jsonArtifact ID:
sample-plugin
IDEs typically have simple wizards that guide you through a project’s creation process but in the end the resulting folder structure, matching the standard Maven project structure, will be as follows:
sample-plugin
├── src
│   ├── main
│   │   ├── java
│   │   └── resources
│   └── test
│       ├── java
│       └── resources
└── pom.xml
The only file that will contain some content at this point is your pom.xml file with the information you provided.
<?xml version="1.0" encoding="UTF-8"?>
<project xmlns="http://maven.apache.org/POM/4.0.0"
         xmlns:xsi="http://www.w3.org/2001/XMLSchema-instance"
         xsi:schemaLocation="http://maven.apache.org/POM/4.0.0 http://maven.apache.org/xsd/maven-4.0.0.xsd">
    <modelVersion>4.0.0</modelVersion>
    <groupId>eu.europa.ec.itb.json</groupId>
    <artifactId>sample-plugin</artifactId>
    <version>1.0-SNAPSHOT</version>
</project>
From this point you will proceed to update your pom.xml by adding:
The required plugin definitions.
Your project’s dependencies.
With respect to plugin definitions add to your pom.xml the following information:
<project>
    ...
    <properties>
        <!-- Plugin dependencies -->
        <version.compilerPlugin>3.10.1</version.compilerPlugin>
        <version.assemblyPlugin>3.4.2</version.assemblyPlugin>
    </properties>
    <build>
        <plugins>
            <plugin>
                <artifactId>maven-assembly-plugin</artifactId>
                <version>${version.assemblyPlugin}</version>
                <configuration>
                    <descriptorRefs>
                        <descriptorRef>jar-with-dependencies</descriptorRef>
                    </descriptorRefs>
                </configuration>
                <executions>
                    <execution>
                        <id>make-assembly</id>
                        <phase>package</phase>
                        <goals>
                            <goal>single</goal>
                        </goals>
                    </execution>
                </executions>
            </plugin>
            <plugin>
                <artifactId>maven-compiler-plugin</artifactId>
                <version>${version.compilerPlugin}</version>
                <configuration>
                    <source>11</source>
                    <target>11</target>
                </configuration>
            </plugin>
        </plugins>
        <finalName>validator-plugin-sample</finalName>
    </build>
</project>
From the configured plugins the important one to highlight is the maven-assembly-plugin. We configure this to produce a
single JAR for the plugin that includes all its third-party dependencies. As explained previously,
producing an all-in-one JAR like this is needed given that plugins execute in their own isolated context that includes only
the resources present in their own JAR file.
The additional maven-compiler-plugin is declared to set the Java language version.
Apart from declaring the project’s plugins we will also include here the dependencies we need. In the case of our plugin
this is only the GITB types library that includes the definitions of the GITB core APIs and classes.
To add this dependency adapt your pom.xml to include the following:
<project>
    ...
    <properties>
        ...
        <!-- Library dependencies -->
        <version.gitbTypes>1.17.0</version.gitbTypes>
    </properties>
    <build>
        ...
    </build>
    <dependencies>
        <dependency>
            <groupId>eu.europa.ec.itb</groupId>
            <artifactId>gitb-types</artifactId>
            <version>${version.gitbTypes}</version>
        </dependency>
    </dependencies>
</project>
The full content of the project’s pom.xml file is listed below:
<?xml version="1.0" encoding="UTF-8"?>
<project xmlns="http://maven.apache.org/POM/4.0.0"
         xmlns:xsi="http://www.w3.org/2001/XMLSchema-instance"
         xsi:schemaLocation="http://maven.apache.org/POM/4.0.0 http://maven.apache.org/xsd/maven-4.0.0.xsd">
    <modelVersion>4.0.0</modelVersion>
    <groupId>eu.europa.ec.itb.json</groupId>
    <artifactId>sample-plugin</artifactId>
    <version>1.0-SNAPSHOT</version>
    <properties>
        <maven.compiler.source>11</maven.compiler.source>
        <maven.compiler.target>11</maven.compiler.target>
        <project.build.sourceEncoding>UTF-8</project.build.sourceEncoding>
        <!-- Plugin dependencies -->
        <version.compilerPlugin>3.10.1</version.compilerPlugin>
        <version.assemblyPlugin>3.4.2</version.assemblyPlugin>
        <!-- Library dependencies -->
        <version.gitbTypes>1.17.0</version.gitbTypes>
    </properties>
    <build>
        <plugins>
            <plugin>
                <artifactId>maven-assembly-plugin</artifactId>
                <version>${version.assemblyPlugin}</version>
                <configuration>
                    <descriptorRefs>
                        <descriptorRef>jar-with-dependencies</descriptorRef>
                    </descriptorRefs>
                </configuration>
                <executions>
                    <execution>
                        <id>make-assembly</id>
                        <phase>package</phase>
                        <goals>
                            <goal>single</goal>
                        </goals>
                    </execution>
                </executions>
            </plugin>
            <plugin>
                <artifactId>maven-compiler-plugin</artifactId>
                <version>${version.compilerPlugin}</version>
                <configuration>
                    <source>11</source>
                    <target>11</target>
                </configuration>
            </plugin>
        </plugins>
        <finalName>validator-plugin-sample</finalName>
    </build>
    <dependencies>
        <dependency>
            <groupId>eu.europa.ec.itb</groupId>
            <artifactId>gitb-types</artifactId>
            <version>${version.gitbTypes}</version>
        </dependency>
    </dependencies>
</project>
Step 4: Develop the plugin’s logic
Having created our project structure we will now proceed to
implement our plugin’s logic. The key implementation step will be to create the class that will act as the plugin’s entry
point. As discussed previously, this will be a class that implements interface com.gitb.vs.ValidationService from the
GITB validation service API.
Under folder src/main/java define a new class PluginInterface in package eu.europa.ec.itb.plugin. In this class we will
implement the methods foreseen by the ValidationService interface:
package eu.europa.ec.itb.plugin;

public class PluginInterface implements ValidationService {

@Override
public GetModuleDefinitionResponse getModuleDefinition(Void aVoid) {
    GetModuleDefinitionResponse response = new GetModuleDefinitionResponse();
    response.setModule(new ValidationModule());
    response.getModule().setId("SamplePlugin");
    return response;
}

@Override
public ValidationResponse validate(ValidateRequest request) {
    // TODO implement this method.
}
The getModuleDefinition method serves to identify the specific plugin in question. It does not affect the plugin’s
operation and may simply return null. It is advised nonetheless to provide a simple implementation as illustrated
above, as this will allow the validator’s identifier (“SamplePlugin” in this case) to be listed in log messages if a failure
occurs.
The more important step is the implementation of the validate method which is where the plugin’s validation will take place.
The first step will be to read the input and determine its size, for which purpose we will use the input named
contentToValidate. As explained previously, this
parameter contains the full path for a file corresponding to the input to validate (regardless of the validator API that was used,
or the approach to pass the input). Given this, we can read the file and calculate its size.
protected static final String INPUT_CONTENT_TO_VALIDATE = "contentToValidate";

@Override
public ValidationResponse validate(ValidateRequest request) {
    var inputFilePath = request.getInput().stream()
        .filter((input) -> INPUT_CONTENT_TO_VALIDATE.equals(input.getName()))
        .findFirst()
        .orElseThrow(() -> new IllegalArgumentException(String.format("The [%s] input is required", INPUT_CONTENT_TO_VALIDATE)))
        .getValue();
    var inputFile = Path.of(inputFilePath);
    var fileSize = readFileSize(inputFile);
    // TODO validate the file size.
}

private long readFileSize(Path file) {
    try {
        return Files.size(file);
    } catch (IOException e) {
        throw new IllegalStateException("Error reading file size", e);
    }
}
We can now continue the implementation by checking the file’s size and returning an error, warning or information message
as defined in our plugin’s requirements. We will be constructing
a TAR validation report within which we will add a report item (an instance of class BAR) accordingly. In the end we
will also set the overall result type before returning the report.
private static final long ONE_KB = 1024;
private static final long TEN_KB = ONE_KB * 10;
private final com.gitb.tr.ObjectFactory objectFactory = new ObjectFactory();
@Override
public ValidationResponse validate(ValidateRequest request) {
...
var report = createReport();
int errorCount = 0, warningCount = 0, infoCount = 0;
if (fileSize > TEN_KB) {
var error = new BAR();
error.setDescription("The provided content exceeded 10KB in size");
error.setLocation(String.format("%s:%s:0", INPUT_CONTENT_TO_VALIDATE, 0));
report.getReports().getInfoOrWarningOrError().add(objectFactory.createTestAssertionGroupReportsTypeError(error));
errorCount += 1;
} else if (fileSize > ONE_KB) {
var warning = new BAR();
warning.setDescription("The provided content exceeded 1KB in size");
warning.setLocation(String.format("%s:%s:0", INPUT_CONTENT_TO_VALIDATE, 0));
report.getReports().getInfoOrWarningOrError().add(objectFactory.createTestAssertionGroupReportsTypeWarning(warning));
warningCount += 1;
} else {
var info = new BAR();
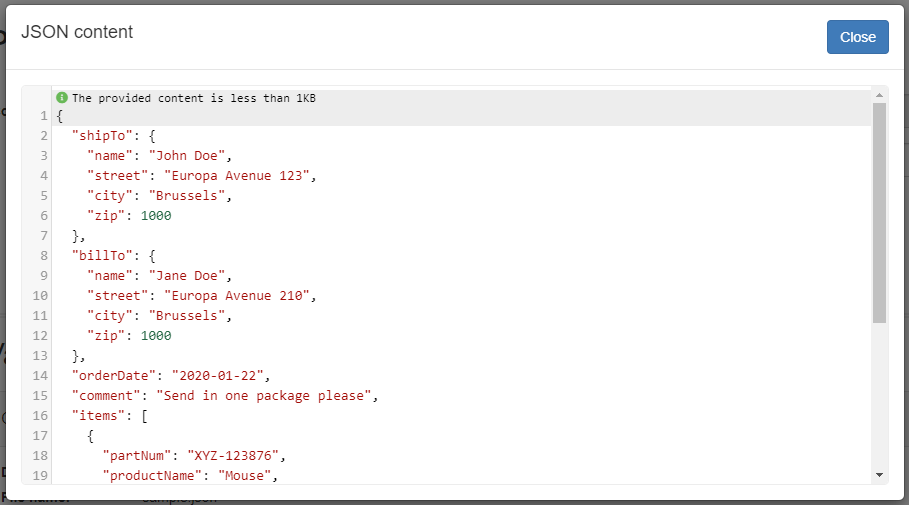
info.setDescription("The provided content is less than 1KB");
info.setLocation(String.format("%s:%s:0", INPUT_CONTENT_TO_VALIDATE, 0));
report.getReports().getInfoOrWarningOrError().add(objectFactory.createTestAssertionGroupReportsTypeInfo(info));
infoCount += 1;
}
report.getCounters().setNrOfErrors(BigInteger.valueOf(errorCount));
report.getCounters().setNrOfWarnings(BigInteger.valueOf(warningCount));
report.getCounters().setNrOfAssertions(BigInteger.valueOf(infoCount));
if (errorCount > 0) {
report.setResult(TestResultType.FAILURE);
} else if (warningCount > 0) {
report.setResult(TestResultType.WARNING);
}
var response = new ValidationResponse();
response.setReport(report);
return response;
}
private TAR createReport() {
TAR report = new TAR();
report.setResult(TestResultType.SUCCESS);
report.setCounters(new ValidationCounters());
report.setReports(new TestAssertionGroupReportsType());
report.setContext(new AnyContent());
try {
report.setDate(DatatypeFactory.newInstance().newXMLGregorianCalendar(new GregorianCalendar()));
} catch (DatatypeConfigurationException e) {
throw new IllegalStateException("Unable to construct data type factory for date", e);
}
return report;
}
Returned report items are always instances of type BAR and their meaning, whether they are errors, warnings or information
messages, is determined by the method used to create their JAXB wrapper (e.g. createTestAssertionGroupReportsTypeError for errors).
For the single report item we are creating we are setting a simple description that will be displayed in the report as well as the relevant
location.
The location string allows the validator to open up a detail popup when the specific item is selected, highlighting the line in
question. To do this we need to specify the relevant content (always contentToValidate for plugins), the line number,
and the column number separated by colons (:). In our case we always return contentToValidate:0:0 to associate the item
with the content’s line zero, or otherwise the file as a whole. If the check we were making referred to a specific line we could
choose to reflect this in the location string (e.g. contentToValidate:10:0 for line 10). The column indicator is practically
not used by the validator so you can always set this to zero. Finally, keep in mind that plugins can return any number of report items;
simply add additional BAR instances to the report and adapt the counters to match.
Regarding the returned report items, we set their description to be descriptive texts. In case youe validator is configured to support multiple languages you can have the same localisation support in your plugin. To do this you would need to:
Retrieve the locale to use as selected by the validator’s user. This is passed by the validator as the
localeinput.Define your message translations as a resource bundle in the plugin.
Use the provided locale string to create a Locale object and load the appropriate message from your resource bundle.
Note
Unit testing plugins: Given that plugins are otherwise not executable it is a good idea to thoroughly unit test them. The plugin’s complete implementation in GitHub includes JUnit 5 and unit tests to cover all operations and input scenarios.
Step 5: Package the plugin
With our implementation complete we will now proceed to package our validator. To do this we will use Maven and issue:
$ mvn clean package
Once completed, the resulting JAR file will be produced in the project’s target folder. Within this you should find
the all-in-one JAR that was produced by the maven-assembly-plugin to bundle all code and dependencies in a single
package. The JAR file to use should be named validator-plugin-sample-jar-with-dependencies.jar.
sample-plugin
├── src
├── target
│   └── validator-plugin-sample-jar-with-dependencies.jar
└── pom.xml
Step 6: Include the plugin in your validator
Having developed and packaged our plugin we can now proceed to include it in our validator’s configuration.
As explained in the JSON validation guide (see Step 3: Prepare validator configuration), our validator’s domain configuration should include the following files and folders:
validator
└── resources
    └── order
        ├── schemas
        │   ├── PurchaseOrder.schema.json
        │   └── PurchaseOrder-large.schema.json
        └── config.properties
We will now extend this by copying the plugin’s JAR file under folder plugins as follows:
validator
└── resources
    └── order
        ├── schemas
        │   ├── PurchaseOrder.schema.json
        │   └── PurchaseOrder-large.schema.json
        ├── plugins
        │   └── validator-plugin-sample-jar-with-dependencies.jar
        └── config.properties
The name of the JAR file as well as its containing plugins folder can be adapted as best suits you. It is nonetheless
a good practice to organise well a domain’s resources to make things more clear and maintainable.
With the plugin’s JAR file in place what remains is to refer to it in the domain configuration file (config.properties).
We can define a plugin in one of two ways:
As a plugin applicable by default to all configured validation types (property prefix
validator.defaultPlugins).As a plugin applicable to specific validation type(s) (property prefix
validator.plugins.FULL_TYPE).
In our case we will set the plugin as applicable to all validation types as follows:
# Relative path to the plugin JAR file.
validator.defaultPlugins.0.jar = plugins/validator-plugin-sample-jar-with-dependencies.jar
# Fully qualified name of the class service as the plugin entry point.
validator.defaultPlugins.0.class = eu.europa.ec.itb.plugin.PluginInterface
Property validator.defaultPlugins.N.class included above as well as the similar validator.plugins.FULL_TYPE.N.class
for type-specific plugins, can take multiple class names as comma-separated strings. In case you have multiple separate plugin
entry points in a single JAR file you can configure them in this way.
Note
Properties validator.defaultPlugins and validator.plugins.FULL_TYPE are both indexed, thus supporting any
number of plugin definitions by adding entries with an incremented index part. In almost all cases however, you would
only ever need to define one plugin and then simply add further logic in the plugin’s internal implementation.
Step 7: Use the updated validator
With the custom plugin in place you can now rebuild and launch the updated validator and try it out.
As an initial note, if you inspect the validator’s logs you will be able to see the plugin being loaded for the “basic” and “large” validation types of the validator’s “order” domain:
...
06/09/2022 16:04:59.668 [] INFO  e.e.e.i.v.plugin.PluginManager - Loaded 1 plugin(s) for order|basic
06/09/2022 16:04:59.669 [] INFO  e.e.e.i.v.plugin.PluginManager - Loaded 1 plugin(s) for order|large
...
When trying out a validation you will now see that the plugin is called and returns its report, whose item(s) (one on our case) are merged with the validator’s other findings.
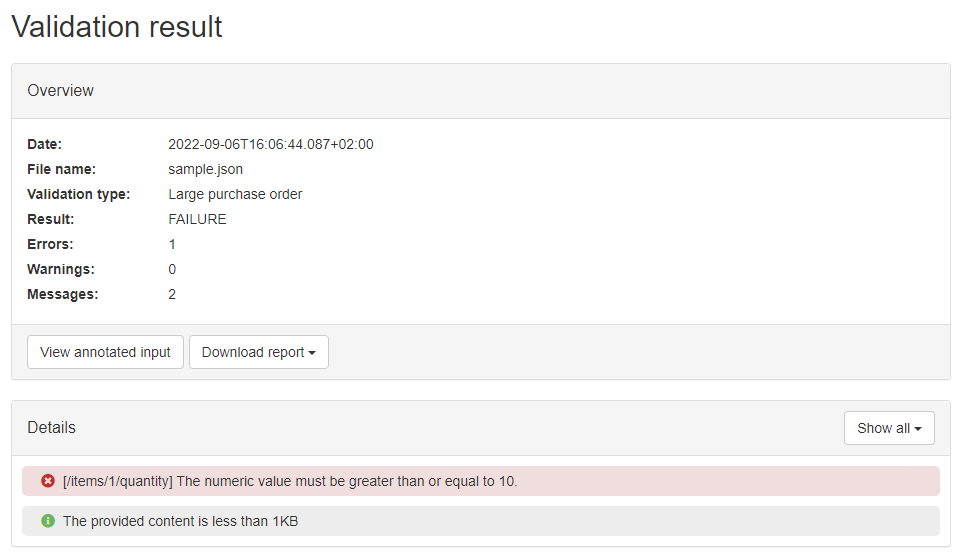
Clicking on the plugin’s report item, a popup will display highlighting the item in question. As we specified the location line to be zero, the item is presented at the top of the validated content.
Summary
Congratulations! You just implemented a simple custom validator plugin to extend your validator’s capabilities. In doing so you learned how plugins work, developed a plugin making use of its provided inputs and returning its report, before finally including the plugin in a validator and trying it out.
See also
The simple plugin developed as part of this guide is also published as a sample on GitHub. Feel free to clone this project to help you follow this guide and also to use the sample implementation as a starting point for your own plugin development.
Extending a validator with a custom plugin is an advanced validator feature. For details on a validator’s basic setup and configuration options you should refer to the following documentation:
The XML validation guide, for XML validators using XML Schema and Schematron.
The RDF validation guide, for RDF validators using SHACL shapes.
The JSON validation guide, for JSON validators using JSON Schema.
The CSV validation guide, for CSV validators using Table Schema.
Custom plugins are simplified implementations of the GITB validation service API. More information on this API and the other APIs foreseen by the GITB specifications is available in the GITB services documentation.
Regarding deploying your validator and bringing it online, you can refer to the step-by-step validator deployment guide. This covers production deployments but also different types of installations such as use of Docker or installation via JAR files.