Guide: Developing complex tests
Track |
|---|
This guide walks you through the process of developing test cases involving custom test services, and setting up your workflow for efficient test development.
What you will achieve
At the end of this guide you will have developed test cases that use custom extension services to test messaging with external systems. Specifically you will:
Create test cases that both send and receive messages via HTTP web services.
Extend the Test Bed’s capabilities through custom test services.
Cover advanced points such as concurrency management, while avoiding common pitfalls.
Define the development resources and workflow to develop tests efficiently.
To achieve the above you will work both through the Test Bed’s user interface and REST API, develop tests in the GITB TDL, and create a supporting test service application using Java and Spring Boot.
What you will need
About 4 hours to cover all points.
An XML or text editor for test case authoring.
A JDK installation (at least version 17).
Apache Maven (at least version 3.8).
A Java IDE to develop custom test services.
Utilities to ZIP archives and make HTTP calls from the command line.
Docker and Docker Compose to run all test components.
Moderate Java programming skills to understand discussed development concepts.
The guide’s complete result is published on GitHub. If you prefer to skip the guide’s detailed steps you can also clone this repository and bring the complete environment up to experiment with. In this case you will need:
About 15 minutes.
A git client to clone the repository.
Docker and Docker Compose to initialise the service.
How to complete this guide
This guide builds upon previous introductory guides that should be completed first. Specifically:
Follow Guide: Installing the Test Bed for development use to make sure you have installed the Test Bed on your local workstation.
Go through Guide: Creating a test suite to establish the fictional specification we are testing for and create a first simple test suite. If you want to skip this, you can get the resulting test suite from here.
Go through Guide: Defining your test configuration to create your initial configuration in your Test Bed instance.
It is advised, although not required, to also go through Guide: Getting started (for developers) as this provides an overview to all technical concepts involved in test development.
Once you have completed the above you can proceed with this guide’s steps. In each case new concepts will be explained before proceeding with development steps. Finally, instead of introducing all considerations at once, this guide follows an incremental approach so that new ideas are highlighted and appreciated leading to incremental improvements to our test design.
Note
The guide’s core steps are followed by a set of additional bonus steps. Although not required, you should go through them as they go beyond the base setup to introduce new concepts, good practices and further improvements.
Steps
Carry out the following steps to complete this guide.
Step 1: Define your testing needs
In Guide: Creating a test suite we assumed that you are part of a project to define a new specification for the exchange of purchase orders between EU retailers. Up to this point your project’s testing needs have focused only on the content itself without addressing how purchase orders are actually exchanged.
Your project’s experts have now also introduced a web service API to make this exchange consistent. Retailer systems will need to implement this to receive orders but also be able to call it to send orders to other retailers. In terms of requirements:
The interface is a REST service listening for
HTTP POSTrequests to a request path/receiveOrder.The body of these requests is the purchase order XML.
Upon reception of a valid request, the receiver must respond with a HTTP code
200(ok), and a reference identifier as payload of the formREF-[\d]+(REF-followed by one or more digits).In case an invalid purchase order is received, the receiver must respond with a HTTP code
400(bad request) and an arbitrary optional text payload with additional error information.
As an example, a valid request would be as follows:
POST /receiveOrder HTTP/1.1
...
Content-Type: text/xml

<?xml version="1.0"?>
<purchaseOrder xmlns="http://itb.ec.europa.eu/sample/po.xsd" orderDate="2018-01-22">
    ...
</purchaseOrder>
A valid response to such a request would be:
HTTP/1.1 200 OK
...
Content-Type: text/plain

REF-0123456789
To complement the message exchange specification, the project’s conformance testing service will be extended with additional test cases as follows:
Send a valid purchase order to the system under test and verify it is correctly responded to.
Send an invalid purchase order to the system under test and verify it is rejected.
Receive a valid purchase order from the system under test and return a correct response.
Step 2: Design your test architecture
The new test cases to be implemented involve the sending and receiving of messages to the system under test. The GITB TDL foresees a series of built-in messaging handlers that at first glance would seem to support what we need. Besides the most trivial use cases, it is nonetheless always a better idea to avoid using these and implement instead a custom messaging service that is specific to our project. A custom service allows us to fine-tune test step reporting, and also cater for project-specific needs such as authentication. In addition, we can extend this service with additional custom processing and validation endpoints to cover other custom needs that may come up.
To cover these custom implementations we will foresee an additional component - a simple web app exposing the necessary GITB SOAP APIs - named po-test-services (“po” for Purchase Order).
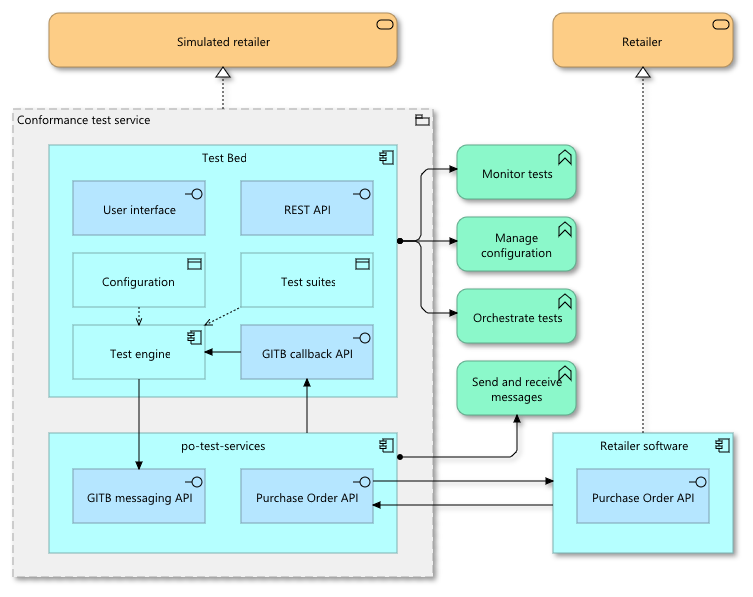
The po-test-services component will be deployed alongside the Test Bed’s core components, forming a part of the conformance test service. It will be triggered by the Test Bed when a test case needs to send a message to a system under test, and also notify the Test Bed when it receives messages. To receive messages it will implement the project’s Purchase Order API, and will notify the Test Bed when needed via its GITB callback API. Simply put, the po-test-services component acts as an adapter between the Test Bed and the systems being tested.
Note
When referring to the system under test we will use from now on the term SUT. This is the term used also within the Test Bed.
Step 3: Prepare your workspace
Before we start with any updates it’s good to set up our workspace to work efficiently. Assuming you have completed Guide: Creating a test suite you have
created a test suite with a simple test case, whereby a purchase order is manually uploaded and then validated. This source of this test suite is defined in
a folder workspace as follows:
workspace
└── testSuite1
    ├── resources
    │   └── PurchaseOrder.xsd
    ├── testCases
    │   └── testCase1.xml
    └── testSuite.xml
If you don’t have this already available then create the workspace folder and extract within it the test suite archive.
In the end make sure your folder structure matches what you see above to make it easier to follow the guide’s steps.
Besides creating this test suite you should also have installed the Test Bed on your workstation and followed Guide: Defining your test configuration to create a community and deploy your test suite. As part of this last guide recall that we covered the following accounts that you will be using:
admin@itb, the Test Bed administrator account (predefined as part of the Test Bed’s installation).
admin@po, the community administrator you created (we’ll use this to manage the community).
user@acme, the organisation administrator you created (we’ll use this to run tests).
We will now connect to the Test Bed as the Test Bed administrator (account admin@itb) and enable the Test Bed’s REST API. The REST API can be used for several tasks, but in our case the main purpose will be to redeploy test suite updates without having to go through manual uploads. To enable it, log into the Test Bed and navigate to System administration from the menu. Here locate the REST API setting in the presented panel, make sure it is enabled and Save.

You need to do this operation as the Test Bed administrator, as enabling the REST API is a system-wide setting. For all subsequent tasks however it is best that you log out, and log in again as the community administrator (account admin@po). Do this now, and once connected use the menu to navigate to the Community management screen to view your community’s details.
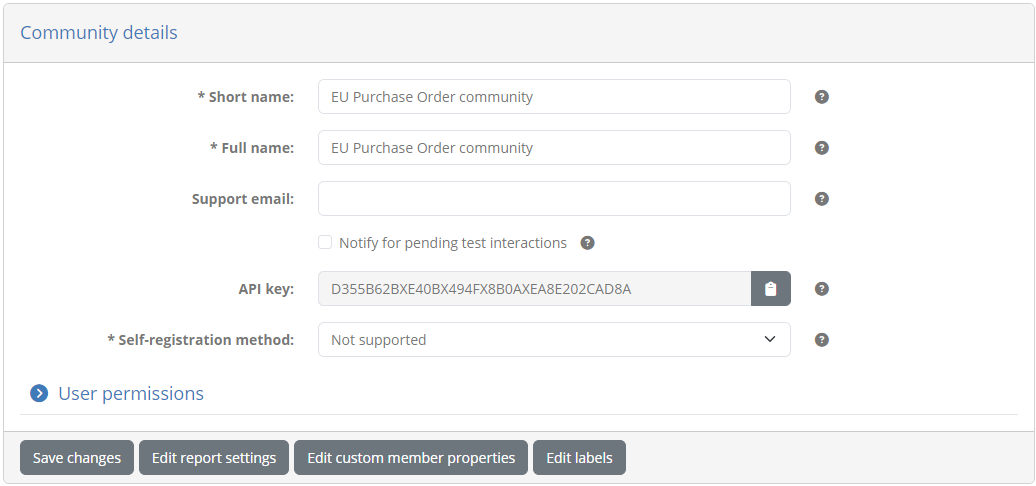
From here note the readonly API key displayed as part of the community details. This API key is needed to authenticate REST API calls for administrator tasks, including the deployment of test suites. Make a copy of this value.
Now use the menu to navigate to the Domain management screen to view the details of your specifications. The Specifications tab lists here the EU Purchase Order v1.0 specification.
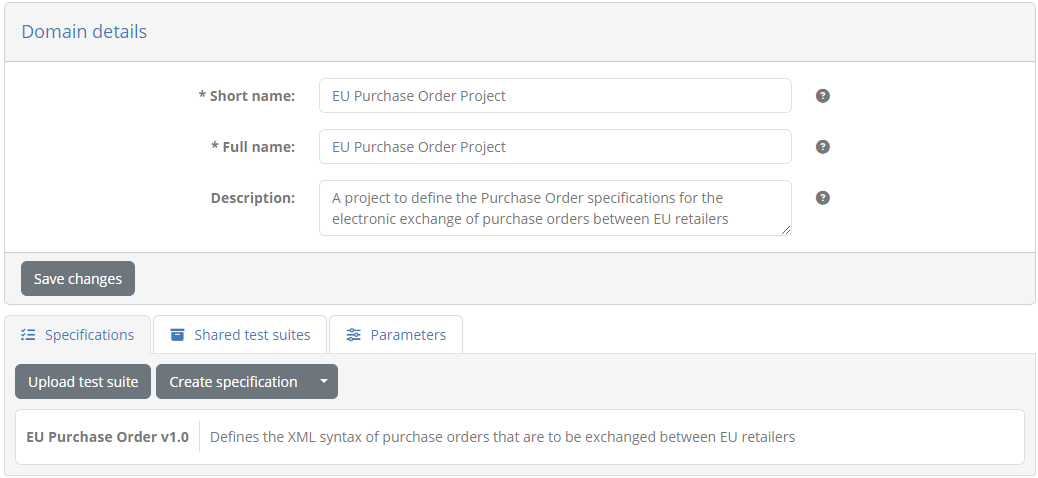
Click the specification to view its details. In the screen that follows you will see the information on the specification, including a similar readonly API key.
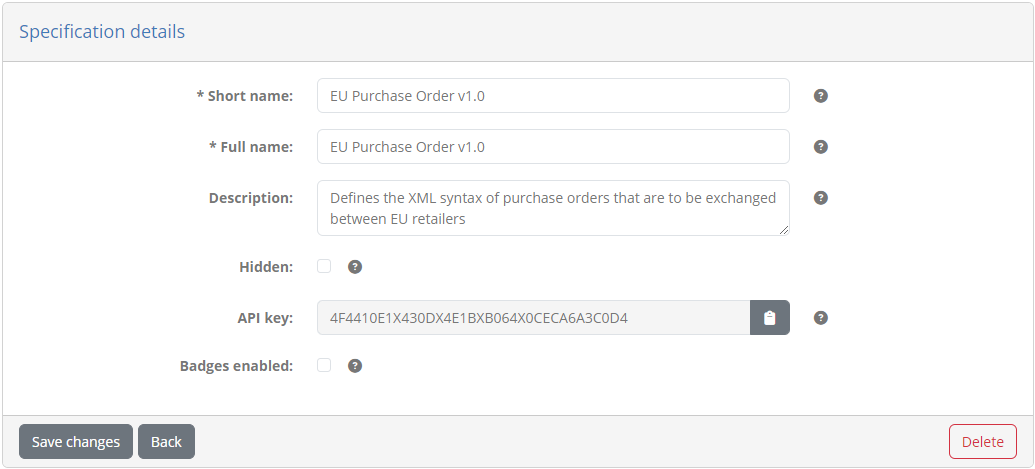
This API key serves to uniquely identify the specification when making REST API calls. In our case it identifies the specification for which we want to upload our test suite. Make a copy of this value.
Now that we have both the community and specification API keys at hand, we will create a simple script that will ZIP our test suite archive and redeploy it using the Test Bed’s REST API. This can be achieved through any number of utilities but in our case we’ll use common commands and tools.
For Linux we will use rm, zip and curl in a deploy_test_suite.sh shell script as follows:
#!/bin/sh
rm -f testSuite1.zip
cd testSuite1
zip -rq ../testSuite1.zip .
cd ..
curl -F updateSpecification=true -F showIdentifiers=false -F specification=4F4410E1X430DX4E1BXB064X0CECA6A3C0D4 -F testSuite=@testSuite1.zip --header "ITB_API_KEY: D355B62BXE40BX494FX8B0AXEA8E202CAD8A" -X POST http://localhost:9000/api/rest/testsuite/deploy
On the other hand for Windows we will use del, 7z (from the 7-Zip tool) and curl in a deploy_test_suite.bat batch file:
del testSuite1.zip
7z a testSuite1.zip .\testSuite1\*
curl -F updateSpecification=true -F showIdentifiers=false  -F specification=4F4410E1X430DX4E1BXB064X0CECA6A3C0D4 -F testSuite=@testSuite1.zip --header "ITB_API_KEY: D355B62BXE40BX494FX8B0AXEA8E202CAD8A" -X POST http://localhost:9000/api/rest/testsuite/deploy
In either case make sure to adapt the script by replacing the API keys as follows:
Use the specification API key as the value of
specification=...Use the community API key as the value of
ITB-API-KEY: ...
Place the script that matches your environment under the workspace folder:
workspace
├── testSuite1
└── deploy_test_suite.bat (or deploy_test_suite.sh)
Once in place, you can call the script to redeploy the test suite. A successful redeployment will return a JSON result including completed as “true”:
{"completed":true, ...}
If there are any problems with the test suite, completed will be “false” and will be followed by the validation findings.
Note
We are using the API’s deploy operation that expects a multi-part form submission. This operation also has a JSON variant whereby the test suite archive is provided as a Base64-encoded string.
Finally, an important point is that we set updateSpecification to “true” instructing the Test Bed to update matching specification metadata based on the
archive’s definitions. This includes definitions of actors, as well as metadata for the test suite and test cases such as names, descriptions and documentation. Such
data can also be modified via the Test Bed’s user interface, in which case you may want to omit the updateSpecification or set it to “false” to avoid
overwriting it. For the initial deployment of our test suite this parameter makes no difference but we set it already as we will be using the API for all subsequent
test suite updates.
Step 4: Create test services app
Before developing any test cases, and to finalise our initial setup, we will create the application to implement our supporting test services. Based on our testing needs and test architecture this application will initially implement the GITB messaging service API to enable sending and receiving of messages. We can always extend this with new endpoints if we eventually need to support custom processing and validation capabilities.
The simplest way to create a new messaging service is to use the Test Bed’s template service. This is a Maven Archetype that creates a Spring Boot application implementing the API(s) we need. It also defines an optional sample implementation of selected service types, although for our purposes we will skip this.
Open a command prompt to the root workspace folder and from here issue:
mvn archetype:generate "-DarchetypeGroupId=eu.europa.ec.itb" "-DarchetypeArtifactId=template-test-service" "-DarchetypeVersion=1.29.5"
Doing so will prompt you with questions to customise your application (typing the <enter> key confirms the default choice). Answer each question as follows:
Define value for property ‘addMessagingService’: y
Define value for property ‘addValidationService’: n
Define value for property ‘addProcessingService’: n
Define value for property ‘addSampleImplementation’: n
Define value for property ‘groupId’: org.test
Define value for property ‘artifactId’: po-test-services
Define value for property ‘version’ 1.0-SNAPSHOT: <enter>
Define value for property ‘package’ org.test: <enter>
Confirm by typing <enter>.
The result of the previous step will be to create a po-test-services project in your workspace. This follows the standard Maven project structure as follows:
workspace
└── po-test-services
    ├── src
    │   ├── main
    │   │   ├── java
    │   │   │   └── org/test/**/*.java
    │   │   └── resources
    │   │       └── application.properties
    │   └── test
    │       └── java
    │           └── org/test/**/*.java
    ├── Dockerfile
    ├── pom.xml
    └── README.md
We currently chose to not add a validation and processing service as there is no current need for them. If we do eventually need them we could either create them as separate applications, or better, simply add the necessary validation and processing endpoints in the po-test-services project. This project will effectively group together all supporting capabilities needed by your test cases that are not available out-of-the-box. Extending this initial service is discussed in more detail in Bonus step: Extend your test services.
Regarding the messaging implementation, the main class of interest currently is org.test.MessagingServiceImpl which implements the Test Bed’s messaging API.
This currently has empty but nonetheless fully functioning implementations, such as the generated send method:
@Override
public SendResponse send(SendRequest parameters) {
    LOG.info("Received 'send' command from Test Bed for session [{}]", parameters.getSessionId());
    SendResponse response = new SendResponse();
    response.setReport(utils.createReport(TestResultType.SUCCESS));
    return response;
}
Besides this class, the gitb package contains several other useful components that you will be using in the upcoming steps. Finally, you should
take note of:
Class org.test.Application which contains the
mainmethod (the application’s entry point).File application.properties which contains the application’s configuration properties.
The project’s README.md file contains instructions on building and running the application using Maven. As you will be developing this, you should load the project in your Java IDE, and use the IDE to build, run and debug the application. As this is a standard Maven project you should only need to load in your IDE the folder containing the project’s pom.xml file.
The only changes we will make at this point will be to configure a different port (to avoid conflicts with the Test Bed’s ports) and context path for the application. Edit file application.properties to set the following properties.
server.port = 7000
server.servlet.context-path = /po
Note
The server.port and server.servlet.context-path properties are part of Spring Boot’s standard configuration properties.
We are now ready to start developing our test cases.
Step 5: Create 1st test case (send valid message to SUT)
For the first test case we need to send a valid purchase order to a SUT and ensure it is correctly responded to.
Let’s first add test case testCase2.xml to our existing test suite:
workspace
└── testSuite1
    ├── resources
    │   └── PurchaseOrder.xsd
    ├── testCases
    │   ├── testCase1.xml
    │   └── testCase2.xml
    └── testSuite.xml
Define the contents of testCase2.xml initially as follows:
<?xml version="1.0" encoding="UTF-8"?>
<testcase id="testCase2_send" xmlns="http://www.gitb.com/tdl/v1/" xmlns:gitb="http://www.gitb.com/core/v1/">
  <metadata>
    <gitb:name>[TC2] Receive a valid purchase order</gitb:name>
    <gitb:version>1.0</gitb:version>
    <gitb:description>Test case that sends a valid purchase order to the SUT and expects a correct response.</gitb:description>
  </metadata>
  <actors>
    <gitb:actor id="Retailer" name="Retailer" role="SUT"/>
    <gitb:actor id="TestBed" name="Other retailer"/>
  </actors>
  <steps>
    <log>"It works!"</log>
  </steps>
</testcase>
The initial definition just logs an “It works!” message that we will replace as we move along. Notice in the actors section
how we defined a second simulated actor named “TestBed” (the identifier and name of this actor can be whatever you like). This is
needed given that when we have messaging, we must have at least two actors (a sender and a receiver). We will now adapt our test
suite definition testSuite.xml to reference the test case and define the new actor.
<?xml version="1.0" encoding="UTF-8"?>
<testsuite id="testSuite1" xmlns="http://www.gitb.com/tdl/v1/" xmlns:gitb="http://www.gitb.com/core/v1/">
  ...
  <actors>
    <gitb:actor id="Retailer">
      <gitb:name>Retailer</gitb:name>
      <gitb:desc>The EU retailer system that needs to be capable of producing and processing purchase orders.</gitb:desc>
    </gitb:actor>
    <gitb:actor id="TestBed">
      <gitb:name>Other retailer</gitb:name>
      <gitb:desc>A simulated retailer implemented by the Test Bed.</gitb:desc>
    </gitb:actor>
  </actors>
  <testcase id="testCase1_upload"/>
  <testcase id="testCase2_send"/>
</testsuite>
With these changes in place we can deploy the update calling deploy_test_suite.bat. If you want to check the result you can connect as ACME’s user (account user@acme), navigate to My conformance statements, and after selecting the single conformance statement, see that the test case has been added:
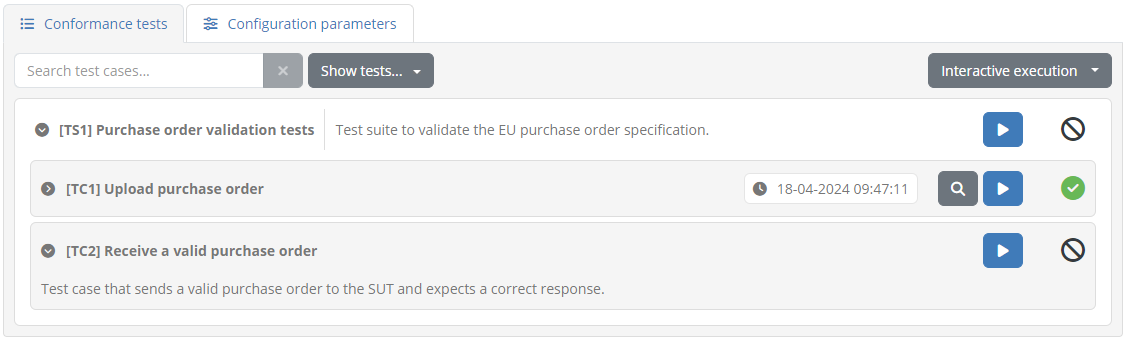
If you execute this test you will see an empty execution diagram but viewing the session log will show the “It works!” message:

Let’s proceed now to implement the test case’s actual steps. We will specifically:
Generate the purchase order to send to the SUT. We could just include a fixed purchase order but we will rather use templating to create one that defines the current date.
Send the purchase order to the SUT, using the po-test-services support app.
Verify the SUT’s response.
To help us generate purchase orders will first create a template poTemplate.xml as a test suite resource. For consistency we’ll add this in the test suite’s resources folder:
  workspace
  └── testSuite1
      ├── resources
      │   ├── poTemplate.xml
      │   └── PurchaseOrder.xsd
      ├── testCases
      │   ├── testCase1.xml
      │   └── testCase2.xml
      └── testSuite.xml
Define the contents of this file as follows:
<?xml version="1.0"?>
<purchaseOrder xmlns="http://itb.ec.europa.eu/sample/po.xsd" orderDate="${orderDate}">
  <shipTo country="BE">
    <name>John Doe</name>
    <street>Europa Avenue 123</street>
    <city>Brussels</city>
    <zip>1000</zip>
  </shipTo>
  <billTo country="BE">
    <name>Jane Doe</name>
    <street>Europa Avenue 210</street>
    <city>Brussels</city>
    <zip>1000</zip>
  </billTo>
  <comment>Send in one package please</comment>
  <items>
    <item partNum="XYZ-123876">
      <productName>Mouse</productName>
      <quantity>1</quantity>
      <priceEUR>15.99</priceEUR>
      <comment>Confirm this is wireless</comment>
    </item>
    <item partNum="ABC-32478">
      <productName>Keyboard</productName>
      <quantity>1</quantity>
      <priceEUR>25.50</priceEUR>
    </item>
  </items>
</purchaseOrder>
Notice here how the file’s root element defines an ${orderDate} placeholder that will be replaced with the current date:
<purchaseOrder xmlns="http://itb.ec.europa.eu/sample/po.xsd" orderDate="${orderDate}">
Now adapt testCase2.xml to import the template you just defined:
<testcase>
  <metadata>...</metadata>
  <imports>
      <artifact name="poTemplate">resources/poTemplate.xml</artifact>
  </imports>
  <actors>...</actors>
  <steps>...</steps>
</testcase>
The import we added will make available the template file as a poTemplate variable. Next up we’ll use the built-in
TokenGenerator to create and record a timestamp
with the expected format.
<steps>
  <!-- Create the order date. -->
  <process output="orderDate" handler="TokenGenerator" operation="timestamp">
      <input name="format">"yyyy-MM-dd"</input>
  </process>
</steps>
The generated orderDate variable will then be used as a parameter for the built-in TemplateProcessor
that is also supplied with the template via variable poTemplate (defined by the earlier import).
<steps>
  ...
  <!-- Use the template to create the purchase order. -->
  <assign to="parameters{orderDate}">$orderDate</assign>
  <process output="purchaseOrder" handler="TemplateProcessor">
      <input name="parameters">$parameters</input>
      <input name="template">$poTemplate</input>
      <input name="syntax">"freemarker"</input>
  </process>
</steps>
The template we are using is quite simple as it has only a single placeholder replacement to make. It is nonetheless a good idea
to specify that this is a FreeMarker template via the syntax input as this will allow us
to add potentially complex processing to the template in the future. The result of the template’s execution - the purchase order to send -
is recorded in variable purchaseOrder.
The next step is to send the generated purchase order to the SUT. For this purpose we will use a send step to be handled by the po-test-services messaging endpoint. We will retrieve its address from the domain’s configuration, and also foresee a system-level configuration property for the address of the SUT endpoint to contact.
<steps>
  ...
  <!-- Send the purchase order to the SUT. -->
  <send id="sendPO" desc="Receive purchase order" from="TestBed" to="Retailer" handler="$DOMAIN{messagingServiceAddress}">
      <input name="purchaseOrder">$purchaseOrder</input>
      <input name="endpoint">$SYSTEM{endpointAddress}</input>
  </send>
</steps>
Note here how we are passing two inputs to the service. For custom services these inputs can be whatever we want, given that anything passed through the test case can be retrieved referring to the same input names in the service’s implementation.
The messaging service address is defined on the domain given that it will be the same for all organisations and tests. We could have provided a fixed URL here, but reading the address from the configuration decouples it from the test definition and makes our test suite portable across environments. Regarding the SUT’s endpoint address, this will be configuration that users (or administrators on their behalf) will need to define for their SUT(s) before running tests.
To define these configuration properties connect as the community administrator (account admin@po). Go to the Domain management screen to view your domain and switch to tab Test services.

From here click Register service to bring up the service creation form.

Complete this as follows:
Test identifier: messagingServiceAddress
Description: Messaging service endpoint.
Endpoint address: http://host.docker.internal:7000/po/services/messaging?wsdl
Service type: Messaging
Note
Referring to the Docker host: You are using here host.docker.internal as the value, given that the Test Bed (specifically the gitb-srv container) needs to access the
messaging service running on your localhost. Note that this special address is Windows-specific - if on Linux use 172.17.0.1.
Clicking on Save you will see the new parameter listed as part of the domain’s configuration.

The name of a test service is a unique key that we can use to refer to it in tests. Naming this “messagingServiceAddress” means that
we can refer to it as $DOMAIN{messagingServiceAddress}.
Note
Domain parameters vs test services: We could have also created the messaging service address as a domain parameter and used it in the same way from test cases. Using however a test service is preferable as its purpose becomes clearer, we can centralise related configurations, and can also test the service for availability.
For the SUT’s endpoint address we will switch to the Community management screen and from there click Edit custom member properties. This screen displays the custom properties defined for the community’s organisations and systems.
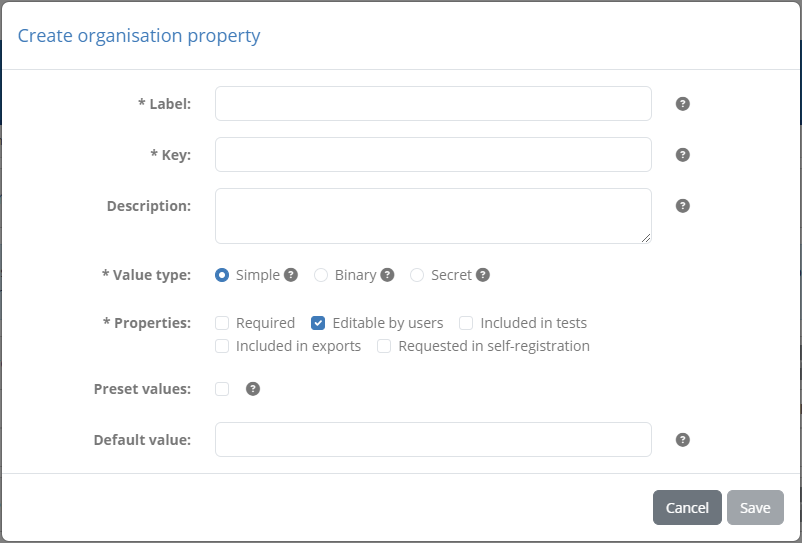
Organisation properties are those that would apply to the organisation as a whole, including all its defined systems. In our case we assume that retailers may want to test multiple different solutions at the same time, each defined as a separate system, so we will add the endpoint address at the level of the system instead. From the System level properties panel click Create property.
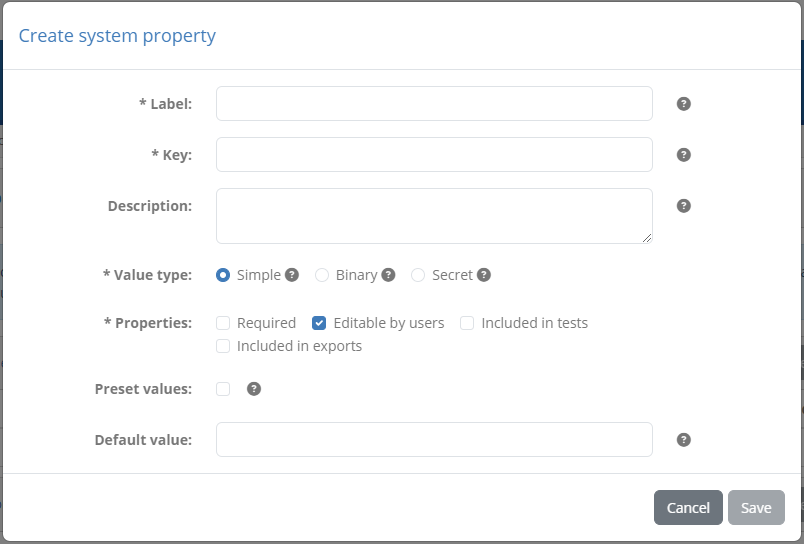
Complete this form as follows:
Label: API endpoint address
Key: endpointAddress
Description: The system’s API endpoint address where receive purchase orders are received.
Value type: Simple
Properties: Check Required, Editable by users and Included in tests
Clicking on Save will now list the new system property.

The label and description provided will serve simply to facilitate users as a label and help tooltip when encoding their information. Setting the property as
required, editable by users and included in tests, means that users can edit the property and will need to do so before launching tests. During test execution
the property will be referenced by test cases using the “endpointAddress” key, as $SYSTEM{endpointAddress}.
Before switching to our custom implementation in the po-test-services app, we will complete our test case definition with the remaining steps. Once the SUT’s response is received we will do two checks to ensure everything went smoothly:
Check that the response status code was 200 (all OK).
Check that the response payload was a valid reference identifier.
Both the response’s status code and payload will be returned from the po-test-services implementation of the send operation. The step’s result will
be a map stored in the test session context, named “sendPO” based on the step’s identifier. We will check these by adding the following
verify steps:
<steps>
  ...
  <send id="sendPO">...</send>
  <!-- Validate response status code. -->
  <verify id="checkStatusCode" desc="Verify status code" handler="StringValidator">
    <input name="actual">$sendPO{response}{status}</input>
    <input name="expected">"200"</input>
    <input name="failureMessage">"The received HTTP status was not 200."</input>
  </verify>
  <!-- Validate response status code. -->
  <verify id="checkReferenceIdentifier" desc="Verify reference identifier" handler="RegExpValidator">
    <input name="input">$sendPO{response}{payload}</input>
    <input name="expression">"^REF\-\d+$"</input>
    <input name="failureMessage">"The returned identifier has an invalid format."</input>
  </verify>
</steps>
Note here how we refer to the step’s results as, for example, $sendPO{response}{status}. This suggests that the send step will return a map that in
turn will include a nested map named “response”. Within this nested map we will find the “status” and “payload” values. We are choosing here to use a
nested map to group the response’s data, so that it is better distinguished from the request’s information (that will also be added to the report for completeness).
This concludes the steps to add. One additional point to consider is that test cases by default execute all steps regardless of whether a failure was encountered.
In our case this is not meaningful given that, for example, a SUT communication failure should immediately terminate the test rather than attempt to validate the response.
To have the test case stop when an error is encountered we will set the stopOnError attribute to “true”:
<steps stopOnError="true">
  ...
</steps>
As a final addition to our test case we will also add a user-friendly output message to summarise the result. This is achieved via the test case’s output element that can define default success and failure messages but also specific scenarios that might be interesting to highlight. Let’s extend the test case by adding this section with default messages and specific failure messages depending on the step that failed.
<testcase>
  <metadata>...</metadata>
  <imports>...</imports>
  <actors>...</actors>
  <steps>...</steps>
  <output>
    <success>
      <default>"Test completed successfully."</default>
    </success>
    <failure>
      <case>
        <cond>$STEP_STATUS{sendPO} = 'ERROR'</cond>
        <message>"An error occurred while sending the purchase order to the system."</message>
      </case>
      <case>
        <cond>$STEP_STATUS{checkStatusCode} = 'ERROR'</cond>
        <message>"The response status code was invalid."</message>
      </case>
      <case>
        <cond>$STEP_STATUS{checkReferenceIdentifier} = 'ERROR'</cond>
        <message>"The returned reference identifier was invalid."</message>
      </case>
      <default>"Test failed. Please check the failed step's report for more information."</default>
    </failure>
  </output>
</testcase>
Each of the listed conditions will be checked in sequence until a condition is matched, otherwise applying the default message. When checking specific failure cases the most useful construct is the STEP_STATUS map as it allows us to pinpoint if a given step (referred to by its identifier) failed or was skipped.
Note
Output messages are complete expressions meaning that you can also include information from the test session context. It is a good practice however to keep these messages limited and refer to a step’s report for more information.
Having concluded our test case we can now view its final contents:
<?xml version="1.0" encoding="UTF-8"?>
<testcase id="testCase2_send" xmlns="http://www.gitb.com/tdl/v1/" xmlns:gitb="http://www.gitb.com/core/v1/">
    <metadata>
        <gitb:name>[TC2] Receive a valid purchase order</gitb:name>
        <gitb:version>1.0</gitb:version>
        <gitb:description>Test case that sends a valid purchase order to the SUT and expects a correct response.</gitb:description>
    </metadata>
    <imports>
        <artifact name="poTemplate">resources/poTemplate.xml</artifact>
    </imports>
    <actors>
        <gitb:actor id="Retailer" name="Retailer" role="SUT"/>
        <gitb:actor id="TestBed" name="Other retailer"/>
    </actors>
    <steps stopOnError="true">
        <!-- Create the order date. -->
        <process output="orderDate" handler="TokenGenerator" operation="timestamp">
            <input name="format">"yyyy-MM-dd"</input>
        </process>
        <!-- Use the template to create the purchase order. -->
        <assign to="parameters{orderDate}">$orderDate</assign>
        <process output="purchaseOrder" handler="TemplateProcessor">
            <input name="parameters">$parameters</input>
            <input name="template">$poTemplate</input>
            <input name="syntax">'freemarker'</input>
        </process>
        <!-- Send the purchase order to the SUT. -->
        <send id="sendPO" desc="Receive purchase order" handler="$DOMAIN{messagingServiceAddress}">
            <input name="purchaseOrder">$purchaseOrder</input>
            <input name="endpoint">$SYSTEM{endpointAddress}</input>
        </send>
        <!-- Validate response status code. -->
        <verify id="checkStatusCode" desc="Verify status code" handler="StringValidator">
            <input name="actual">$sendPO{response}{status}</input>
            <input name="expected">"200"</input>
            <input name="failureMessage">"The received HTTP status was not 200."</input>
        </verify>
        <!-- Validate response status code. -->
        <verify id="checkReferenceIdentifier" desc="Verify reference identifier" handler="RegExpValidator">
            <input name="input">$sendPO{response}{payload}</input>
            <input name="expression">"^REF\-\d+$"</input>
            <input name="failureMessage">"The returned identifier has an invalid format."</input>
        </verify>
    </steps>
    <output>
        <success>
            <default>"Test completed successfully."</default>
        </success>
        <failure>
            <case>
                <cond>$STEP_STATUS{sendPO} = "ERROR"</cond>
                <message>"An error occurred while sending the purchase order to the system."</message>
            </case>
            <case>
                <cond>$STEP_STATUS{checkStatusCode} = "ERROR"</cond>
                <message>"The response status code was invalid."</message>
            </case>
            <case>
                <cond>$STEP_STATUS{checkReferenceIdentifier} = "ERROR"</cond>
                <message>"The returned reference identifier was invalid."</message>
            </case>
            <default>"Test failed. Please check the failed step's report for more information."</default>
        </failure>
    </output>
</testcase>
With the test case definition completed we can now switch to the Java implementation in the po-test-services app. Open in your IDE
class org.test.gitb.MessagingServiceImpl and go to method send, adapting its implementation as follows:
public SendResponse send(SendRequest parameters) {
  LOG.info("Received 'send' command from Test Bed for session [{}]", parameters.getSessionId());
  // Extract inputs.
  String purchaseOrder = utils.getRequiredString(parameters.getInput(), "purchaseOrder");
  String endpoint = utils.getRequiredString(parameters.getInput(), "endpoint");
  // Create request.
  HttpRequest sutRequest = HttpRequest.newBuilder()
        .uri(URI.create(endpoint))
        .setHeader(HttpHeaders.CONTENT_TYPE, MediaType.APPLICATION_XML_VALUE)
        .POST(HttpRequest.BodyPublishers.ofString(purchaseOrder))
        .build();
  // Call SUT.
  HttpResponse<String> sutResponse;
  try {
    sutResponse = HttpClient.newBuilder()
          .connectTimeout(Duration.ofSeconds(10))
          .followRedirects(HttpClient.Redirect.ALWAYS)
          .build()
          .send(sutRequest, HttpResponse.BodyHandlers.ofString());
  } catch (Exception e) {
    throw new IllegalStateException("Error while contacting SUT", e);
  }
  // Prepare report for Test Bed.
  TAR report = utils.createReport(TestResultType.SUCCESS);
  // The purchase order we sent.
  AnyContent requestData = utils.createAnyContentSimple("purchaseOrder", purchaseOrder, ValueEmbeddingEnumeration.STRING);
  // Don't record this in the session context as we don't need it.
  requestData.setForContext(false);
  // Pass a hint to the Test Bed that this is XML for better syntax highlighting.
  requestData.setMimeType(MediaType.APPLICATION_XML_VALUE);
  report.getContext().getItem().add(requestData);
  // The response data we received.
  AnyContent responseData = new AnyContent();
  responseData.setName("response");
  responseData.getItem().add(utils.createAnyContentSimple("status", String.valueOf(sutResponse.statusCode()), ValueEmbeddingEnumeration.STRING));
  responseData.getItem().add(utils.createAnyContentSimple("payload", String.valueOf(sutResponse.body()), ValueEmbeddingEnumeration.STRING));
  report.getContext().getItem().add(responseData);
  // Return report.
  SendResponse response = new SendResponse();
  response.setReport(report);
  return response;
}
The implementation here and the inline comments should be easy to follow. At the start of the method we extract the inputs “purchaseOrder” and
“endpoint”, matching the inputs passed in the test case as part of the send step.
// Extract inputs.
String purchaseOrder = utils.getRequiredString(parameters.getInput(), "purchaseOrder");
String endpoint = utils.getRequiredString(parameters.getInput(), "endpoint");
Having extracted these we then proceed to make the call to the SUT. We are assuming currently here that other elements of the call,
for example the fact we are making a POST and submitting XML are built into the implementation. We could otherwise have also
extracted these from the inputs, thus making the service even more of a generic building block.
Once the SUT’s response is received we then prepare the report to return to the Test Bed. Notice here that we are setting the report’s result as a success regardless of the response status:
TAR report = utils.createReport(TestResultType.SUCCESS);
Alternatively we could have already checked the status and set the result accordingly (e.g. set as failed for anything other than the expected code 200). Doing this in the test case however adds more clarity, and allows including test cases later on where we expect requests to be rejected (e.g. when sending an invalid purchase order). In addition, it allows us to decouple low-level errors (e.g. the SUT being unreachable) from more business-level issues.
In the report’s context we can also return information that will be (a) displayed as part of the step’s report, and (b) available in the test session context for subsequent steps. If we want to include certain information only for display in the report we can already set it as such. This is the case for the purchase order that was sent, that would be useful for the user to view but is not needed by other test steps.
// The purchase order we sent.
AnyContent requestData = utils.createAnyContentSimple("purchaseOrder", purchaseOrder, ValueEmbeddingEnumeration.STRING);
// Don't record this in the session context as we don't need it.
requestData.setForContext(false);
To return the response data (the status and payload) we are not adding them directly to the report’s context, but we are rather grouping them in a map called “response”:
// The response data we received.
AnyContent responseData = new AnyContent();
responseData.setName("response");
responseData.getItem().add(utils.createAnyContentSimple("status", String.valueOf(sutResponse.statusCode()), ValueEmbeddingEnumeration.STRING));
responseData.getItem().add(utils.createAnyContentSimple("payload", String.valueOf(sutResponse.body()), ValueEmbeddingEnumeration.STRING));
report.getContext().getItem().add(responseData);
If you recall from the test case definition, this nested map is reflected in how we subsequently look up these values:
<steps stopOnError="true">
  ...
  <send id="sendPO">...</send>
  <!-- Validate response status code. -->
  <verify id="checkStatusCode" desc="Verify status code" handler="StringValidator">
    <input name="actual">$sendPO{response}{status}</input>
    <input name="expected">"200"</input>
    <input name="failureMessage">"The received HTTP status was not 200."</input>
  </verify>
  ...
</steps>
Having completed the test case definition in XML and the supporting service implementation in Java we can now (a) restart the po-test-services app and (b) run deploy_test_suite.bat to update the test suite. We are now ready to run the test case against a SUT. To do this we will take two additional steps
We will create a mock server to simulate the SUT.
We will update ACME’s configuration in the Test Bed to set the SUT’s endpoint address.
For the first step we can use the popular MockServer tool that offers a public Docker image.
The configuration of the mock server can be downloaded from here and extracted to the workspace folder.
What you should have in the end is a new sut-mock folder as follows:
workspace
├── po-test-services
├── sut-mock
│   ├── config
│   │   ├── config.json
│   │   └── mockserver.properties
│   └── docker-compose.yml
└── testSuite1
The config.json file defines the requests (currently one) that the server will catch and respond to.
[
  {
    "id": "Receive valid purchase order",
    "httpRequest": {
      "method": "POST",
      "path": "/receiveOrder"
    },
    "httpResponseTemplate": {
      "templateType": "MUSTACHE",
      "template": "{ 'statusCode': 200, 'headers': { 'content-type': 'text/plain' }, 'body': 'REF-0123456789' }"
    }
  }
]
File mockserver.properties points the server to this file and instructs it to reload when changed.
mockserver.initializationJsonPath = /config/config.json
mockserver.watchInitializationJson = true
Finally docker-compose.yml defines the mock service, loading the configuration files, and binding it to port 1080.
version: '3.1'

services:
  mock-server:
    # A mock service implementation to realise the SUT. The mock service's configuration reads endpoint definitions
    # from ./config/config.json and reloads the mocks when changed.
    image: mockserver/mockserver:5.15.0
    restart: unless-stopped
    volumes:
      - ./config:/config
    ports:
      - "1080:1080"
    environment:
      - MOCKSERVER_PROPERTY_FILE=/config/mockserver.properties
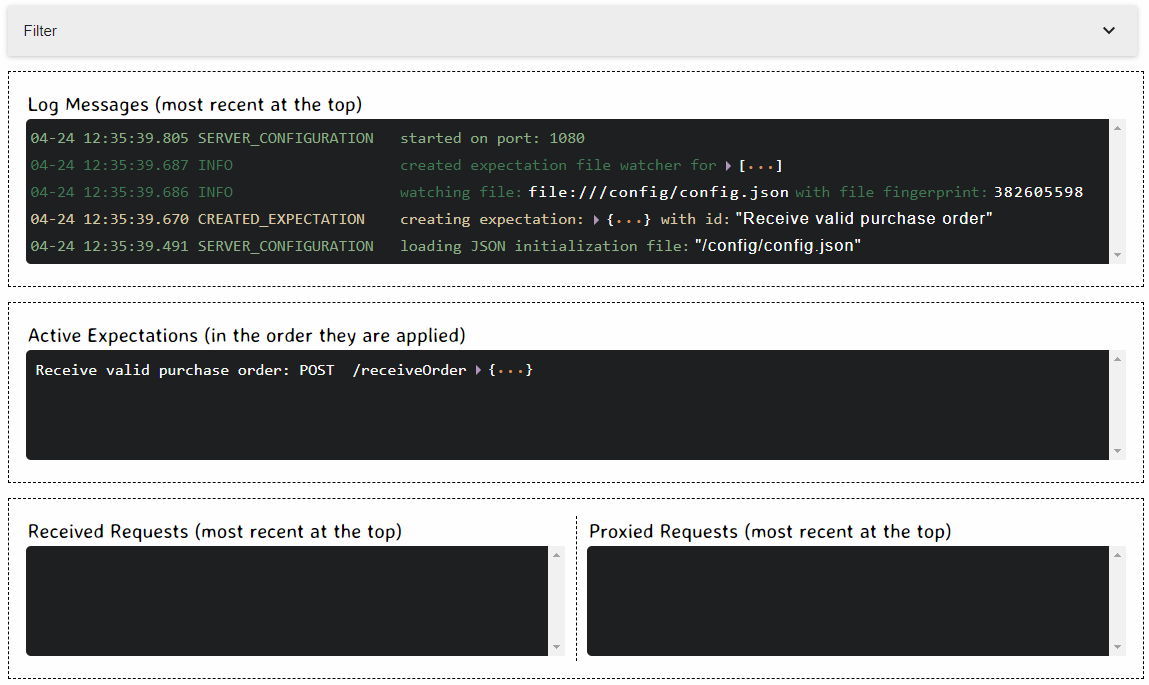
You can start up the mock server issuing from the sut-mock folder docker compose up -d. Following this you can
open a browser to http://localhost:1080/mockserver/dashboard to view the server’s dashboard. This lists all received requests
and the actively mocked endpoints.
We can now log into the Test Bed as our organisation user (account user@acme), and navigate to My organisation where you can see in the Systems tab the system we will test (“ACME backend retailing system”).
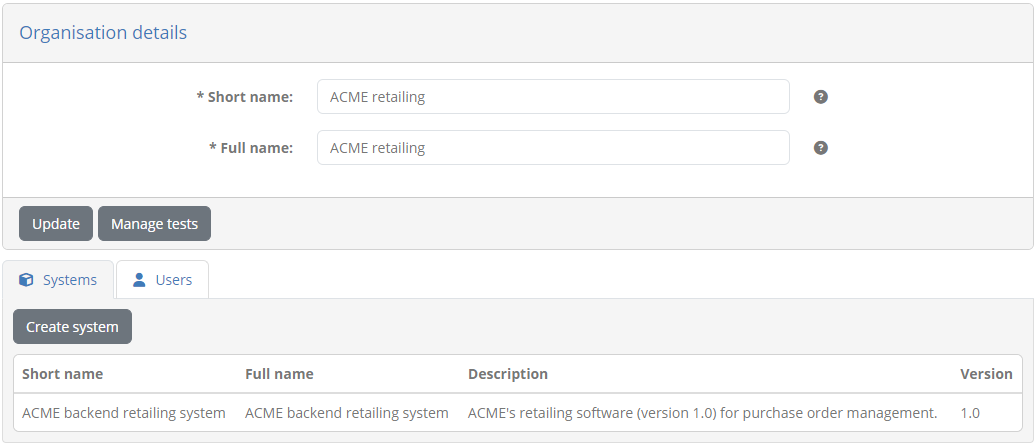
Clicking this takes you to the system’s details where you will notice an Additional properties section that can be clicked to expand. This includes the “endpointAddress” system-level configuration property we defined earlier to hold the system’s endpoint address.
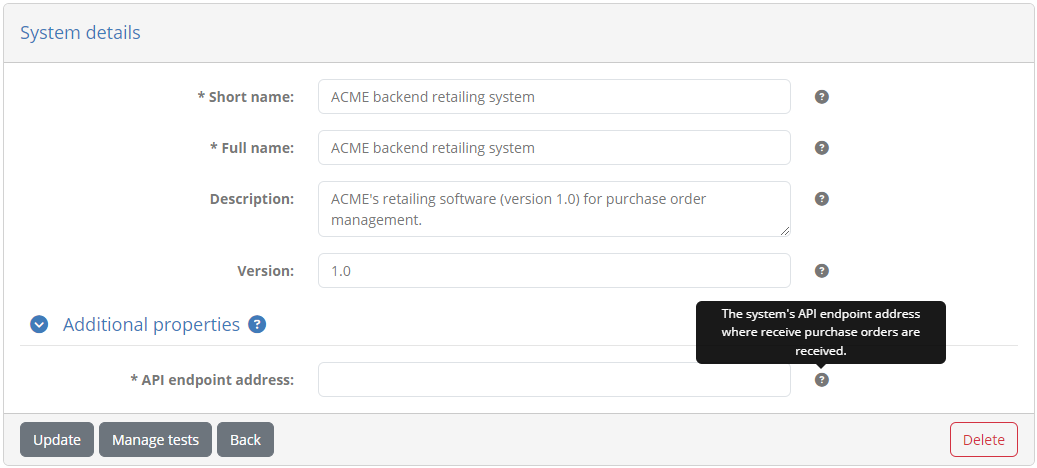
Complete this with the endpoint exposed by the SUT’s mock server “http://localhost:1080/receiveOrder” and click Update.
Note
You are using localhost for the SUT’s endpoint address as this will be called by your messaging service which is also running on your localhost.
If the messaging service was deployed within the Test Bed’s Dockerised service you would need to use the special address host.docker.internal
(or 172.17.0.1 for Linux).
Having completed the setup and configuration of our SUT you can return to the conformance statement and click to start the new test session.
Once finished you will see all steps displayed as completed with the final success message you configured in the test case’s output section.
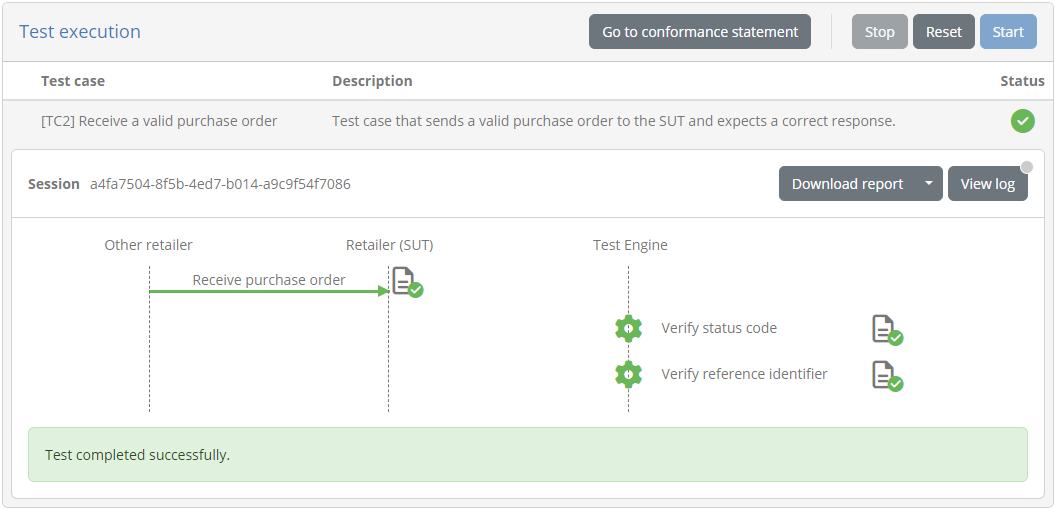
Clicking on the send step’s report you can also see the information you returned from the po-test-services app, including the generated purchase order that was sent, and the response status and payload grouped under the “response” block.
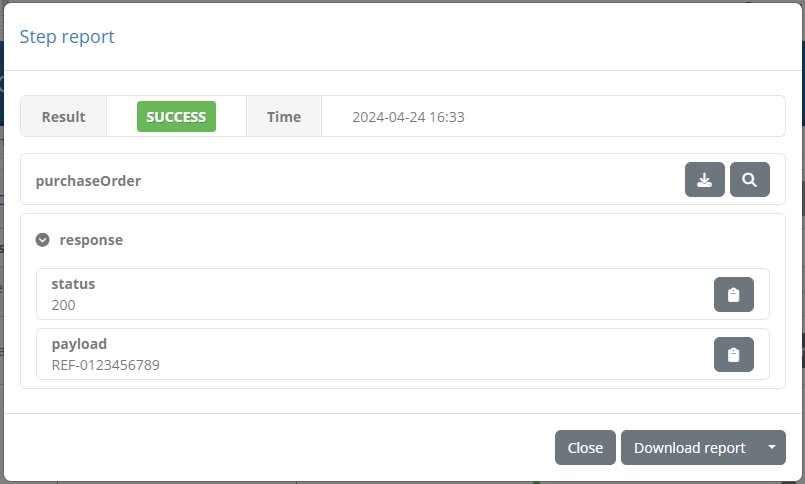
The first test case is now completed, tested and ready to use.
Step 6: Create 2nd test case (send invalid message to SUT)
For the second test case we need to send an invalid purchase order to a SUT, and ensure it is rejected with a 400 response.
Let’s add test case testCase3.xml to the test suite:
workspace
└── testSuite1
    ├── resources
    │   ├── poTemplate.xml
    │   └── PurchaseOrder.xsd
    ├── testCases
    │   ├── testCase1.xml
    │   ├── testCase2.xml
    │   └── testCase3.xml
    └── testSuite.xml
Define the initial contents of testCase3.xml as follows:
<?xml version="1.0" encoding="UTF-8"?>
<testcase id="testCase3_sendInvalid" xmlns="http://www.gitb.com/tdl/v1/" xmlns:gitb="http://www.gitb.com/core/v1/">
  <metadata>
    <gitb:name>[TC3] Receive an invalid purchase order</gitb:name>
    <gitb:version>1.0</gitb:version>
    <gitb:description>Test case that sends an invalid purchase order to the SUT and expects it to be rejected.</gitb:description>
  </metadata>
  <actors>
    <gitb:actor id="Retailer" name="Retailer" role="SUT"/>
    <gitb:actor id="TestBed" name="Other retailer"/>
  </actors>
  <steps stopOnError="true">
    <log>"It works!"</log>
  </steps>
</testcase>
Once defined, remember to also reference the test case from the test suite’s definition in testSuite.xml:
<testsuite>
  <metadata>...</metadata>
  <actors>...<actors>
  <testcase id="testCase1_upload"/>
  <testcase id="testCase2_send"/>
  <testcase id="testCase3_sendInvalid"/>
</testsuite>
For the content of the invalid purchase order we will use one that does not respect its XSD. In truth you could envision any number of “unhappy flow” scenarios testing things like encodings or correct API paths, but the principle is always similar. We will not use a template this time to generate the purchase order but rather just foresee a fixed resource in the test suite. Create file invalidPurchaseOrder.xml under the test suite’s resources folder as follows:
workspace
└── testSuite1
    ├── resources
    │   ├── invalidPurchaseOrder.xml
    │   ├── poTemplate.xml
    │   └── PurchaseOrder.xsd
    ├── testCases
    │   ├── testCase1.xml
    │   ├── testCase2.xml
    │   └── testCase3.xml
    └── testSuite.xml
The file is an XML document that clearly does not respect our data model. Its contents are as follows:
<?xml version="1.0"?>
<purchaseOrder xmlns="http://itb.ec.europa.eu/sample/po.xsd" orderDate="2022-10-24">
  <invalidElement>An unexpected element</invalidElement>
</purchaseOrder>
Coming back to the testCase3.xml we will now import this file and send it to the SUT. We will then verify that the returned response code was 400.
<testcase>
  <metadata>...</metadata>
  <imports>
    <artifact name="purchaseOrder">resources/invalidPurchaseOrder.xml</artifact>
  </imports>
  <actors>...</actors>
  <steps stopOnError="true">
    <!-- Send the purchase order to the SUT. -->
    <send id="sendPO" desc="Receive invalid purchase order" handler="$DOMAIN{messagingServiceAddress}">
      <input name="purchaseOrder">$purchaseOrder</input>
      <input name="endpoint">$SYSTEM{endpointAddress}</input>
    </send>
    <!-- Validate response status code. -->
    <verify id="checkStatusCode" desc="Verify status code" handler="StringValidator">
      <input name="actual">$sendPO{response}{status}</input>
      <input name="expected">"400"</input>
      <input name="failureMessage">"The received HTTP status was not 400."</input>
    </verify>
  </steps>
</testcase>
Finally, we will also include an output section to provide user-friendly summary messages:
<testcase>
  <metadata>...</metadata>
  <imports>...</imports>
  <actors>...</actors>
  <steps>...</steps>
  <output>
    <success>
      <default>"Test completed successfully."</default>
    </success>
    <failure>
      <case>
        <cond>$STEP_STATUS{sendPO} = "ERROR"</cond>
        <message>"An error occurred while sending the purchase order to the system."</message>
      </case>
      <case>
        <cond>$STEP_STATUS{checkStatusCode} = "ERROR"</cond>
        <message>"The response status code was invalid (the system is expected to reject invalid purchase orders)."</message>
      </case>
      <default>"Test failed. Please check the failed step's report for more information."</default>
    </failure>
  </output>
</testcase>
As a final improvement to the test case we will use a tag to highlight that it is testing an “unhappy flow” scenario. Tags are visual aids for your users that can be very helpful in distinguishing certain test cases’ characteristics. You can add any number of tags to highlight whatever you find interesting. We will add an “unhappyFlow” tag as part of the test case’s metadata as follows:
<testcase>
  <metadata>
    <gitb:name>[TC3] Receive an invalid purchase order</gitb:name>
    <gitb:version>1.0</gitb:version>
    <gitb:description>Test case that sends an invalid purchase order to the SUT and expects it to be rejected.</gitb:description>
    <gitb:tags>
      <gitb:tag foreground="#FFFFFF" background="#FF2E00" name="unhappyFlow">Test case validating correct handling of error cases.</gitb:tag>
    </gitb:tags>
  </metadata>
  <imports>...</imports>
  <actors>...</actors>
  <steps>...</steps>
  <output>...</output>
</testcase>
This completes the test case definition. Moreover, as there is no change to our messaging mechanics there is no need to update the po-test-services app. The complete test case definition is as follows:
<?xml version="1.0" encoding="UTF-8"?>
<testcase id="testCase3_sendInvalid" xmlns="http://www.gitb.com/tdl/v1/" xmlns:gitb="http://www.gitb.com/core/v1/">
    <metadata>
        <gitb:name>[TC3] Receive an invalid purchase order</gitb:name>
        <gitb:version>1.0</gitb:version>
        <gitb:description>Test case that sends an invalid purchase order to the SUT and expects it to be rejected.</gitb:description>
        <gitb:tags>
            <gitb:tag foreground="#FFFFFF" background="#FF2E00" name="unhappyFlow">Test case validating correct handling of error cases.</gitb:tag>
        </gitb:tags>
    </metadata>
    <imports>
        <artifact name="purchaseOrder">resources/invalidPurchaseOrder.xml</artifact>
    </imports>
    <actors>
        <gitb:actor id="Retailer" name="Retailer" role="SUT"/>
        <gitb:actor id="TestBed" name="Other retailer"/>
    </actors>
    <steps stopOnError="true">
        <!-- Send the purchase order to the SUT. -->
        <send id="sendPO" desc="Receive invalid purchase order" handler="$DOMAIN{messagingServiceAddress}">
            <input name="purchaseOrder">$purchaseOrder</input>
            <input name="endpoint">$SYSTEM{endpointAddress}</input>
        </send>
        <!-- Validate response status code. -->
        <verify id="checkStatusCode" desc="Verify status code" handler="StringValidator">
            <input name="actual">$sendPO{response}{status}</input>
            <input name="expected">"400"</input>
            <input name="failureMessage">"The received HTTP status was not 400."</input>
        </verify>
    </steps>
    <output>
        <success>
            <default>"Test completed successfully."</default>
        </success>
        <failure>
            <case>
                <cond>$STEP_STATUS{sendPO} = "ERROR"</cond>
                <message>"An error occurred while sending the purchase order to the system."</message>
            </case>
            <case>
                <cond>$STEP_STATUS{checkStatusCode} = "ERROR"</cond>
                <message>"The response status code was invalid (the system is expected to reject invalid purchase orders)."</message>
            </case>
            <default>"Test failed. Please check the failed step's report for more information."</default>
        </failure>
    </output>
</testcase>
Remember to deploy the updated test suite by running again script deploy_test_suite.bat.
You can now log in as the organisation user (account user@acme) to try out the new test. From the conformance statement details screen you will now notice the newly added test case with its distinguishing tag:
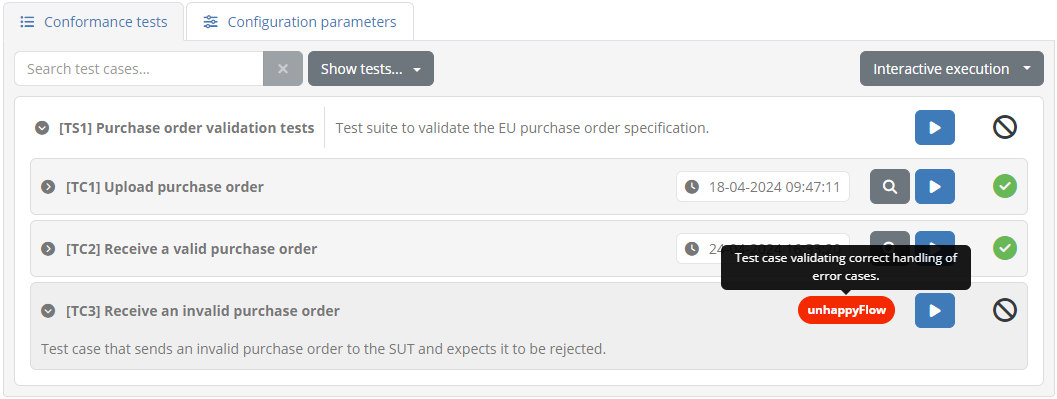
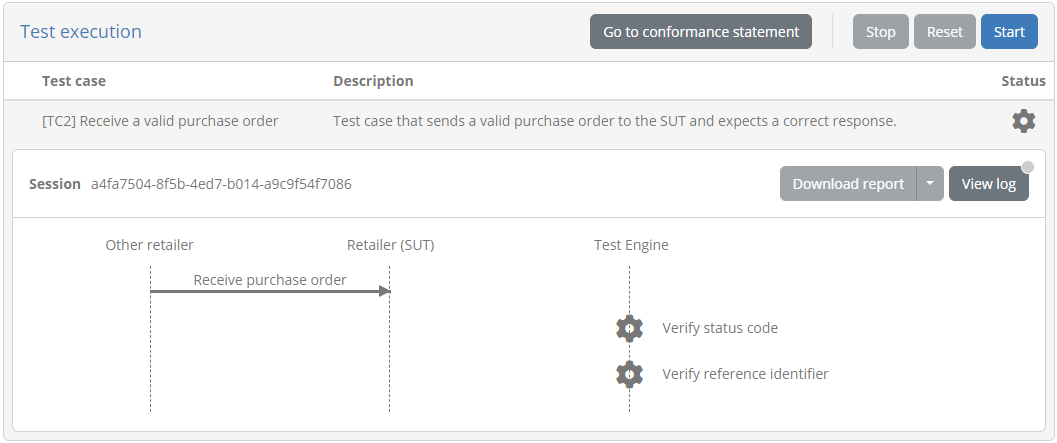
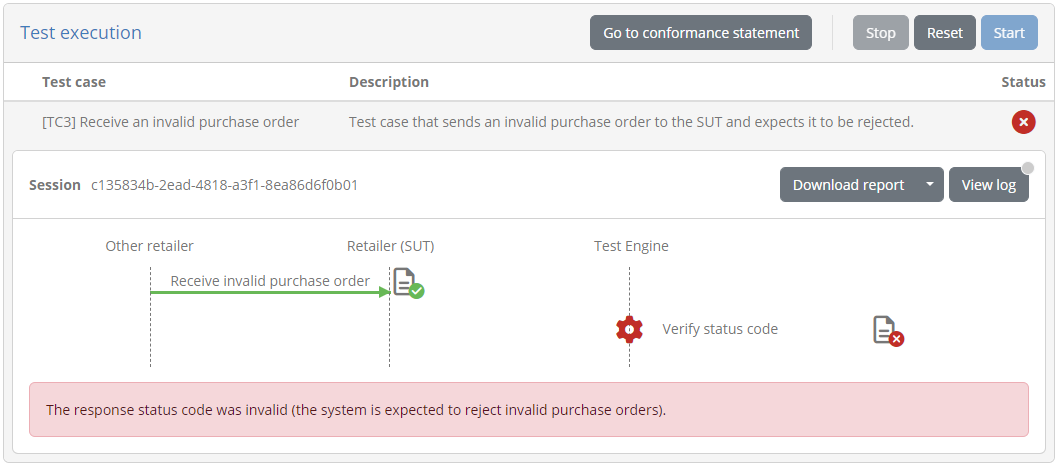
Clicking to execute this you will see its execution diagram:

Once completed, the test case will be marked as a failure. This is because the mock server we had configured is set to accept any request and respond with a reference identifier.
You could also test alternate responses by adapting the mock server’s configuration, and adding an expectation for a different endpoint path that returns a 400 error. You could then replace the endpoint in the system’s properties and check to see that the rejection results in a successful test.
Note
Validating “unhappy flow” scenarios is one of the key reasons why it is not practical to test using actual systems, or to rely fully on peer-to-peer tests. In contrast to real systems that are designed to work correctly, the Test Bed can “misbehave” as needed.
Step 7: Create 3rd test case (receive message from SUT)
For the third foreseen test case we need to have the Test Bed receive a purchase order from the SUT and validate it for correctness. A correct purchase order will be one that is syntactically valid, and that specifies an order date matching the current day.
Let’s start with the test case definition. First add test case testCase4.xml to the test suite:
workspace
└── testSuite1
    ├── resources
    ├── testCases
    │   ├── testCase1.xml
    │   ├── testCase2.xml
    │   ├── testCase3.xml
    │   └── testCase4.xml
    └── testSuite.xml
Define the initial contents of testCase4.xml as follows:
<?xml version="1.0" encoding="UTF-8"?>
<testcase id="testCase4_receive" xmlns="http://www.gitb.com/tdl/v1/" xmlns:gitb="http://www.gitb.com/core/v1/">
  <metadata>
    <gitb:name>[TC4] Send a valid purchase order</gitb:name>
    <gitb:version>1.0</gitb:version>
    <gitb:description>Test case that expects the SUT to send a valid purchase order.</gitb:description>
  </metadata>
  <actors>
    <gitb:actor id="Retailer" name="Retailer" role="SUT"/>
    <gitb:actor id="TestBed" name="Other retailer"/>
  </actors>
  <steps stopOnError="true">
    <log>"It works!"</log>
  </steps>
</testcase>
As usual, remember to also reference the test case from the test suite’s definition in testSuite.xml:
<testsuite>
  <metadata>...</metadata>
  <actors>...<actors>
  <testcase id="testCase1_upload"/>
  <testcase id="testCase2_send"/>
  <testcase id="testCase3_sendInvalid"/>
  <testcase id="testCase4_receive"/>
</testsuite>
The test case will start with a receive step, expecting a purchase
order to be sent to the Test Bed. In general, receive steps are used whenever we need to suspend the test session’s execution until a message
is (asynchronously) received. The actual receiving of SUT calls will be handled by our po-test-services app.
<steps stopOnError="true">
  <!-- Receive a purchase order from the SUT. -->
  <receive id="receivePO" desc="Send your purchase order" handler="$DOMAIN{messagingServiceAddress}">
      <input name="vatNumber">$ORGANISATION{vatNumber}</input>
  </receive>
</steps>
You will notice here that we are passing an input to the receive step named “vatNumber”. Moreover, this value is set with a new
organisation-level configuration property
named similarly “vatNumber” and referenced as $ORGANISATION{vatNumber}. To understand why this is needed consider how receiving messages via a
custom messaging service works:
Executing a receive step will call the messaging service’s receive operation. The actual call to come in from a SUT however, happens asynchronously
via the purchase order API implemented by the po-test-services app. When receiving a SUT call, the app will need to have a way to match it to a pending
test session’s receive step so that it can be notified to proceed. To achieve this we are passing the SUT’s VAT number, a configuration value that will
be requested from retailers, that will serve to distinguish them. This VAT number will be considered as an endpoint path parameter by the po-test-services app
on the REST API it exposes to SUTs.
In the end, consider that passing the “vatNumber” input in the receive step, is the test session telling the po-test-services app that it will pause
until a message is received from a retailer with that VAT number.
Given that VAT numbers will be provided by retailer testers, we can add an improvement to our test case to ensure that their formatting is always consistent. Specifically we will process VAT numbers to make sure spaces and dots are removed before using them (transforming for example “BE0123.456.789” or “BE 0123456789” to “BE0123456789”). We will do this with an assign step, leveraging the GITB TDL’s built-in XPath 3.0 language:
<steps stopOnError="true">
  <!-- Strip all spaces and dots from the configured VAT number. -->
  <assign to="formattedVatNumber">translate($ORGANISATION{vatNumber}, " .", "")</assign>
  <!-- Receive a purchase order from the SUT. -->
  <receive id="receivePO" desc="Send your purchase order" handler="$DOMAIN{messagingServiceAddress}">
      <input name="vatNumber">$formattedVatNumber</input>
  </receive>
</steps>
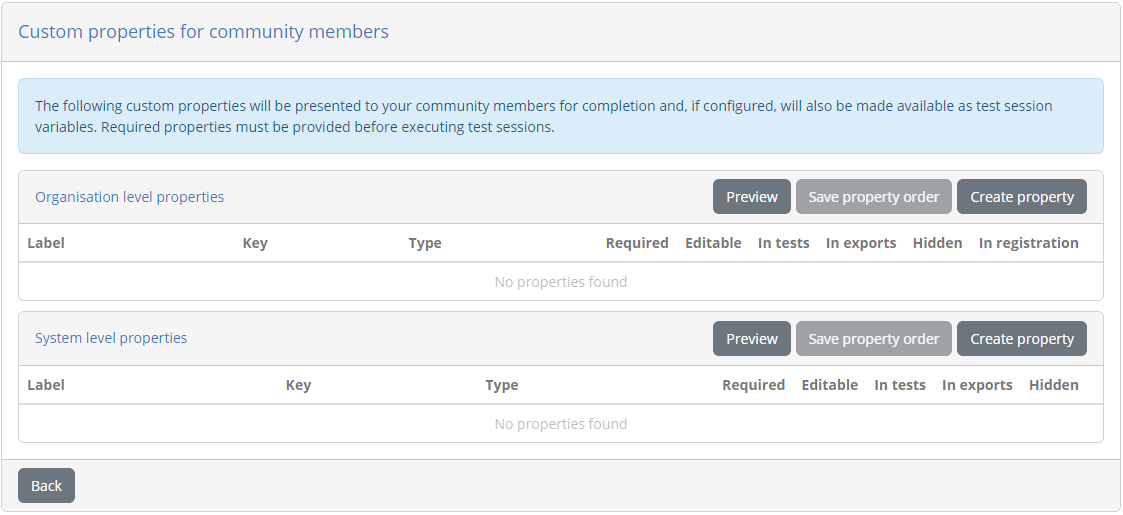
Let’s now complete the setup of the VAT number configuration by logging into the Test Bed as the community administrator (account admin@po). Navigate to the Community management screen, and from here click Edit custom member properties. Notice here that we have still not defined any custom organisation-level properties:

The VAT number will be added as a property at organisation level, as it will apply to all systems of an organisation. Click on Create property to bring up its creation form:
Complete this as follows:
Label: VAT number
Key: vatNumber
Description: The complete EU VAT number of the retailer.
Value type: Simple
Properties: Check Required, Editable by users and Included in tests
Clicking on Save will now list the new organisation property.

We can already set the value for our ACME retailing test organisation, by clicking to view its details and entering its VAT number under Additional properties.
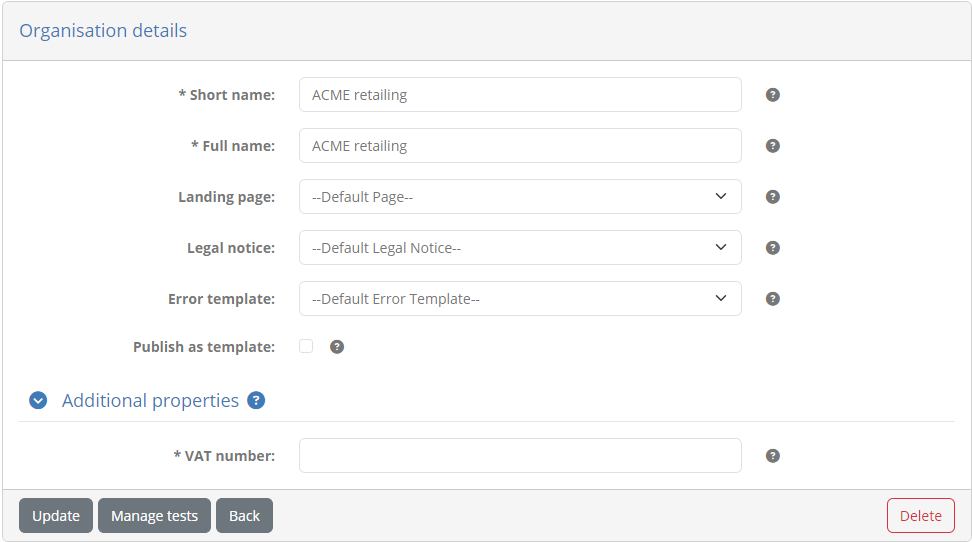
Complete this with “BE0123.456.789” and click Update.
Coming back to the test case now, the next step will be to validate the purchase orders from the SUT. Remember that we want to make two checks here:
Check the syntax to ensure it matches our data model.
Check the content to ensure the order date is as expected.
For the syntax check we can import our XSD and use it with a verify step
and the built-in XmlValidator. For the purchase order itself we will
assume that this is returned from the receive step’s report as item “purchaseOrder”, so that it can be referenced as $receivePO{purchaseOrder}.
<testcase>
  <metadata>...</metadata>
  <imports>
    <artifact name="poSchema">resources/PurchaseOrder.xsd</artifact>
  </imports>
  <actors>...</actors>
  <steps stopOnError="true">
    <!-- Strip all spaces and dots from the configured VAT number. -->
    <assign to="formattedVatNumber">translate($ORGANISATION{vatNumber}, " .", "")</assign>
    <!-- Receive a purchase order from the SUT. -->
    <receive id="receivePO" desc="Send your purchase order" handler="$DOMAIN{messagingServiceAddress}">
      <input name="vatNumber">$formattedVatNumber</input>
    </receive>
    <!-- Validate received purchase order. -->
    <verify desc="Validate purchase order" handler="XmlValidator">
      <input name="xml">$receivePO{purchaseOrder}</input>
      <input name="xsd">$poSchema</input>
    </verify>
  </steps>
</testcase>
To check the order date the simplest approach technically would be to use an XPath expression to pick out the order date attribute and check its value. This means that for a purchase order such as the following:
<?xml version="1.0"?>
<purchaseOrder xmlns="http://itb.ec.europa.eu/sample/po.xsd" orderDate="2024-04-26">
  ...
</purchaseOrder>
The XPath expression to use would be string(/*:purchaseOrder/@orderDate) = '2024-04-26'.
One simple approach to add this check would be to use the XPathValidator after the XSD check:
<steps stopOnError="true">
  ...
  <!-- Validate received purchase order. -->
  <verify desc="Validate purchase order" handler="XmlValidator">
    <input name="xml">$receivePO{purchaseOrder}</input>
    <input name="xsd">$poSchema</input>
  </verify>
  <!-- Calculate the current date. -->
  <process output="expectedOrderDate" handler="TokenGenerator" operation="timestamp">
      <input name="format">"yyyy-MM-dd"</input>
  </process>
  <!-- Validate received date. -->
  <verify desc="Validate order date" handler="XPathValidator">
    <input name="xml">$receivePO{purchaseOrder}</input>
    <input name="expression">string(/*:purchaseOrder/@orderDate) = $expectedOrderDate</input>
  </verify>
</steps>
Note
You can also define namespace-aware XPath expressions using the test case’s namespaces section, where namespace prefixes are declared.
Using the XPathValidator covers our basic need to validate the purchase order’s date. There is however room for improvement with respect to user
experience and the clarity of the returned feedback. Specifically:
The validation of a purchase order is conceptually a single step. We cover it with two
verifysteps but this is due to the test engine’s capabilities rather than what is meaningful for users. It would be best to add all checks in a single step and resulting report.If the order date is invalid, the report will simply state that it didn’t match the provided expression. It would be best to provide a more meaningful message such as “The order date must match today’s date (2024-04-24)”.
We could of course improve things by using custom output messages as we saw previously, but this would be impractical if a validation report includes
multiple issues.
To address these issues we will replace the XPathValidator by a Schematron validation, the standard XML tool to make rule-based
content checks. A Schematron rule to replicate our assertion would be as follows:
<?xml version="1.0" encoding="UTF-8"?>
<schema xmlns="http://purl.oclc.org/dsdl/schematron" queryBinding="xslt2">
  <title>Purchase Order rules</title>
  <ns prefix="po" uri="http://itb.ec.europa.eu/sample/po.xsd"/>
  <pattern name="General checks">
    <rule context="/po:purchaseOrder">
      <assert test="string(@orderDate) = '2024-04-24'" flag="fatal" id="PO-01">The order date must match today's date (2024-04-24).</assert>
    </rule>
  </pattern>
</schema>
The next challenge is to consider the expected date dynamically. For this purpose we will create the Schematron on-the-fly by using a template, and leverage information from the session context. Create file schematronTemplate.sch as a test suite resource:
workspace
└── testSuite1
    ├── resources
    │   ├── invalidPurchaseOrder.xml
    │   ├── poTemplate.xml
    │   ├── PurchaseOrder.xsd
    │   └── schematronTemplate.sch
    ├── testCases
    └── testSuite.xml
The content of the file will be as follows (note the ${expectedOrderDate} placeholders for the expected date):
<#ftl output_format="XML">
<?xml version="1.0" encoding="UTF-8"?>
<schema xmlns="http://purl.oclc.org/dsdl/schematron" queryBinding="xslt2">
  <title>Purchase Order rules</title>
  <ns prefix="po" uri="http://itb.ec.europa.eu/sample/po.xsd"/>
  <pattern name="General checks">
    <rule context="/po:purchaseOrder">
      <assert test="string(@orderDate) = '${expectedOrderDate}'" flag="fatal" id="PO-01">The order date must match today's date (${expectedOrderDate}).</assert>
    </rule>
  </pattern>
</schema>
Note
The output_format set on the template’s first line is used to instruct FreeMarker to XML-escape all substituted values. Similar
constructs for different output formats could be useful if you don’t fully control the values to be substituted.
We can now import this in our test case, use it to generate the Schematron to use, and finally make the verification of the purchase order in one go.
<testcase>
  <metadata>...</metadata>
  <imports>
    <artifact name="poSchema">resources/PurchaseOrder.xsd</artifact>
    <artifact name="poSchematronTemplate">resources/schematronTemplate.sch</artifact>
  </imports>
  <actors>...</actors>
  <steps stopOnError="true">
    ...
    <!-- Calculate the current date. -->
    <process output="expectedOrderDate" handler="TokenGenerator" operation="timestamp">
      <input name="format">"yyyy-MM-dd"</input>
    </process>
    <!-- Use the template to create the Schematron. -->
    <assign to="parameters{expectedOrderDate}">$expectedOrderDate</assign>
    <process output="poSchematron" handler="TemplateProcessor">
      <input name="parameters">$parameters</input>
      <input name="template">$poSchematronTemplate</input>
      <input name="syntax">'freemarker'</input>
    </process>
    <assign to="schematrons" append="true">$poSchematron</assign>
    <!-- Validate the received purchase order. -->
    <verify id="validatePurchaseOrder" desc="Validate purchase order" handler="XmlValidator">
      <input name="xml">$receivePO{purchaseOrder}</input>
      <input name="xsd">$poSchema</input>
      <input name="schematron">$schematrons</input>
      <input name="showValidationArtefacts">false()</input>
    </verify>
  </steps>
</testcase>
Note that when calling the XmlValidator we also specified here the showValidationArtefacts input to not include the XSD and Schematron in the step’s
report. To complete the test case we can finally add a similar output section with user-friendly summary messages. The overall test case is as follows:
<?xml version="1.0" encoding="UTF-8"?>
<testcase id="testCase4_receive" xmlns="http://www.gitb.com/tdl/v1/" xmlns:gitb="http://www.gitb.com/core/v1/">
    <metadata>
        <gitb:name>[TC4] Send a valid purchase order</gitb:name>
        <gitb:version>1.0</gitb:version>
        <gitb:description>Test case that expects the SUT to send a valid purchase order.</gitb:description>
    </metadata>
    <imports>
        <artifact name="poSchema">resources/PurchaseOrder.xsd</artifact>
        <artifact name="poSchematronTemplate">resources/schematronTemplate.sch</artifact>
    </imports>
    <actors>
        <gitb:actor id="Retailer" name="Retailer" role="SUT"/>
        <gitb:actor id="TestBed" name="Other retailer"/>
    </actors>
    <steps stopOnError="true">
        <!-- Strip all spaces and dots from the configured VAT number. -->
        <assign to="formattedVatNumber">translate($ORGANISATION{vatNumber}, " .", "")</assign>
        <!-- Receive a purchase order from the SUT. -->
        <receive id="receivePO" desc="Send your purchase order" handler="$DOMAIN{messagingServiceAddress}">
            <input name="vatNumber">$formattedVatNumber</input>
        </receive>
        <!-- Calculate the current date. -->
        <process output="expectedOrderDate" handler="TokenGenerator" operation="timestamp">
            <input name="format">"yyyy-MM-dd"</input>
        </process>
        <!-- Use the template to create the Schematron. -->
        <assign to="parameters{expectedOrderDate}">$expectedOrderDate</assign>
        <process output="poSchematron" handler="TemplateProcessor">
            <input name="parameters">$parameters</input>
            <input name="template">$poSchematronTemplate</input>
            <input name="syntax">'freemarker'</input>
        </process>
        <assign to="schematrons" append="true">$poSchematron</assign>
        <!-- Validate the received purchase order. -->
        <verify id="validatePurchaseOrder" desc="Validate purchase order" handler="XmlValidator">
            <input name="xml">$receivePO{purchaseOrder}</input>
            <input name="xsd">$poSchema</input>
            <input name="schematron">$schematrons</input>
            <input name="showValidationArtefacts">false()</input>
        </verify>
    </steps>
    <output>
        <success>
            <default>"Test completed successfully."</default>
        </success>
        <failure>
            <case>
                <cond>$STEP_STATUS{receivePO} = "ERROR"</cond>
                <message>"An error occurred while receiving the purchase order."</message>
            </case>
            <case>
                <cond>$STEP_STATUS{validatePurchaseOrder} = "ERROR"</cond>
                <message>"The provided purchase order was invalid. Check the step's report for the detailed findings."</message>
            </case>
            <default>"Test failed. Please check the failed step's report for more information."</default>
        </failure>
    </output>
</testcase>
We are now ready to switch to the po-test-services app to implement the receiving logic. Recall from our earlier discussion that the
receive operation triggered by the relevant step, and the calls received from SUTs are decoupled. In the receive operation we will
need to record the step’s expected information (the SUT VAT number) so that we can use it for subsequent matching when a SUT makes a call.
There is however one additional, and rather nuanced point to consider before the implementation. Given the asynchronous nature of communications
we could face a race condition whereby a message is received by a SUT before the test session signals it is expecting one via a receive
step. In this case, the receive step will appear to hang, even if the SUT has already sent the message. This scenario comes up usually when
we have several automated messaging steps occurring in a single test case, so our simple one-step test case is likely not affected. However, even
such seemingly simple scenarios could end up being stuck, if for example you use an interact
step to inform the user of what is expected. In this case the user will likely send a message before closing the interact step, and thus
before the receive step has had a chance to execute.
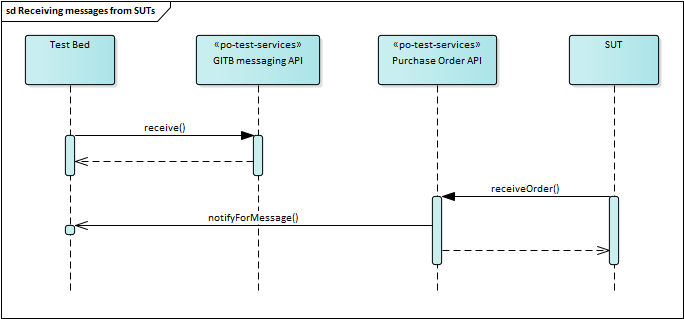
In brief, regardless of how simple a test case might seem, it is always a good practice to plan for messages being received out of sequence. Considering this our sequence diagram can be elaborated as follows:
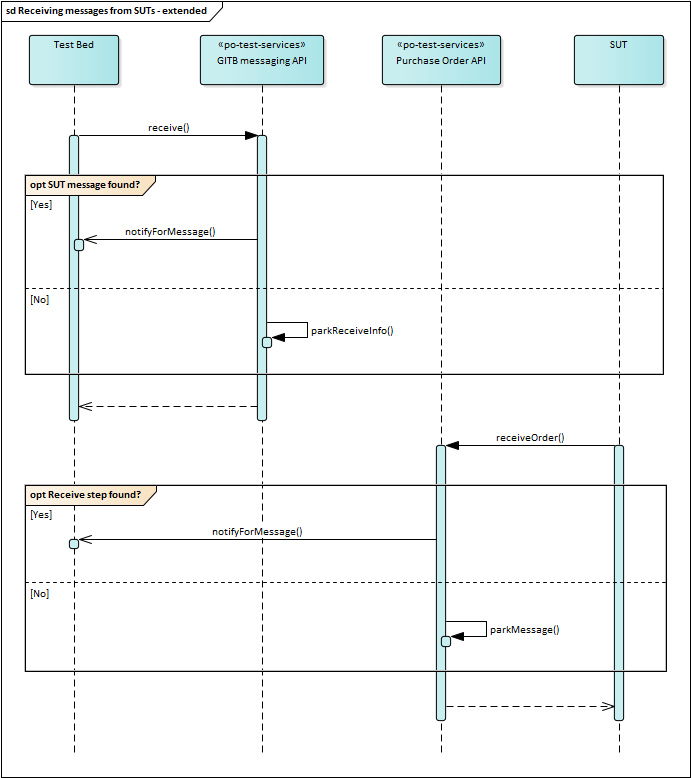
Implementation-wise, our code will match the following logic:
If we get a
receivecall from the Test Bed, check to see if there is a matching SUT message already received and if so complete immediately. Otherwise park it for later.If we get a SUT message, check to see if we have a
receivestep waiting for it, and if yes notify the Test Bed. Otherwise park the SUT message for later.
Let’s first implement the receive operation on the messaging service API. Open class org.test.gitb.MessagingServiceImpl and edit the receive method
as follows:
public Void receive(ReceiveRequest parameters) {
  LOG.info("Received 'receive' command from Test Bed for session [{}]", parameters.getSessionId());
  // Extract input.
  String vatNumber = utils.getRequiredString(parameters.getInput(), "vatNumber");
  // Manage the received call (park it for later or immediately satisfy it).
  stateManager.handleReceiveStep(new PendingReceiveStep(
        parameters.getSessionId(),
        parameters.getCallId(),
        utils.getReplyToAddressFromHeaders(wsContext).orElseThrow(),
        vatNumber
  ));
  return new Void();
}
PendingReceiveStep is a Java record we will add to the project in package org.test.state:
workspace
└── po-test-services
    └── src
        └── main
            └── java
                ├── org/test/gitb/MessagingServiceImpl.java
                └── org/test/state/PendingReceiveStep.java
This will act as a simple readonly-record of a receive step’s information for subsequent matching and callbacks:
package org.test.state;

/**
 * Information on a pending 'receive' step.
 *
 * @param sessionId The test session identifier.
 * @param callId The 'receive' step's call identifier.
 * @param callbackAddress The Test Bed's callback address.
 * @param vatNumber The VAT number for the expected received message.
 */
public record PendingReceiveStep(String sessionId, String callId, String callbackAddress, String vatNumber) {
}
From the record’s properties in effect only the vatNumber will be used for subsequent matching. The other properties are there to allow us to correctly
notify the Test Bed. Specifically:
The session identifier (
sessionId) identifies the test session we are referring to.The call identifier (
callId) identifies the specificreceivestep to respond to (in case we have multiple in parallel).The callback address (
callbackAddress) provides the endpoint URL to make the callback on (this could also be fixed in the po-test-services app’s configuration).
Notice that we are delegating all processing to class org.test.gitb.StateManager and its new method handleReceiveStep. Let’s define this initially
as empty:
/**
  * Handle a received `receive` step.
  *
  * @param stepInfo The step's information.
  */
public void handleReceiveStep(PendingReceiveStep stepInfo) {
    // TODO
}
Let’s now cover the reception of calls from SUTs. For this we will implement a new REST controller class PurchaseOrderServer in package org.test.api.
workspace
└── po-test-services
    └── src
        └── main
            └── java
                ├── org/test/api/PurchaseOrderServer.java
                ├── org/test/gitb/MessagingServiceImpl.java
                └── org/test/state/PendingReceiveStep.java
Its implementation is as follows:
package org.test.api;

import org.slf4j.Logger;
import org.slf4j.LoggerFactory;
import org.springframework.beans.factory.annotation.Autowired;
import org.springframework.http.MediaType;
import org.springframework.web.bind.annotation.*;
import org.test.gitb.StateManager;
import org.test.state.SutMessage;

/**
 * Implementation of the Purchase Order REST API to receive messages from SUTs.
 */
@RestController
public class PurchaseOrderServer {

  private static final Logger LOG = LoggerFactory.getLogger(PurchaseOrderServer.class);

  @Autowired
  private StateManager stateManager = null;

  @ResponseBody
  @PostMapping(path = "/api/{vatNumber}/receiveOrder", produces = MediaType.TEXT_PLAIN_VALUE)
  public String receiveOrder(@PathVariable("vatNumber") String vatNumber, @RequestBody String content) {
    LOG.info("Received call for VAT number {}", vatNumber);
    stateManager.handleSutMessage(new SutMessage(vatNumber, content));
    return "REF-0123456789";
  }

}
The logic here is very simple. We receive calls from SUTs at an endpoint address that includes their VAT number. We then delegate all processing to the org.test.gitb.StateManager and return a fixed reference identifier as a response. SutMessage is a Java record we will add to the project in package org.test.state:
workspace
└── po-test-services
    └── src
        └── main
            └── java
                ├── org/test/api/PurchaseOrderServer.java
                ├── org/test/gitb/MessagingServiceImpl.java
                ├── org/test/state/PendingReceiveStep.java
                └── org/test/state/SutMessage.java
The record, similar to record org.test.state.PendingReceiveStep, serves to store in a readonly way the information on received SUT calls, notably the
relevant vatNumber and the purchase order’s content.
package org.test.state;

/**
 * Information on a message received from a SUT.
 *
 * @param vatNumber The relevant VAT number.
 * @param content The message's content.
 */
public record SutMessage(String vatNumber, String content) {
}
Let’s now switch to the org.test.gitb.StateManager class to complete the implementation. We are grouping all state-related processing in a single class
(a singleton Spring component), to ensure that we avoid race conditions. All state manipulation will occur here as atomic operations wrapped by the class’s
public methods and contained within synchronized blocks. In terms of state we will maintain in parallel (a) the pending receive steps from the Test Bed,
and (b) the purchase orders received from SUTs.
package org.test.gitb;

@Component
public class StateManager {

  /** The map of in-memory active sessions. */
  private final Map<String, Map<String, Object>> sessions = new HashMap<>();
  /** Parked SUT messages for later matching against test sessions. */
  private final List<SutMessage> sutMessages = new ArrayList<>();

  ...

}
For the methods handling receive steps (from the Test Bed) and SUT messages (from the SUTs) the implementation would be as follows:
package org.test.gitb;

@Component
public class StateManager {

  ...

  /**
   * Handle a received SUT message.
   *
   * @param messageInfo The message information.
   */
  public void handleSutMessage(SutMessage messageInfo) {
    synchronized (lock) {
      if (sessions.isEmpty()) {
        // Ignore messages coming when we have no ongoing test sessions.
        LOG.info("Ignoring message received for VAT number {} as no sessions were active", messageInfo.vatNumber());
      } else {
        boolean sessionFound = false;
        for (var sessionEntry: sessions.entrySet()) {
          List<PendingReceiveStep> pendingSteps = (List<PendingReceiveStep>) sessionEntry.getValue().get("pendingSteps");
          if (pendingSteps != null && !pendingSteps.isEmpty()) {
            // We have a test session with pending 'receive' steps - look for a match.
            OptionalInt foundStepIndex = IntStream.range(0, pendingSteps.size())
                  .filter(i -> messageInfo.vatNumber().equalsIgnoreCase(pendingSteps.get(i).vatNumber()))
                  .findFirst();
            if (foundStepIndex.isPresent()) {
              // Matching 'receive' step found = notify Test Bed.
              sessionFound = true;
              PendingReceiveStep matchedStep = pendingSteps.remove(foundStepIndex.getAsInt());
              completeReceiveStepWithPurchaseOrder(matchedStep, messageInfo.content());
              LOG.info("Found session [{}] expecting a message for VAT number [{}]", matchedStep.sessionId(), matchedStep.vatNumber());
            }
          }
        }
        if (!sessionFound) {
          LOG.info("No test session was found to be expecting message for VAT number [{}]", messageInfo.vatNumber());
          sutMessages.add(messageInfo);
        }
      }
    }
  }

  /**
   * Handle a received 'receive' step.
   *
   * @param stepInfo The step's information.
   */
  public void handleReceiveStep(PendingReceiveStep stepInfo) {
    synchronized (lock) {
      // Check to see if we have an already received SUT message for the expected VAT number.
      OptionalInt foundMessageIndex = IntStream.range(0, sutMessages.size())
            .filter(i -> stepInfo.vatNumber().equalsIgnoreCase(sutMessages.get(i).vatNumber()))
            .findFirst();
      if (foundMessageIndex.isPresent()) {
        // Found matching SUT message - notify Test Bed.
        LOG.info("Found matching SUT message for test session [{}]", stepInfo.sessionId());
        SutMessage matchedMessage = sutMessages.remove(foundMessageIndex.getAsInt());
        completeReceiveStepWithPurchaseOrder(stepInfo, matchedMessage.content());
      } else {
        // SUT message not found - park step for later.
        LOG.info("Parking for later step expecting message for VAT number [{}] in session [{}]", stepInfo.vatNumber(), stepInfo.sessionId());
        if (sessions.containsKey(stepInfo.sessionId())) {
          List<PendingReceiveStep> pendingSteps = (List<PendingReceiveStep>) sessions.get(stepInfo.sessionId()).computeIfAbsent("pendingSteps", key -> new ArrayList<PendingReceiveStep>());
          pendingSteps.add(stepInfo);
        }
      }
    }
  }

  ...

}
The logic in both cases is similar: check first if we already have what we want to match and if so notify the Test Bed. Otherwise park to check again
in the future. Regarding the notification to the Test Bed, we use method completeReceiveStepWithPurchaseOrder. This would be implemented as follows:
package org.test.gitb;

@Component
public class StateManager {

  ...

  /**
   * Complete a 'receive' step by notifying the Test Bed.
   *
   * @param stepInfo The 'receive' step's information.
   * @param purchaseOrder The purchase order to return.
   */
  private void completeReceiveStepWithPurchaseOrder(PendingReceiveStep stepInfo, String purchaseOrder) {
    TAR report = utils.createReport(TestResultType.SUCCESS);
    report.getContext().getItem().add(utils.createAnyContentSimple("purchaseOrder", purchaseOrder, ValueEmbeddingEnumeration.STRING));
    testBedNotifier.notifyTestBed(stepInfo.sessionId(), stepInfo.callId(), stepInfo.callbackAddress(), report);
  }

  ...

}
See here how we are including in the report to return, the received purchase order named “purchaseOrder”. This is what allows us in the test case
to refer to it in subsequent steps as $receivePO{purchaseOrder}. As we have defined specific methods to cover our needs we can also remove the
unused generic methods from org.test.gitb.StateManager that were added through the project template. The methods you can remove would be getSessionInfo
setSessionInfo and getAllSessions.
In method handleSutMessage you may have noticed a check on whether we have active sessions or not. If not, the receive message will not be
recorded for subsequent lookups.
public void handleSutMessage(SutMessage messageInfo) {
  synchronized (lock) {
    if (sessions.isEmpty()) {
      // Ignore messages coming when we have no ongoing test sessions.
      LOG.info("Ignoring message received for VAT number {} as no sessions were active", messageInfo.vatNumber());
    } else {
      ...
    }
  }
}
This is a design choice to prevent SUT messages being indefinitely parked, whereby we only park and track them while we have ongoing test sessions. This is
why we also extend method destroySession to make sure recorded SUT messages are cleared if there are no more test sessions in progress.
public void destroySession(String sessionId) {
  synchronized (lock) {
    sessions.remove(sessionId);
    // If we have no more active test sessions discard all parked SUT messages.
    if (sessions.isEmpty()) {
      sutMessages.clear();
    }
  }
}
From a lifecycle perspective, sessions are initialised and destroyed through class org.test.gitb.MessagingServiceImpl, and specifically methods
initiate and finalize. These methods are called by the Test Bed whenever a test session is ready to start, and after it has stopped executing.
package org.test.gitb;

...

@Component
public class MessagingServiceImpl implements MessagingService {

  public InitiateResponse initiate(InitiateRequest parameters) {
    ...
    stateManager.createSession(sessionId, replyToAddress);
    ...
  }

  ...

  public Void finalize(FinalizeRequest parameters) {
    ...
    stateManager.destroySession(parameters.getSessionId());
    ...
  }

}
With these updates we conclude the Java implementation for the test case. Before trying it out make sure you rebuild and restart the po-test-services app, and also update the test suite running the deploy_test_suite.bat script.
Log into the Test Bed as the organisation user (account user@acme) and view your conformance statement updated with the newly added test case:
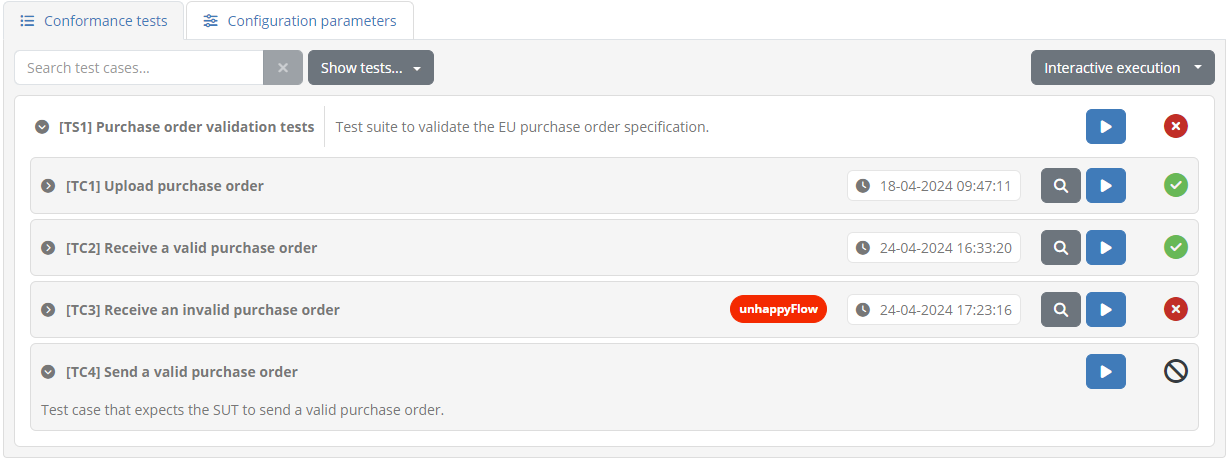
Clicking to execute this you will see its execution diagram:

Now when you click on Start to begin the test session, you will notice that the session is active and
the initial receive step is highlighted as pending.
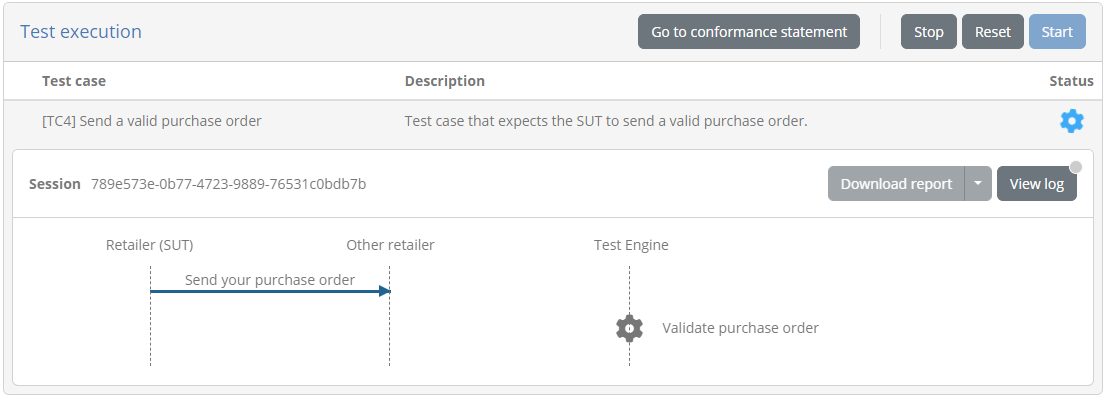
Checking the po-test-services app at this point you will see the log statements from our implementation:
...
... MessagingServiceImpl : Initiated a new session [789e573e-0b77-4723-9889-76531c0bdb7b] with callback address [http://localhost:8080/itbsrv/MessagingClient?wsdl]
... MessagingServiceImpl : Received 'receive' command from Test Bed for session [789e573e-0b77-4723-9889-76531c0bdb7b]
... StateManager         : Parking for later step expecting message for VAT number [BE0123456789] in session [789e573e-0b77-4723-9889-76531c0bdb7b]
To complete this step we will need to POST a purchase order to the po-test-services endpoint at http://localhost:7000/po/api/BE0123456789/receiveOrder.
Create a sample purchase order file in your workspace named samplePO.xml under folder samples:
workspace
├── po-test-services
├── samples
│   └── samplePO.xml
├── sut-mock
└── testSuite1
This is a syntactically valid purchase order, but that defines a past order date:
<?xml version="1.0"?>
<purchaseOrder xmlns="http://itb.ec.europa.eu/sample/po.xsd" orderDate="2022-04-15">
  <shipTo country="BE">
    <name>John Doe</name>
    <street>Europa Avenue 123</street>
    <city>Brussels</city>
    <zip>1000</zip>
  </shipTo>
  <billTo country="BE">
    <name>Jane Doe</name>
    <street>Europa Avenue 210</street>
    <city>Brussels</city>
    <zip>1000</zip>
  </billTo>
  <comment>Send in one package please</comment>
  <items>
    <item partNum="XYZ-123876">
      <productName>Mouse</productName>
      <quantity>1</quantity>
      <priceEUR>15.99</priceEUR>
      <comment>Confirm this is wireless</comment>
    </item>
    <item partNum="ABC-32478">
      <productName>Keyboard</productName>
      <quantity>1</quantity>
      <priceEUR>25.50</priceEUR>
    </item>
  </items>
</purchaseOrder>
You can submit the purchase order via the console using curl as follows (assuming execution from the workspace root folder):
curl -X POST -H "Content-Type: application/xml" -d @samples/samplePO.xml http://localhost:7000/po/api/BE0123456789/receiveOrder
This will result in the returned reference identifier (“REF-0123456789”) being printed on console. More importantly we see now that the test session has completed with a validation failure:
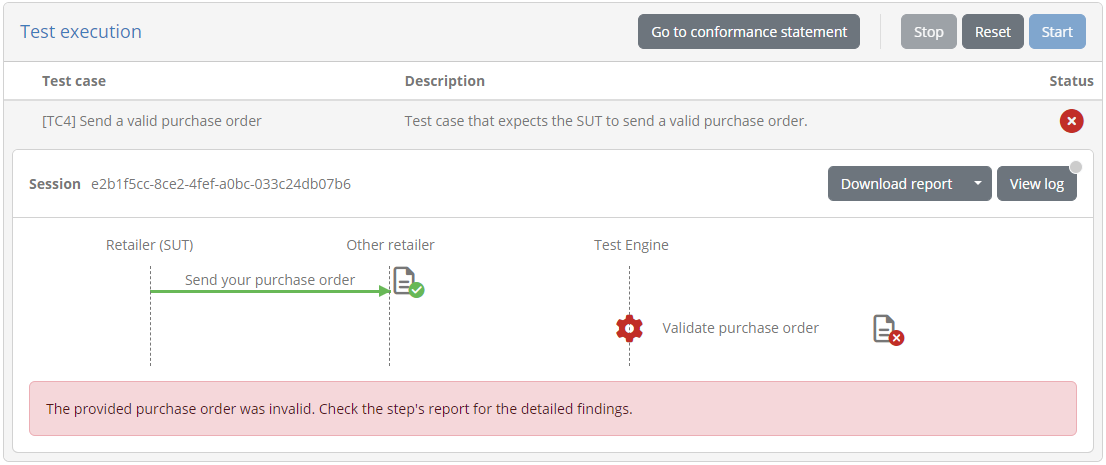
Clicking the step’s report we can see that, as expected, the purchase order was rejected due to the date not being current:
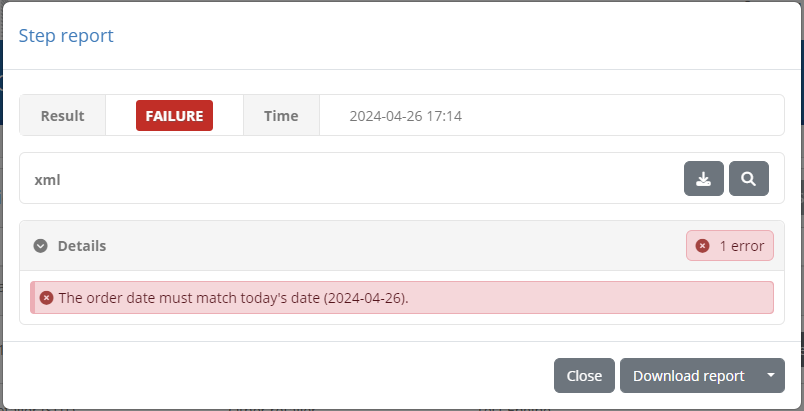
Moreover we can click on the listed error to view it within the validated purchase order.
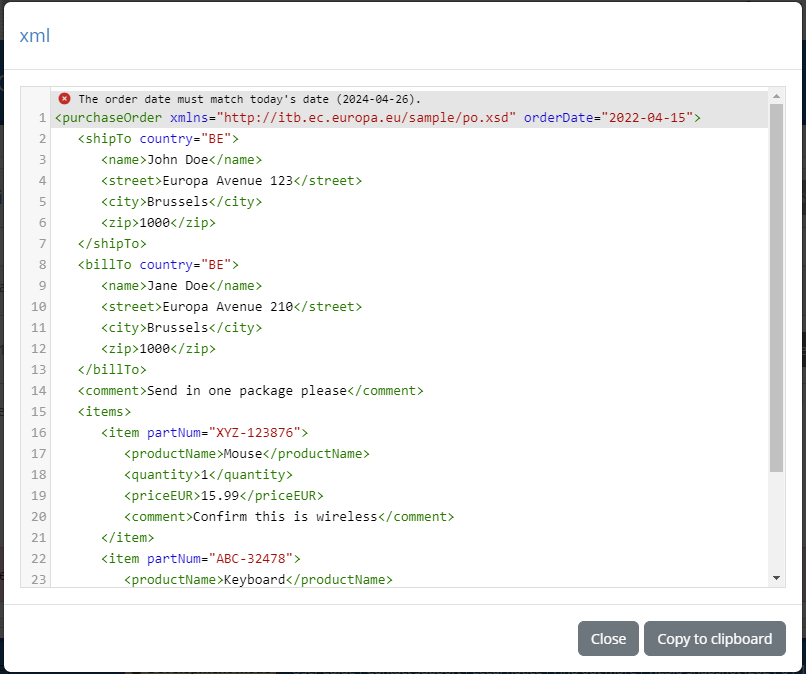
Finally, as a last check you can see that the exchange and notification were also logged in the po-test-services app:
...
... PurchaseOrderServer  : Received call for VAT number [BE0123456789]
... StateManager         : Found session [789e573e-0b77-4723-9889-76531c0bdb7b] expecting a message for VAT number [BE0123456789]
... TestBedNotifier      : Notifying Test Bed for session [789e573e-0b77-4723-9889-76531c0bdb7b]
... MessagingServiceImpl : Finalising session [789e573e-0b77-4723-9889-76531c0bdb7b]
This completes the third and final test case for the EU Purchase Order API. The steps that follow are bonus steps to highlight additional concepts and make further improvements.
Bonus step: Reuse steps with scriptlets
Once you start creating several test cases you will see that certain parts start getting repeated. Already with the limited test cases you created we have seen a couple elements repeat:
The generation of the current order date in the expected format.
The sending of a purchase order in both valid and invalid cases.
Such steps, or also entire sequences of steps, represent good reuse candidates. The GITB TDL offers the scriptlet concept precisely for this purpose: to define and reuse common building blocks. Scriptlets can be seen as the equivalent of functions, defining their own scope, optional input parameters, and optional outputs; that can be called as needed by test cases and other scriptlets.
Let’s first define a scriptlet for the order date generation. Create a folder scriptlets under testSuite1, and within it file createOrderDate.xml.
workspace
├── po-test-services
├── samples
├── sut-mock
└── testSuite1
    ├── resources
    ├── scriptlets
    │   └── createOrderDate.xml
    ├── testCases
    └── testSuite.xml
Define the contents of this file as follows:
<?xml version="1.0" encoding="UTF-8"?>
<scriptlet id="createOrderDate" xmlns="http://www.gitb.com/tdl/v1/">
  <steps>
    <process output="orderDate" handler="TokenGenerator" operation="timestamp">
      <input name="format">"yyyy-MM-dd"</input>
    </process>
  </steps>
  <output name="orderDate"/>
</scriptlet>
Even though this includes only a single step, it is still interesting to refactor into a scriptlet in case we need to change the implementation. For example if the date format changes, we will only need to update it here rather than modify potentially dozens of test cases.
Scriptlets are used via the call step. We will do this now in the related test cases, specifically testCase2.xml and testCase4.xml.
workspace
├── po-test-services
├── samples
├── sut-mock
└── testSuite1
    ├── resources
    ├── scriptlets
    ├── testCases
    │   ├── testCase1.xml
    │   ├── testCase2.xml
    │   ├── testCase3.xml
    │   └── testCase4.xml
    └── testSuite.xml
Adapt testCase2.xml to use the scriptlet:
<steps stopOnError="true">
  <!-- Create the order date. -->
  <call output="orderDate" path="scriptlets/createOrderDate.xml"/>
  ...
</steps>
And also similarly testCase4.xml:
<steps stopOnError="true">
  <!-- Calculate the current date. -->
  <call output="expectedOrderDate" path="scriptlets/createOrderDate.xml"/>
  ...
</steps>
Note
Scriptlet paths in call steps are considered relative to their containing test suite root folder.
Having refactored the order date creation into a simple scriptlet, we can now proceed to the sending of a purchase order. Create within the scriptlets folder a new file sendPurchaseOrder.xml.
workspace
├── po-test-services
├── samples
├── sut-mock
└── testSuite1
    ├── resources
    ├── scriptlets
    │   ├── createOrderDate.xml
    │   └── sendPurchaseOrder.xml
    ├── tests
    └── testSuite.xml
Now define the file’s contents as follows:
<?xml version="1.0" encoding="UTF-8"?>
<scriptlet id="sendPurchaseOrder" xmlns="http://www.gitb.com/tdl/v1/">
  <params>
    <var name="description" type="string"><value>Receive purchase order</value></var>
    <var name="purchaseOrder" type="binary"/>
  </params>
  <steps>
    <!-- Send the purchase order to the SUT. -->
    <send id="sendData" desc="$description" handler="$DOMAIN{messagingServiceAddress}">
      <input name="purchaseOrder">$purchaseOrder</input>
      <input name="endpoint">$SYSTEM{endpointAddress}</input>
    </send>
  </steps>
  <output name="sendData"/>
</scriptlet>
There a couple of noteworthy points here compared to the simpler createOrderDate.xml scriptlet. First of all this scriptlet expects parameters,
namely the purchase order to send as well as the description to show for the step. The description in particular is an optional parameter as
it defines a default value. If not provided, the step’s description will be “Receive purchase order” but this can be set explicitly as in the case where
we send an invalid file to the SUT. In addition, note here how $SYSTEM{endpointAddress} is referred to within the scriptlet as this is common for
all test cases.
Note
Step descriptions can be set dynamically only within scriptlets, and as long as the value can be determined when the test case is loaded.
Let’s now call the scriptlet from testCase2.xml and testCase3.xml.
workspace
├── po-test-services
├── samples
├── sut-mock
└── testSuite1
    ├── resources
    ├── scriptlets
    ├── testCases
    │   ├── testCase1.xml
    │   ├── testCase2.xml
    │   ├── testCase3.xml
    │   └── testCase4.xml
    └── testSuite.xml
Edit testCase2.xml to use the scriptlet:
<steps stopOnError="true">
  ...
  <!-- Send the purchase order to the SUT. -->
  <call output="sendPO" path="scriptlets/sendPurchaseOrder.xml">
    <input name="purchaseOrder">$purchaseOrder</input>
  </call>
  ...
</steps>
And also similarly testCase3.xml:
<steps stopOnError="true">
  <!-- Send the purchase order to the SUT. -->
  <call output="sendPO" path="scriptlets/sendPurchaseOrder.xml">
      <input name="description">"Receive invalid purchase order"</input>
      <input name="purchaseOrder">$purchaseOrder</input>
  </call>
  ...
</steps>
You can now update the test suite by running the deploy_test_suite.bat script. You will notice when re-executing the adapted test cases, that there is no visual difference when using scriptlets. We have nonetheless improved our setup by defining the first set of reusable test case building blocks.
As a final note, consider that you can naturally execute scriptlets also from within other scriptlets, not just test cases. In addition, you can even call scriptlets from other test suites by referring to their containing test suite’s identifier. This is out of scope for the current guide but you can find out more in the GITB TDL documentation.
Bonus step: Add instruction prompts and log feedback
To facilitate users of your testing service, especially newcomers, it is always a good idea to provide as much feedback as possible on what is expected from them. Such feedback would be especially important for test cases that suspend until the SUT sends a message, such as the one we included previously to receive a purchase order from the SUT.
The GITB TDL foresees two main ways of sharing feedback to users:
Displaying popup prompts to users via the interact step.
Adding messages to the test session log via the log step.
Regarding logging, it is interesting to note that besides using the log step, you may also add messages remotely through the GITB service APIs, in our
case via the po-test-services app. We will now extend the third test case we added to add both a user prompt and log message. In addition, we will make this
as reusable as possible by defining such feedback actions in a scriptlet.
Let’s define this now under the test suite’s scriptlets folder as file informUser.xml.
workspace
├── po-test-services
├── samples
├── sut-mock
└── testSuite1
    ├── resources
    ├── scriptlets
    │   ├── createOrderDate.xml
    │   ├── informUser.xml
    │   └── createOrderDate.xml
    ├── testCases
    └── testSuite.xml
The contents of this file will initially be as follows:
<?xml version="1.0" encoding="UTF-8"?>
<scriptlet id="informUser" xmlns="http://www.gitb.com/tdl/v1/">
  <params>
    <var name="message" type="string"/>
  </params>
  <steps>
    <!-- Add the message to the log. -->
    <log>$message</log>
    <!-- Show feedback prompt. -->
    <interact hidden="true" inputTitle="Test information" desc="Inform user">
      <instruct desc="Next step" forceDisplay="true">$message</instruct>
    </interact>
  </steps>
</scriptlet>
See here how the feedback message is passed as a parameter and then used first to add a log statement and then to display a user interaction popup.
For the popup, using step interact we also set the step as hidden so that the execution diagram does not show the interaction as a meaningful
test step. Like this, the step is not displayed on the diagram but is nonetheless executed. The forceDisplay attribute ensures that the provided
message is always displayed inline, rather than use a code editor if found to exceed the inline display threshold.
To use this scriptlet adapt testCase4.xml where we expect the SUT to send a message.
workspace
├── po-test-services
├── samples
├── sut-mock
└── testSuite1
    ├── resources
    ├── scriptlets
    ├── testCases
    │   ├── testCase1.xml
    │   ├── testCase2.xml
    │   ├── testCase3.xml
    │   └── testCase4.xml
    └── testSuite.xml
We will now call the scriptlet just before the receive step. We will also move the call step defining the expectedOrderDate before, so that
we can construct a message referencing both the VAT number to use on the call as well as the expected date:
<steps stopOnError="true">
  <!-- Strip all spaces and dots from the configured VAT number. -->
  <assign to="formattedVatNumber">translate($ORGANISATION{vatNumber}, " .", "")</assign>
  <!-- Calculate the current date. -->
  <call output="expectedOrderDate" path="scriptlets/createOrderDate.xml"/>
  <!-- Inform user. -->
  <call path="scriptlets/informUser.xml">
    <input name="message">"Please use your assigned endpoint for " || $formattedVatNumber || " to send a purchase order for validation. The order date must match the current date (" || $expectedOrderDate || ")."</input>
  </call>
  <!-- Receive a purchase order from the SUT. -->
  <receive>...</receive>
  ...
</step>
See here how the message to show to the user is constructed based on the VAT number and current date to make it more precise rather than a generic instruction. Now you can finish the test suite update by running the deploy_test_suite.bat script.
To try this out connect as the ACME organisation user (account user@acme), select My conformance statements, and from the conformance statement detail
screen execute test case [TC4] Send a valid purchase order. Before starting the test you will notice that the execution diagram remains unchanged even
though we added the new (hidden) interact step:
Clicking on Start will now display as a first step the feedback message to the user.
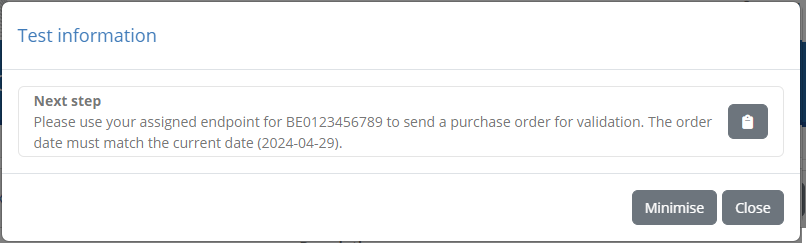
From here clicking on Close will dismiss the popup, concluding the interact step, before proceeding to the receive step. Note that our implementation
in po-test-services to address race conditions ensures that the SUT message will be picked up regardless of whether the user sends it before or after the
feedback popup is closed. Clicking on View log you will also see the log message that was added with the same feedback message:
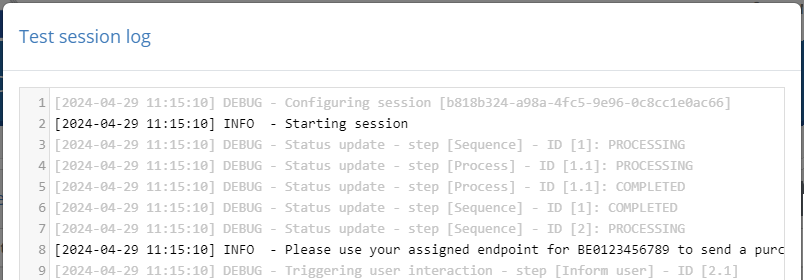
With respect to logging, we might want to also add log statements from the side of the po-test-services app. We will do this now, to log the precise point when the po-test-services is expecting to receive a SUT message.
Open class org.test.gitb.StateManager and adapt method handleReceiveStep as follows:
public void handleReceiveStep(PendingReceiveStep stepInfo) {
  synchronized (lock) {
    ...
    if (foundMessageIndex.isPresent()) {
      ...
    } else {
      // SUT message not found - park step for later.
      LOG.info("Parking for later step expecting message for VAT number [{}] in session [{}]", stepInfo.vatNumber(), stepInfo.sessionId());
      ...
      testBedNotifier.sendLogMessage(stepInfo.sessionId(), stepInfo.callbackAddress(), "Ready to receive SUT message for VAT number [%s].".formatted(stepInfo.vatNumber()), LogLevel.INFO);
    }
  }
}
We could have also wrapped the existing LOG.info call to make both actions (log locally and on the Test Bed). We chose not to do this keeping in mind
that the test session log is for your end users and might need to differ from your internal logs.
Restarting the po-test-services app and relaunching the test session will show the new log message in the test session log:
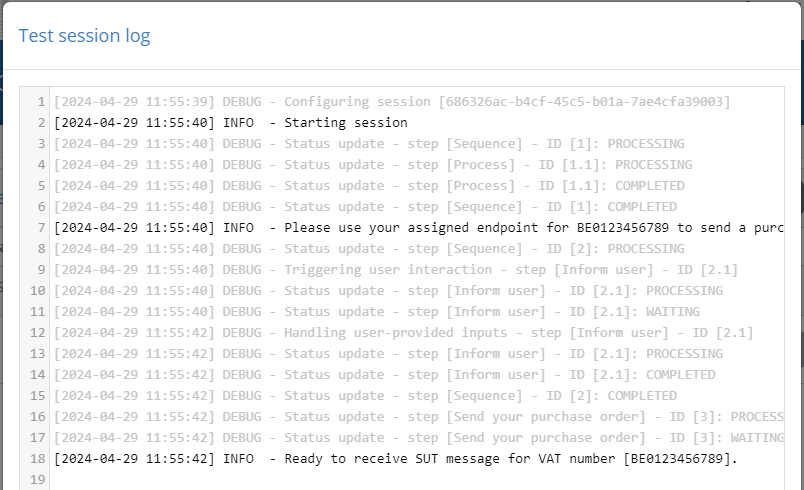
We have now added instruction feedback prompts and log statements to our test case. There is however one additional improvement we can consider making, particularly on the feedback prompts. When users execute your test cases for the first few times they will be happy to get such verbose guidance. However, after having completed several test sessions they may prefer to not get stopped every time to close instruction prompts. Consider that up to now we only added one such prompt in a single test case, but it could be that you have multiple across several test cases and even several prompts within the same test case. To address this we will allow the user to toggle such verbose help on and off.
To do this we will adapt our informUser.xml scriptlet to check a flag set as a custom organisation property,
and an if step marked as static:
<scriptlet>
  <params>...</params>
  <steps>
    <!-- Add the message to the log. -->
    <log>$message</log>
    <!-- Show feedback prompt. -->
    <if static="true">
      <cond>$ORGANISATION{helpOn} = "Y"</cond>
      <then>
        <interact hidden="true" inputTitle="Test information" desc="Inform user">
          <instruct desc="Next step" forceDisplay="true">$message</instruct>
        </interact>
      </then>
    </if>
  </steps>
</scriptlet>
An if set as static means that it is evaluated upon test case load time rather than when the step executes. The result
is to include only the set of steps in the then or else (if present) block depending on the checked condition. This contrasts
it to a dynamic if (the default) that runs its then or else steps depending on the session’s state, and represents the
logical branching on the execution diagram.
An alternative approach would have been to use the skipped attribute on the interact step. The skipped attribute is
similarly evaluated at test case load time but needs to be set to either a fixed boolean value or a variable that can evaluate as
a boolean (provided with values “true” or “false”). This approach would have looked as follows:
<scriptlet>
  <params>...</params>
  <steps>
    <!-- Add the message to the log. -->
    <log>$message</log>
    <!-- Show feedback prompt. -->
    <interact skipped="$ORGANISATION{skipHelp}" hidden="true" inputTitle="Test information" desc="Inform user">
      <instruct desc="Next step" forceDisplay="true">$message</instruct>
    </interact>
  </steps>
</scriptlet>
The skipped attribute is a simple alternative to an if set as static but is less powerful. It does not support full conditions,
neither does it support an alternative set of steps. For the purpose of this guide we will use the if approach.
Connect now to the Test Bed as the community administrator (account admin@po), go to the Community management screen and from here select to Edit custom member properties. Select to create a new organisation level property and complete the displayed form:
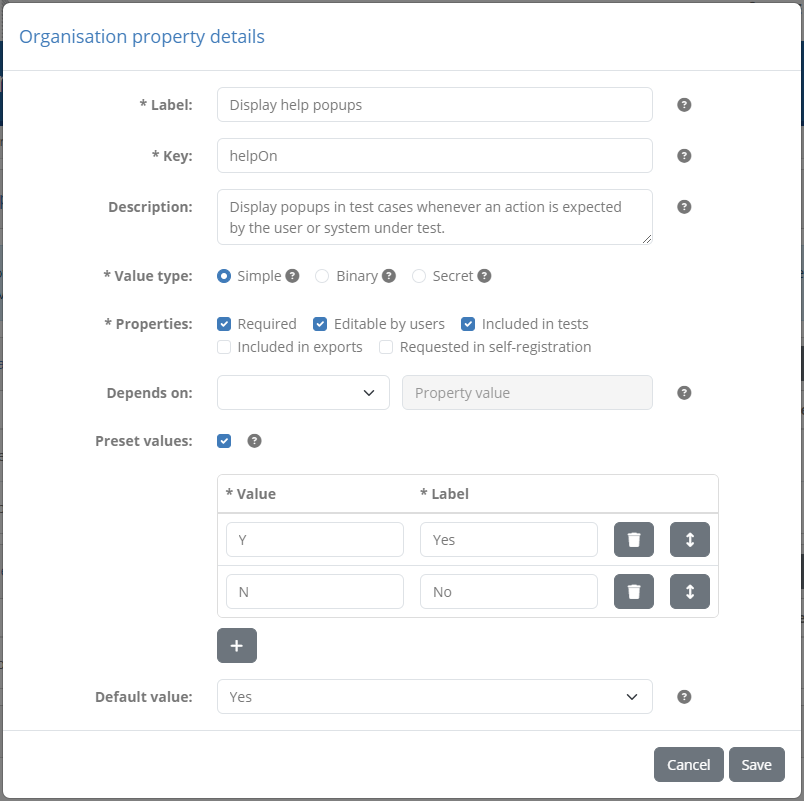
The values to use are as follows:
Label: Display help popups
Key: helpOn
Description: Display popups in test cases whenever an action is expected by the user or system under test.
Value type: Simple
Properties: Check Required, Editable by users and Included in tests
Preset values: Add values Y and N labelled as Yes and No
Default value: Set to Yes
With this property created, you will notice that when viewing the ACME retailing organisation’s details, the new property is now displayed. As this organisation already existed when the property was created you will need to set its value explicitly, however for new organisations verbose help will be on by default.

With this property users can now toggle on and off instruction popups as part of their organisation’s configuration.
Bonus step: Document your test cases
To facilitate users when executing your test cases, the Test Bed allows complementing their definitions with rich documentation. Such documentation can describe the steps to be carried out, list prerequisites, or link to online resources for further information. Rich documentation is supported for test suites, test cases and individual test steps, displayed upon request in popups. Test case documentation in particular is also included in PDF test case reports.
We will proceed to add rich documentation for the first test case we added. The documentation will include the definition of the test case, describe its steps in a list and also via a sequence diagram, and finally include a link to online resources.
As a first step we will add to the Test Bed the following sequence diagram (you can download this here):
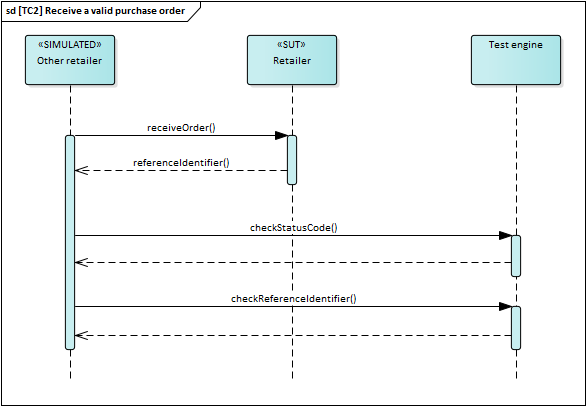

Connect as the community administrator (account admin@po), go to the Community management screen and switch to the Resources tab.

Click Upload resource and upload the diagram, providing also a description of “Sequence diagram for TC2.” before clicking Save.
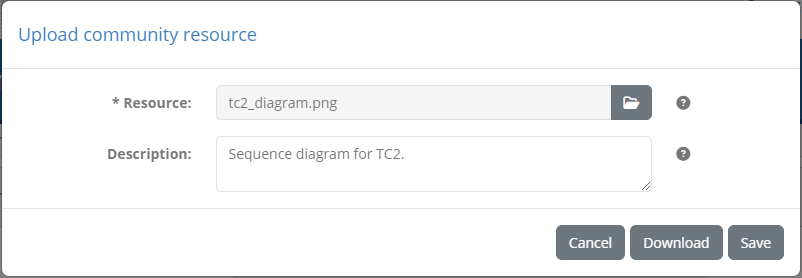
The diagram is now listed as a community resource, files that are accessible only to community members and can be used in any rich content defined for the community.

Now switch to the Domain management screen, and in sequence select the EU Purchase Order v1.0 specification, followed by testSuite1 and finally testCase2_send. This brings you to the test case’s detail screen:
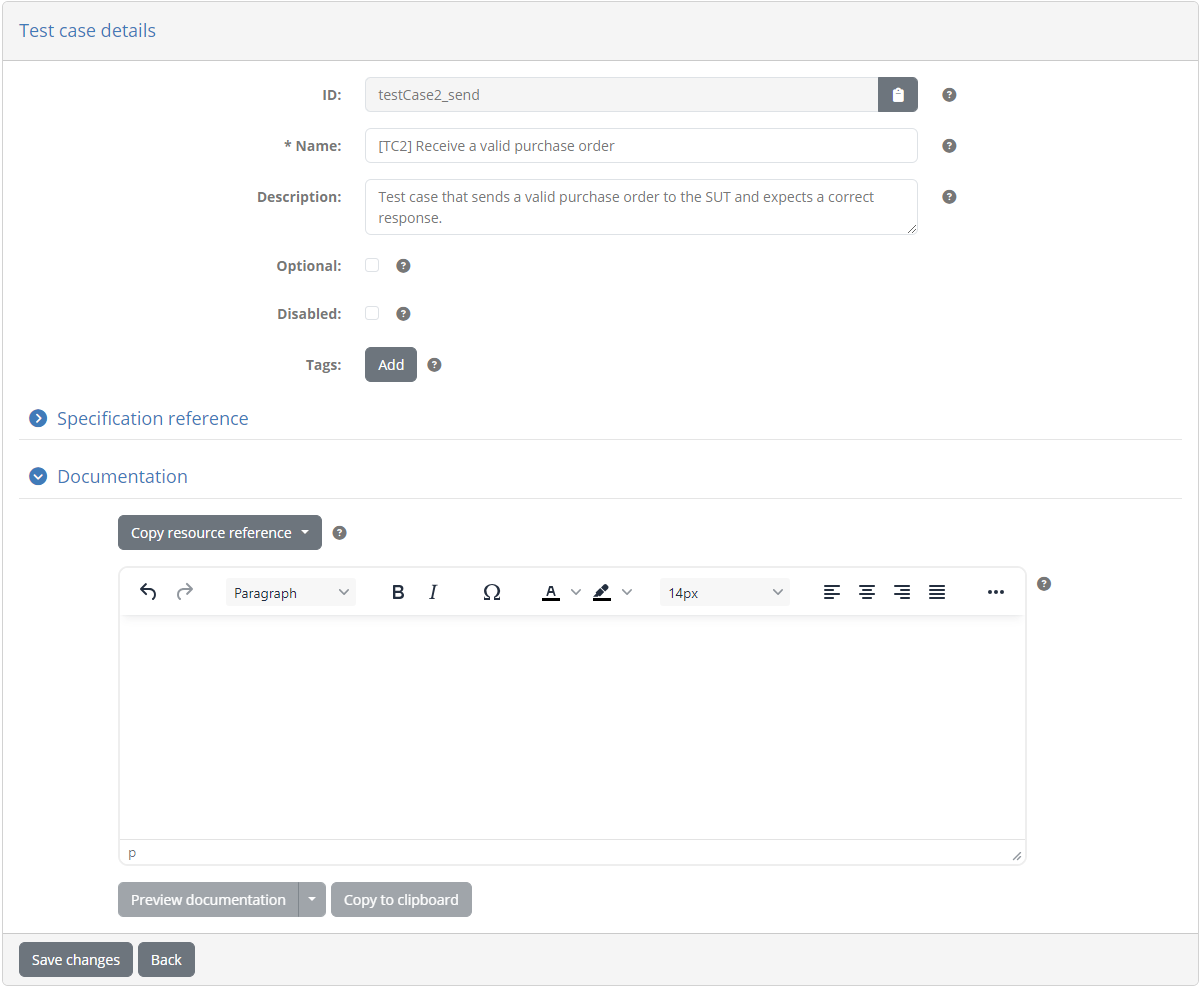
You will notice here the expandable Documentation section, which provides an editor to define the documentation content. As part of this notice the Copy resource reference button that allows you to search and copy the reference to use for the diagram you added previously. The copied resource reference can then be added as the source of an image.
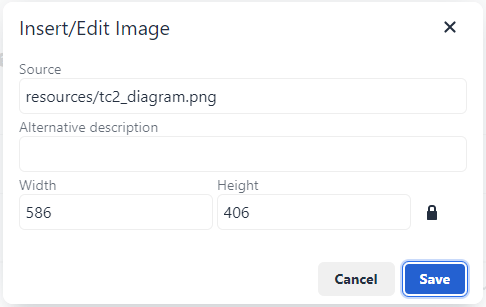
Note that you are not limited to using community resources for images. You can include any file, and then add a link for it providing the resource reference as the URL (for example link to a user guide PDF document). While editing the content you can click Preview documentation to see the end result, and also use the Preview documentation in PDF report option to see if it works as you expect in PDF reports. When you’re satisfied with the result click on Save changes.
As an additional step, we will add the test case’s documentation directly in the test suite archive. It is interesting to do this if we want to continue managing test suite metadata through the test suite archive and the REST API. Otherwise, if set to update specification metadata, a test suite deployment (manual or via REST API) would remove documentation added only through the user interface. While still on the test case details screen click Copy to clipboard beneath the editor.
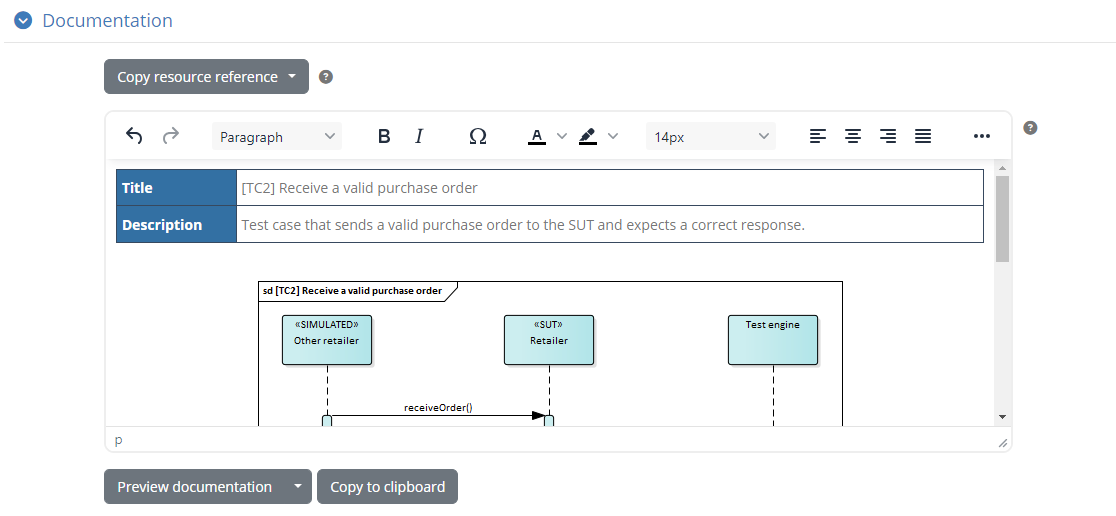
This copies to your clipboard the HTML source included in the editor. Now create in your test suite archive a new folder named docs, and within it file testCase2.html.
workspace
├── po-test-services
├── samples
├── sut-mock
└── testSuite1
    ├── docs
    │   └── testCase2.html
    ├── resources
    ├── scriptlets
    ├── testCases
    └── testSuite.xml
For the contents of this file you can paste the HTML copied earlier from the test case. Now switch to the test case definition in testCase2.xml
and edit its metadata to point to the HTML file:
<testcase>
  <metadata>
    <gitb:name>[TC2] Receive a valid purchase order</gitb:name>
    <gitb:version>1.0</gitb:version>
    <gitb:description>Test case that sends a valid purchase order to the SUT and expects a correct response.</gitb:description>
    <gitb:documentation import="docs/testCase2.html"/>
  </metadata>
  <imports>...</imports>
  <actors>...</actors>
  <steps>...</steps>
  <output>...</output>
</testcase>
Finally, remember to update the test suite by running the deploy_test_suite.bat script.
You can now access the documentation through the Test Bed’s user interface. Log on as ACME’s user (account user@acme), and navigate to the conformance statement’s details. In the list of test cases you will now see a documentation icon at the right of [TC2] Receive a valid purchase order.
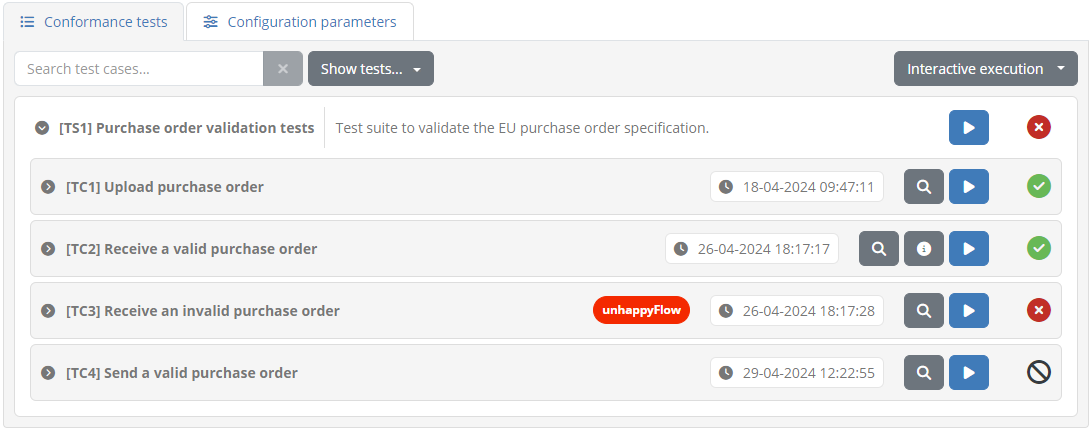
Clicking this will open a popup dialog displaying the test case’s documentation.
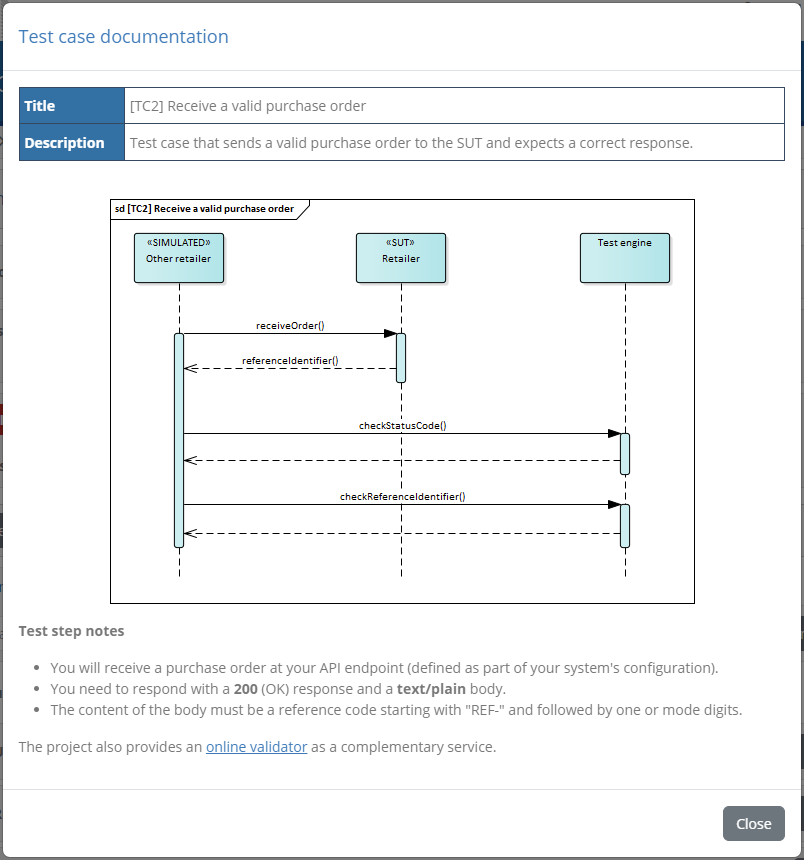
Bonus step: Extend your test services
Up to now we have used the po-test-services application purely as a messaging service extension for our test cases. As you have seen however, the GITB test service APIs also include validation and processing services.
If you find the need to include such extensions you may be tempted to re-execute the service template project to create additional applications per API. Although the result would be perfectly functional it would be overkill to create three (or more) distinct applications, each implementing a different API. In contrast, the most efficient approach is to have a single application that contains all your supporting services. This is why we named our supporting application po-test-services rather than e.g. po-messaging-service.
To illustrate how you would extend this for new API implementations, let’s assume you want to move the reference identifiers’ validation to a custom validation service. Create class org.test.gitb.ValidationServiceImpl as follows:
package org.test.gitb;

import com.gitb.tr.TestResultType;
import com.gitb.vs.*;
import com.gitb.vs.Void;
import org.springframework.beans.factory.annotation.Autowired;
import org.springframework.stereotype.Component;

/**
 * Spring component that realises the validation service.
 */
@Component
public class ValidationServiceImpl implements ValidationService {

  @Autowired
  private Utils utils = null;

  /**
   * Return empty definition.
   *
   * @param aVoid No parameters expected.
   * @return An empty definition.
   */
  @Override
  public GetModuleDefinitionResponse getModuleDefinition(Void aVoid) {
    return new GetModuleDefinitionResponse();
  }

  /**
   * Implement a verify step's validation.
   *
   * @param validateRequest The step's inputs and metadata.
   * @return The validation response.
   */
  @Override
  public ValidationResponse validate(ValidateRequest validateRequest) {
    // TODO add your validation logic here.
    ValidationResponse response = new ValidationResponse();
    response.setReport(utils.createReport(TestResultType.SUCCESS));
    return response;
  }
}
With the service implementation in place, you now need to publish the endpoint. Do this by adapting class org.test.gitb.ServiceConfig as follows:
package org.test.gitb;

...

/**
 * Configuration class responsible for creating the Spring beans required by the service.
 */
@Configuration
public class ServiceConfig {

  /**
   * The CXF endpoint that will serve validation service calls.
   *
   * @return The endpoint.
   */
  @Bean
  public EndpointImpl validationService(Bus cxfBus, ValidationServiceImpl validationServiceImplementation) {
      EndpointImpl endpoint = new EndpointImpl(cxfBus, validationServiceImplementation);
      endpoint.setServiceName(new QName("http://www.gitb.com/vs/v1/", "ValidationService"));
      endpoint.setEndpointName(new QName("http://www.gitb.com/vs/v1/", "ValidationServicePort"));
      endpoint.publish("/validation");
      return endpoint;
  }

  ...

}
If you restart the po-test-services application the validation service would be accessible at http://localhost:7000/po/services/validation?wsdl.
Putting this in a domain parameter as http://host.docker.internal:7000/po/services/validation?wsdl, you could then use this from test case verify steps as follows:
<verify desc="Validate identifier" handler="$DOMAIN{validationServiceAddress}">
  <input name="identifier">$identifier</input>
</verify>
Note
Referring to the Docker host: You are using here host.docker.internal as the value, given that the Test Bed (specifically the gitb-srv container) needs to access the
validation service running on your localhost. Note that this special address is Windows-specific - if on Linux use 172.17.0.1.
The approach is very similar when it comes to custom processing needs. An example could be if you need to generate reference identifiers that require
a non-trivial generation algorithm. This could be provided via a process step using a custom processing handler that will provide the generated
identifier as an output. To define such a service create class org.test.gitb.ProcessingServiceImpl as follows:
package org.test.gitb;

import com.gitb.ps.*;
import com.gitb.ps.Void;
import com.gitb.tr.TestResultType;
import org.springframework.beans.factory.annotation.Autowired;
import org.springframework.stereotype.Component;

/**
 * Spring component that realises the processing service.
 */
@Component
public class ProcessingServiceImpl implements ProcessingService {

  @Autowired
  private Utils utils = null;

  /**
   * Return empty definition.
   *
   * @param aVoid No parameters expected.
   * @return An empty definition.
   */
  @Override
  public GetModuleDefinitionResponse getModuleDefinition(Void aVoid) {
    return new GetModuleDefinitionResponse();
  }

  /**
   * Implement a process step's logic.
   *
   * @param processRequest The step's parameters and metadata.
   * @return The output and step report.
   */
  @Override
  public ProcessResponse process(ProcessRequest processRequest) {
    // TODO add your processing logic here.
    ProcessResponse response = new ProcessResponse();
    response.setReport(utils.createReport(TestResultType.SUCCESS));
    return response;
  }

  /**
   * Empty implementation.
   *
   * @param beginTransactionRequest The step's parameters and metadata.
   * @return The response.
   */
  @Override
  public BeginTransactionResponse beginTransaction(BeginTransactionRequest beginTransactionRequest) {
    return new BeginTransactionResponse();
  }

  /**
   * Empty implementation.
   *
   * @param basicRequest The step's parameters and metadata.
   * @return An empty response.
   */
  @Override
  public Void endTransaction(BasicRequest basicRequest) {
    return new Void();
  }
}
Similarly you now need to publish the endpoint. Do this by adapting class org.test.gitb.ServiceConfig as follows:
package org.test.gitb;

...

/**
 * Configuration class responsible for creating the Spring beans required by the service.
 */
@Configuration
public class ServiceConfig {

  /**
   * The CXF endpoint that will serve processing service calls.
   *
   * @return The endpoint.
   */
  @Bean
  public EndpointImpl processingService(Bus cxfBus, ProcessingServiceImpl processingServiceImplementation) {
      EndpointImpl endpoint = new EndpointImpl(cxfBus, processingServiceImplementation);
      endpoint.setServiceName(new QName("http://www.gitb.com/ps/v1/", "ProcessingServiceService"));
      endpoint.setEndpointName(new QName("http://www.gitb.com/ps/v1/", "ProcessingServicePort"));
      endpoint.publish("/process");
      return endpoint;
  }

  ...

}
Restarting the po-test-services application the processing service would be accessible at http://localhost:7000/po/services/process?wsdl.
Putting this in a domain parameter as http://host.docker.internal:7000/po/services/process?wsdl, you could then use this from test case process steps as follows (note, you could also include inputs here):
<process output="identifier" desc="Generate identifier" handler="$DOMAIN{processingServiceAddress}"/>
Note
Referring to the Docker host: You are using here host.docker.internal as the value, given that the Test Bed (specifically the gitb-srv container) needs to access the
processing service running on your localhost. Note that this special address is Windows-specific - if on Linux use 172.17.0.1.
Finally, you may want instead of adding new services to also support additional use cases linked to the same service API. For example, we may want to
add further custom messaging send operations in addition to what we already cover. Similarly here, you could create a new service endpoint
within the same po-test-services application which would work as expected. This would add however unnecessary development and configuration overhead as
we could simply reuse the existing org.test.gitb.MessagingServiceImpl class and its send method.
A simple approach would be to foresee an additional input, named for example “type” and passed by test case send steps, to help the implementation
distinguish what it is expected to do. Depending on the specified “type” we could then look up different sets of inputs, take different actions and produce
different reports. In the end the send and receive operations can be seen as simply a common entry point from which you can branch out to the different
actions to take.
public SendResponse send(SendRequest parameters) {
  LOG.info("Received 'send' command from Test Bed for session [{}]", parameters.getSessionId());
  SendResponse response = new SendResponse();
  // Determine operation type.
  String operationType = utils.getRequiredString(parameters.getInput(), "type");
  // Proceed and delegate depending on operation type.
  switch (operationType) {
      case "validPurchaseOrder" -> {
          // TODO Send a valid purchase order: extract inputs, take actions and produce report.
      }
      case "invalidPurchaseOrder" -> {
          // TODO Send an invalid purchase order: extract inputs, take actions and produce report.
      }
      case "validInvoice" -> {
          // TODO Send a valid invoice: extract inputs, take actions and produce report.
      }
      default -> throw new IllegalArgumentException("Unexpected operationType [%s]".formatted(operationType));
  }
  return response;
}
To conclude, it should be clear that any project making use of custom test services should have:
A single supporting service application.
At most one of each API implementation type.
Anything more than this would work without problems but would be incurring higher resource use, development effort and configuration overhead.
Bonus step: Share your setup as a preconfigured package
Besides setting up your local test environment you will likely want to share this with others. This can be easily achieved through the Test Bed’s export and import capabilities. In brief:
You export the community with its domain, and if needed, the applicable system settings, from the source environment.
In the target environment you create a new domain and linked community as placeholders, and then import the archive from the previous step.
The target environment will now have a copy of your setup, lacking only the po-test-services application (unless a common instance is used).
What do you do however if you want to use your current setup to create a full self-contained and preconfigured environment for others to reuse? The goal would be for another user to simply install a test package, start it, and then begin using it without any manual imports or service deployments. This is exactly what the Test Bed’s sandbox instance concept is used for.
Note
There exists a detailed guide focusing specifically on sandbox instances. The current guide takes one of the available approaches to create such a package for your current setup.
To begin with let’s first connect as the community administrator (account admin@po) and navigate to Data export. From here select Community configuration, specify an export password of sandbox, and click the All button from the options’ table to include everything.
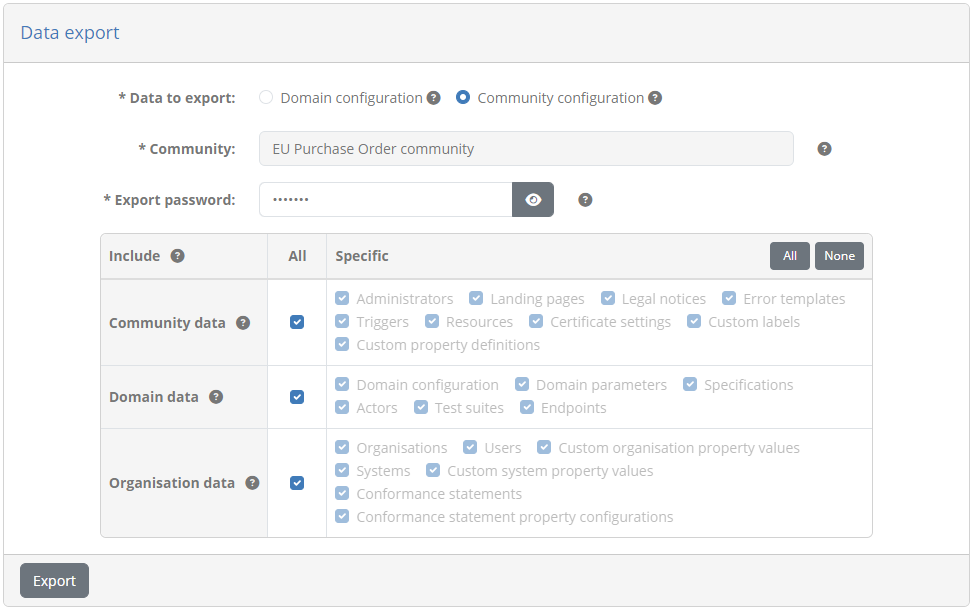
Clicking on Export will create and download an archive named export.zip including your community’s full configuration. This is an encrypted archive protected with the sandbox password you entered. Place the archive in your workspace in a data folder as follows:
workspace
├── data
│   └── export.zip
├── po-test-services
├── samples
├── sut-mock
├── testSuite1
└── deploy_test_suite.bat
Now add in the workspace the Test Bed’s installation docker-compose.yml file:
workspace
├── data
│   └── export.zip
├── po-test-services
├── samples
├── sut-mock
├── testSuite1
├── deploy_test_suite.bat
└── docker-compose.yml
The initial contents of this file are as follows:
volumes:
   gitb-repo:
   gitb-dbdata:

services:
   gitb-redis:
      image: isaitb/gitb-redis
      container_name: itb-redis
      restart: unless-stopped
   gitb-mysql:
      image: isaitb/gitb-mysql
      container_name: itb-mysql
      restart: unless-stopped
      volumes:
       - gitb-dbdata:/var/lib/mysql
      healthcheck:
       test: "/usr/bin/mysql --user=root --password=$$MYSQL_ROOT_PASSWORD --execute \"SHOW DATABASES;\""
       interval: 3s
       retries: 50
   gitb-srv:
      image: isaitb/gitb-srv
      container_name: itb-srv
      restart: unless-stopped
      environment:
       - CALLBACK_ROOT_URL=http://localhost:8080/itbsrv
      ports:
       - "8080:8080"
   gitb-ui:
      image: isaitb/gitb-ui
      container_name: itb-ui
      restart: unless-stopped
      ports:
       - "9000:9000"
      environment:
       - THEME=ec
      volumes:
       - gitb-repo:/gitb-repository
      depends_on:
       gitb-redis:
         condition: service_started
       gitb-mysql:
         condition: service_healthy
       gitb-srv:
         condition: service_started
As this will be a self-contained service, we will adapt the installation script accordingly. Starting with the gitb-srv service
we will update it as follows:
Adapt the
CALLBACK_ROOT_URLvariable to set it with the internal address within the Dockerised service. This is used in the final callback URL communicated to supporting services.Remove the host port mapping as access from the po-test-services app will be internal to the Dockerised service.
...

services:
  gitb-redis:
    ...
  gitb-mysql:
    ...
  gitb-srv:
    image: isaitb/gitb-srv
    restart: unless-stopped
    environment:
     - CALLBACK_ROOT_URL=http://gitb-srv:8080/itbsrv
  gitb-ui:
    ...
With respect to the gitb-ui service, we will make the following adaptations:
Add a volume mounting the export.zip archive we created previously.
Add the
DATA_ARCHIVE_KEYvariable with the value of the archive’s password.Add the
AUTOMATION_API_ENABLEDvariable to ensure the REST API we were using for test suite deployments is enabled.
...

services:
  gitb-redis:
    ...
  gitb-mysql:
    ...
  gitb-srv:
    ...
  gitb-ui:
    image: isaitb/gitb-ui
    restart: unless-stopped
    ports:
      - "9000:9000"
    environment:
      - DATA_ARCHIVE_KEY=snapshot
      - AUTOMATION_API_ENABLED=true
      - THEME=ec
    volumes:
      - gitb-repo:/gitb-repository
      - ./data/:/gitb-repository/data/in/:rw
    depends_on:
      gitb-redis:
        condition: service_started
      gitb-mysql:
        condition: service_healthy
      gitb-srv:
        condition: service_started
The next step will be to include the po-test-services application as part of the Dockerised service. If you have published a Docker image from this you could refer to this here and configure it accordingly. In our case we will package as part of the archive the full source code and define a containerised build. Like this the image will be built from source before being used.
Let’s first add a Dockerfile for the po-test-services application (replace it if it already exists):
workspace
├── data
│   └── export.zip
├── po-test-services
│   └── Dockerfile
├── samples
├── sut-mock
├── testSuite1
├── deploy_test_suite.bat
└── docker-compose.yml
The Dockerfile contents will include a build and run stage as follows:
# Stage 1: Build application
FROM maven:3.9-eclipse-temurin-21 AS builder

WORKDIR /app
COPY . /app
RUN mvn clean install -DskipTests=true

# Stage 2: Run application
FROM eclipse-temurin:21-jre-jammy

RUN mkdir /app
COPY --from=builder /app/target/po-test-services-1.0-SNAPSHOT.jar /app/app.jar
RUN sh -c 'touch /app/app.jar'
ENTRYPOINT ["java","-Djava.security.egd=file:/dev/./urandom","-Xmx2048m","-jar","/app/app.jar"]
EXPOSE 7000
WORKDIR /app
Note here how we are first using Maven to build the resulting Spring Boot JAR file and then we are copying that into the final image. The exposed port matches the one we configured in the application’s properties (port 7000).
With this in place we can now extend our docker-compose.yml file as follows:
...

services:
  gitb-redis:
    ...
  gitb-mysql:
    ...
  gitb-srv:
    ...
  gitb-ui:
    ...
  po-test-services:
    build:
      context: ./po-test-services
    restart: unless-stopped
    ports:
      - "7000:7000"
Finally, recall that we had added a mock server implementation under the sut-mock folder to act as the SUT in the first test case we developed. We will also add this to the Dockerised service:
...

services:
  gitb-redis:
    ...
  gitb-mysql:
    ...
  gitb-srv:
    ...
  gitb-ui:
    ...
  po-test-services:
    ...
  po-mock-server:
    image: mockserver/mockserver:5.15.0
    restart: unless-stopped
    volumes:
      - ./sut-mock/config:/config
    ports:
      - "1080:1080"
    environment:
      - MOCKSERVER_PROPERTY_FILE=/config/mockserver.properties
With this update the docker-compose.yml file defining our Dockerised service is complete. Its full contents are as follows:
volumes:
  gitb-repo:
  gitb-dbdata:

services:
  gitb-redis:
    image: isaitb/gitb-redis
    restart: unless-stopped
  gitb-mysql:
    image: isaitb/gitb-mysql
    restart: unless-stopped
    volumes:
      - gitb-dbdata:/var/lib/mysql
    healthcheck:
      test: "/usr/bin/mysql --user=root --password=$$MYSQL_ROOT_PASSWORD --execute \"SHOW DATABASES;\""
      interval: 3s
      retries: 50
  gitb-srv:
    image: isaitb/gitb-srv
    restart: unless-stopped
    environment:
      - CALLBACK_ROOT_URL=http://gitb-srv:8080/itbsrv
  gitb-ui:
    image: isaitb/gitb-ui
    restart: unless-stopped
    ports:
      - "9000:9000"
    environment:
      - DATA_ARCHIVE_KEY=sandbox
      - AUTOMATION_API_ENABLED=true
      - THEME=ec
    volumes:
      - gitb-repo:/gitb-repository
      - ./data/:/gitb-repository/data/in/:rw
    depends_on:
      gitb-redis:
        condition: service_started
      gitb-mysql:
        condition: service_healthy
      gitb-srv:
        condition: service_started
  po-test-services:
    build:
      context: ./po-test-services
    restart: unless-stopped
    ports:
      - "7000:7000"
  po-mock-server:
    image: mockserver/mockserver:5.15.0
    restart: unless-stopped
    volumes:
      - ./sut-mock/config:/config
    ports:
      - "1080:1080"
    environment:
      - MOCKSERVER_PROPERTY_FILE=/config/mockserver.properties
Before trying out your preconfigured Test Bed environment make sure you stop your existing development instances to avoid port conflicts. Specifically shut down:
The Test Bed.
The sut-mock server application.
The po-test-services application.
Alternatively you could have set different host port mappings for ports 9000, 7000 and 1080 respectively in the docker-compose.yml file (using for example ports 9001, 7001 and 1081):
...

services:
  gitb-redis:
    ...
  gitb-mysql:
    ...
  gitb-srv:
    ...
  gitb-ui:
    ...
    ports:
      - "9001:9000"
  po-test-services:
    ...
    ports:
      - "7001:7000"
  po-mock-server:
    ...
    ports:
      - "1081:1080"
Once you’ve either shut down your development instances or have adapted your host port mappings you can start the preconfigured Test Bed environment. To do this issue from your workspace root folder:
docker compose up -d
This command will take a few minutes as it completes the following steps:
Pull missing images
Build images that have a build definition (the
po-test-servicesimage).Start up the service.
Once complete you can navigate to http://localhost:9000 and log in using the same functional accounts you have been using in development. Before you can start launching tests however there is one last step to adapt in the Test Bed’s configuration. You need to replace the host values you used in the addresses to reach the po-test-services application and the mock server acting as the SUT. This is because of Docker networking and the fact that all services are now part of the same Dockerised service as opposed to running independently on your localhost.
Connect as the community administrator (account admin@po), navigate to the Domain management screen and switch to the Test services tab. Edit here the
messagingServiceAddress service to set its address to http://po-test-services:7000/po/services/messaging?wsdl.
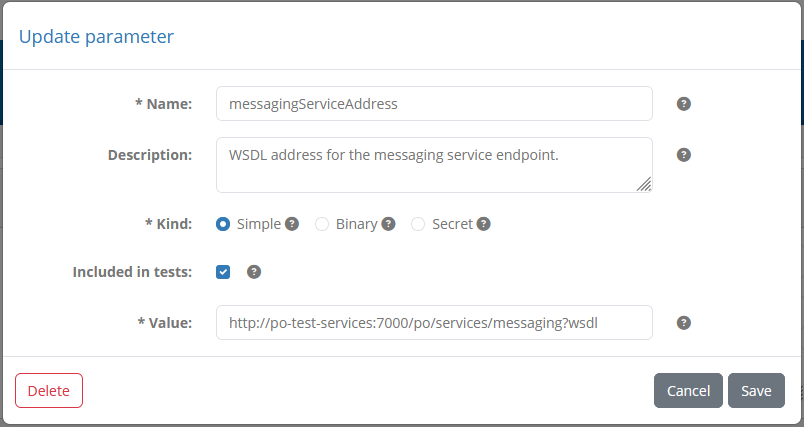
Now switch to the Community management screen, select the ACME retailing organisation, and click on the ACME backend retailing system from the Systems
tab. Here expand the Additional properties section and set the API endpoint address to http://po-mock-server:1080/receiveOrder.
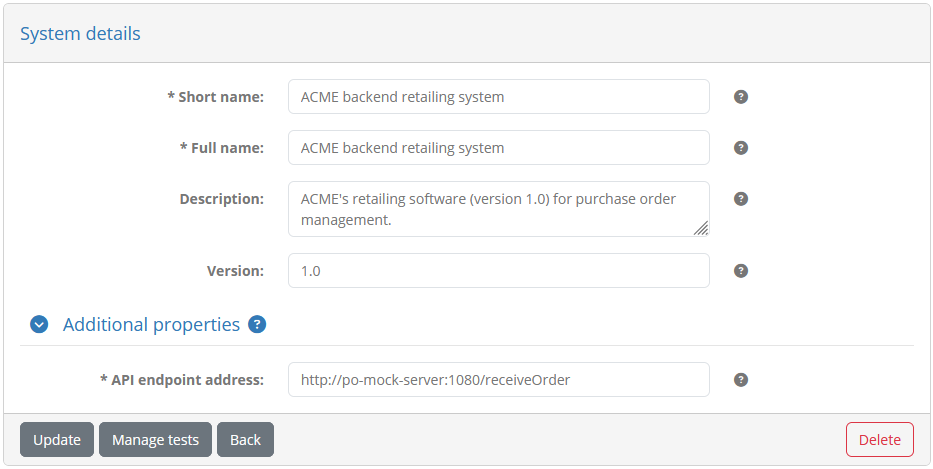
Note
The host values po-test-services and po-mock-server match the names of the respective containers in the Dockerised service.
Having replaced these addresses you can now execute all test cases as you did previously. Once you’re happy with how the setup is working you should replace the data archive you used to initialise the Test Bed’s state. This is needed so that the archive includes the corrected addresses you just reconfigured. Go to the Data export screen and repeat the export you did in the beginning of this section:
Select Community configuration
For the export password enter sandbox
Click All to include all data in the export.
Finally, click on Export to produce the new archive. Save the archive in the data folder in your workspace, replacing the previous one:
workspace
├── data
│   └── export.zip
├── po-test-services
├── samples
├── sut-mock
├── testSuite1
├── deploy_test_suite.bat
└── docker-compose.yml
To make a final test of your setup you can now completely delete your sandbox instance and recreate it to test. To fully delete your current instance issue:
docker compose down -v
Now (with the new export archive in place), issue:
docker compose up -d
You can now reconnect using the ACME user (account user@acme) and verify that all tests are working as expected following a fresh installation.
Note
You could have also made the networking updates before making the initial export from your development environment. It is a good practice however to anyway make final tests and fine-tuning on an instance of the sandbox environment to cross-check that everything is running smoothly.
At this point your configuration is complete and ready to share as a preconfigured package to other users. The simplest way to do this is to create a ZIP archive of the complete workspace folder and share it as-is. Alongside this you would also need to communicate the preconfigured user account(s) to use, and any other instructions you find useful.
For the person receiving this package the only prerequisite would be to have Docker and Docker Compose available. Assuming this is the case they would then need to extract the archive to their own workspace, and issue:
docker compose up -d
With this, all components will be automatically built, pulled and initialised with the preconfigured data, at which point they will be able to connect and start testing.
Note finally, that including the entire workspace folder in the delivered package allows for an environment where the recipient has full development access to continue work on the included test suite and po-test-services application. If you prefer to not make the package available as a developer setup, for example if you are delivering this to the end-users of your conformance testing service, you can remove the included test suite resources and application code. For the po-test-services application you would however need to foresee another means of delivery, such as building the resulting container image from a pre-built JAR file, or replacing the build definition to pull a Docker image published on a registry. In any case there are different options here covered in Guide: Deploying preconfigured Test Bed instances to help you complete your configuration.
Summary
Congratulations! Reaching this point you have handled message exchanges as part of your testing setup. In doing so you created test cases for sending and receiving messages to remote systems, supported by a custom test service application implementing the GITB service APIs. Both the test cases and test services are designed robustly and in line with best practices. Finally, you also put in place an efficient development workspace to develop and debug your test services, using in parallel the Test Bed’s REST API for the simplified update of test suites.
See also
The guide’s resulting setup is also available on a GitHub repository that you can clone and refer to. In terms of further guides, and in case you skipped them before going through the current one, be sure to check out:
Guide: Installing the Test Bed for development use for the Test Bed’s development installation.
Guide: Creating a test suite for the initial creation of a simple test suite.
Guide: Defining your test configuration for the initial test configuration in the Test Bed.
Guide: Executing a test case explaining how to execute test cases.
Guide: Getting started (for developers) providing an overview of all technical concepts involved in test development.
Complementing the guides, it is important to have alongside you for test development the reference documentation, notably:
The GITB TDL documentation, covering all aspects of the test case definition language.
The GITB test services documentation, covering the development of custom test services.
Finally, aside from conformance testing you may be interested in using the Test Bed’s reusable components to define standalone validators for different types of specifications. In that case you are invited to check:
The XML validation guide using XML Schema and Schematron.
The RDF validation guide using SHACL shapes.
The JSON validation guide using JSON Schema.
The CSV validation guide using Table Schema.