Guide: Getting started (for managers)
Track |
|---|
This guide explains how you can start using the Test Bed for a project that you manage. The target audience is a project’s decision makers, i.e. the people that ultimately decide whether conformance testing applies or is necessary for a project, and whether the Test Bed will be selected as the solution to use.
What you will achieve
At the end of this guide you will know whether the Test Bed suits your project’s testing needs and how to take the first step in using it. You will also have an overview of the different options available to you and the steps you will be following with the Test Bed team to get you started.
What you will need
About 30 minutes.
An understanding of your project’s needs (e.g. types of testing) and constraints (e.g. security).
How to complete this guide
This guide is meant to inform you of the Test Bed’s on-boarding process, not act as a hands-on tutorial. The steps that are listed below are sequential in nature, reflecting the points you should consider before getting in touch with the Test Bed team, and subsequently the steps that you will be following to complete your on-boarding.
Steps
The following sections represent the steps followed when you are on-boarded as a Test Bed user. Read through them to be aware of what this process involves.
Step 1: Determine your needs
The first point to consider is whether the Test Bed is the right solution for your project. In addition, you should be clear on which of the Test Bed’s offerings best suits your needs.
From a high-level perspective, the Test Bed provides you with two different, although often complementary, services:
Validators, web applications and command-line tools to validate content against your project’s specifications.
The complete Test Bed, a platform you can use to test, verify and monitor conformance against your specifications within your community of users.
Validators are stateless services that, given a configuration of supported validation types and validation artefacts, validate provided input and produce a report. They can be used both as public tools in support of a specification and as internal validation components in production services or data processing workflows. What validators don’t do is to record submitted data and validation results, nor do they support additional context around validations to define more complete scenarios to test conformance.
These limitations are where the complete Test Bed comes in. In contrast to validators, the Test Bed is an account-based service that records all test sessions and their involved data to allow conformance of different parties to be measured, reported upon, and monitored. In addition, the setup within the Test Bed is based around several test cases, organised in test suites, that can include any number of testing steps needed to realise different conformance testing scenarios. Validators are considered complementary to the complete Test Bed as they can be used as building blocks when content needs to be validated.
In case your needs are best matched by a validator, you should consult the detailed guides for the different types of validators supported by the Test Bed:
The XML validation guide, for XML validators using XML Schema and Schematron.
The RDF validation guide, for RDF validators using SHACL shapes.
The JSON validation guide, for JSON validators using JSON Schema.
The CSV validation guide, for CSV validators using Table Schema.
These guides walk you through the process of setting up such a validator and explain how you should get started. The remainder of the current guide will focus on the second option, using the complete Test Bed platform to realise conformance testing in your project.
Before proceeding you should also be clear on what the Test Bed does not do. To be specific:
Use the Test Bed to validate content, message exchanges, and full conversations; supporting self-service testing by users and monitoring of progress.
Do not use the Test Bed for performance, penetration, unit testing; or functional testing within the context of a single application.
These latter use cases are much better served by tools dedicated to those kinds of tests.
Step 2: Determine how to deploy the Test Bed
Note
Deployment details will be part of the discussions with the Test Bed team to find the most appropriate approach for your project (see Step 4: Introductory meeting). It is nonetheless useful to already have in mind the different options that will be discussed.
The Test Bed platform is made available in two different ways:
As a software component to be installed and operated on your own infrastructure.
As a shared service operated by DIGIT on the cloud.
The Test Bed is provided as a package that can be easily installed and operated on your own infrastructure. If used in this way you maintain complete control over its setup and operation, and you manage fully its access by your users. Note that the Test Bed is designed to be easily updated and always maintain compatibility with existing data and test suites (i.e. upgrades and migrations should not be a concern for you). The Test Bed software is provided using a permissive EUPL licence and can be used by anyone, free-of-charge.
DIGIT’s shared Test Bed service is an instance of the Test Bed software running on the cloud. This is operated and managed by the Test Bed team making it the simplest option for most projects. It is a multi-tenant environment, meaning that it is shared by several projects, each assigned its own “community”. These communities are by default not visible nor accessible to each other, but you can always define your own community as being public to enable user self-registration. On-boarding of a new project to the shared service is subject to an eligibility check, with subsequent usage being free-of-charge.
Note
Your eligibility to be on-boarded to DIGIT’s shared Test Bed service is checked as part of your introductory meeting with the Test Bed team.
Using the Test Bed as a component or as a service is an option for you to decide. The sections that follow highlight certain aspects that you should be aware of that may lead to opt for a specific approach. An overview of the options and questions to consider is provided at the end as a summary.
Operational window
The shared DIGIT Test Bed service is online from Monday through Friday, between 05h00 and 20h00 CET. In case this operational window is not sufficient for your project’s needs you will need to operate your own Test Bed instance on your own infrastructure. Apart from an extended operational window this approach would also allow to you to control all other aspects of your service’s operation and monitoring.
Privacy and security
The shared DIGIT Test Bed service is publicly available and cloud-hosted (with resources physically located within the EU). Security measures are in place to protect data and strictly authorise all access, however the platform itself is not as protected as one that would only be accessible within an internal, restricted network. Having said this, the Test Bed is not classified as a critical service and the data it manages is normally only meant for testing purposes.
It may be the case that your project requires increased security assurances that make the use of the cloud-hosted shared service not possible. Such a restriction could be due to:
Regulation covering test infrastructure and data storage.
The need to use sensitive test data.
The need to access internal systems as part of conformance testing for which it is unacceptable to expose even limited access.
Security concerns typically arise from the last point, given that systems being tested are typically not themselves publicly available. Keep in mind however that exposing access to such services doesn’t have to mean a compromise in security. There are multiple measures that can be applied, such as channelling all access through authenticated intermediate services, establishing site-to-site VPNs, or adding blanket firewall restrictions to all sources but the Test Bed. Still, in case the shared public service is still considered unacceptable, your option would be to deploy the Test Bed software yourself, within your restricted network.
Note
Using sensitive or production data for any form of testing is always a bad option.
Additional test components
It is often the case that to realise a project’s conformance testing additional components are needed. Typical examples of such components are:
Reference implementations of systems that will be used to e.g. process messages received from the systems being tested.
Middleware components used as part of the communication infrastructure of the project, such as an eDelivery Access Point.
Custom services used to manage messaging, processing and validation aspects that implement the GITB service APIs for integration with the Test Bed.
Such components need to be online and accessible by the Test Bed to carry out tests. If your project needs such components you need to see how these will be deployed and/or made accessible to the Test Bed. Important things you need to keep in mind on this are that:
You typically need to have full access to manage such components, not only for their initial installation but also for their operation.
Even if you use the shared DIGIT Test Bed service, the Test Bed team will not manage nor monitor such additional components.
Hosting such components might require infrastructure resources that exceed the Test Bed’s capacity.
The need for such components to cover your project’s testing needs will be a key point in your initial discussion with the Test Bed team. If this is indeed the case, you will most likely need to foresee your own infrastructure to host them. Several options exist here that you will be discussing with the Test Bed team to find the best one for your project:
Use the shared DIGIT Test Bed service, connecting to these components running on your own infrastructure.
Deploy also the Test Bed itself as a component on your own infrastructure.
Deploy your additional components on the Test Bed’s shared infrastructure (exceptionally and if resource needs are low).
High testing load
Conformance testing activity for most projects comes in bursts but typically remains low from a traffic perspective. Remember that these are tests that take place at specific milestones and are not e.g. automated for daily execution. In addition, the test data being exchanged is typically limited in volume.
If you expect this to not be the case for your project, i.e. you expect large numbers of daily tests with potentially large test data, you will most likely need to run the Test Bed on your own infrastructure. This is done to allow you to tweak your infrastructure to your own needs but also to protect other users of the shared DIGIT Test Bed service from being impacted from other projects’ testing.
Such needs will be discussed as part of your initial meeting with the Test Bed team. Keep in mind that test cases offer great flexibility and can be designed to work around such limitations. For example, you may have your own custom components managing large datasets with the Test Bed only providing control, monitoring and reporting, without needing to access the actual test data.
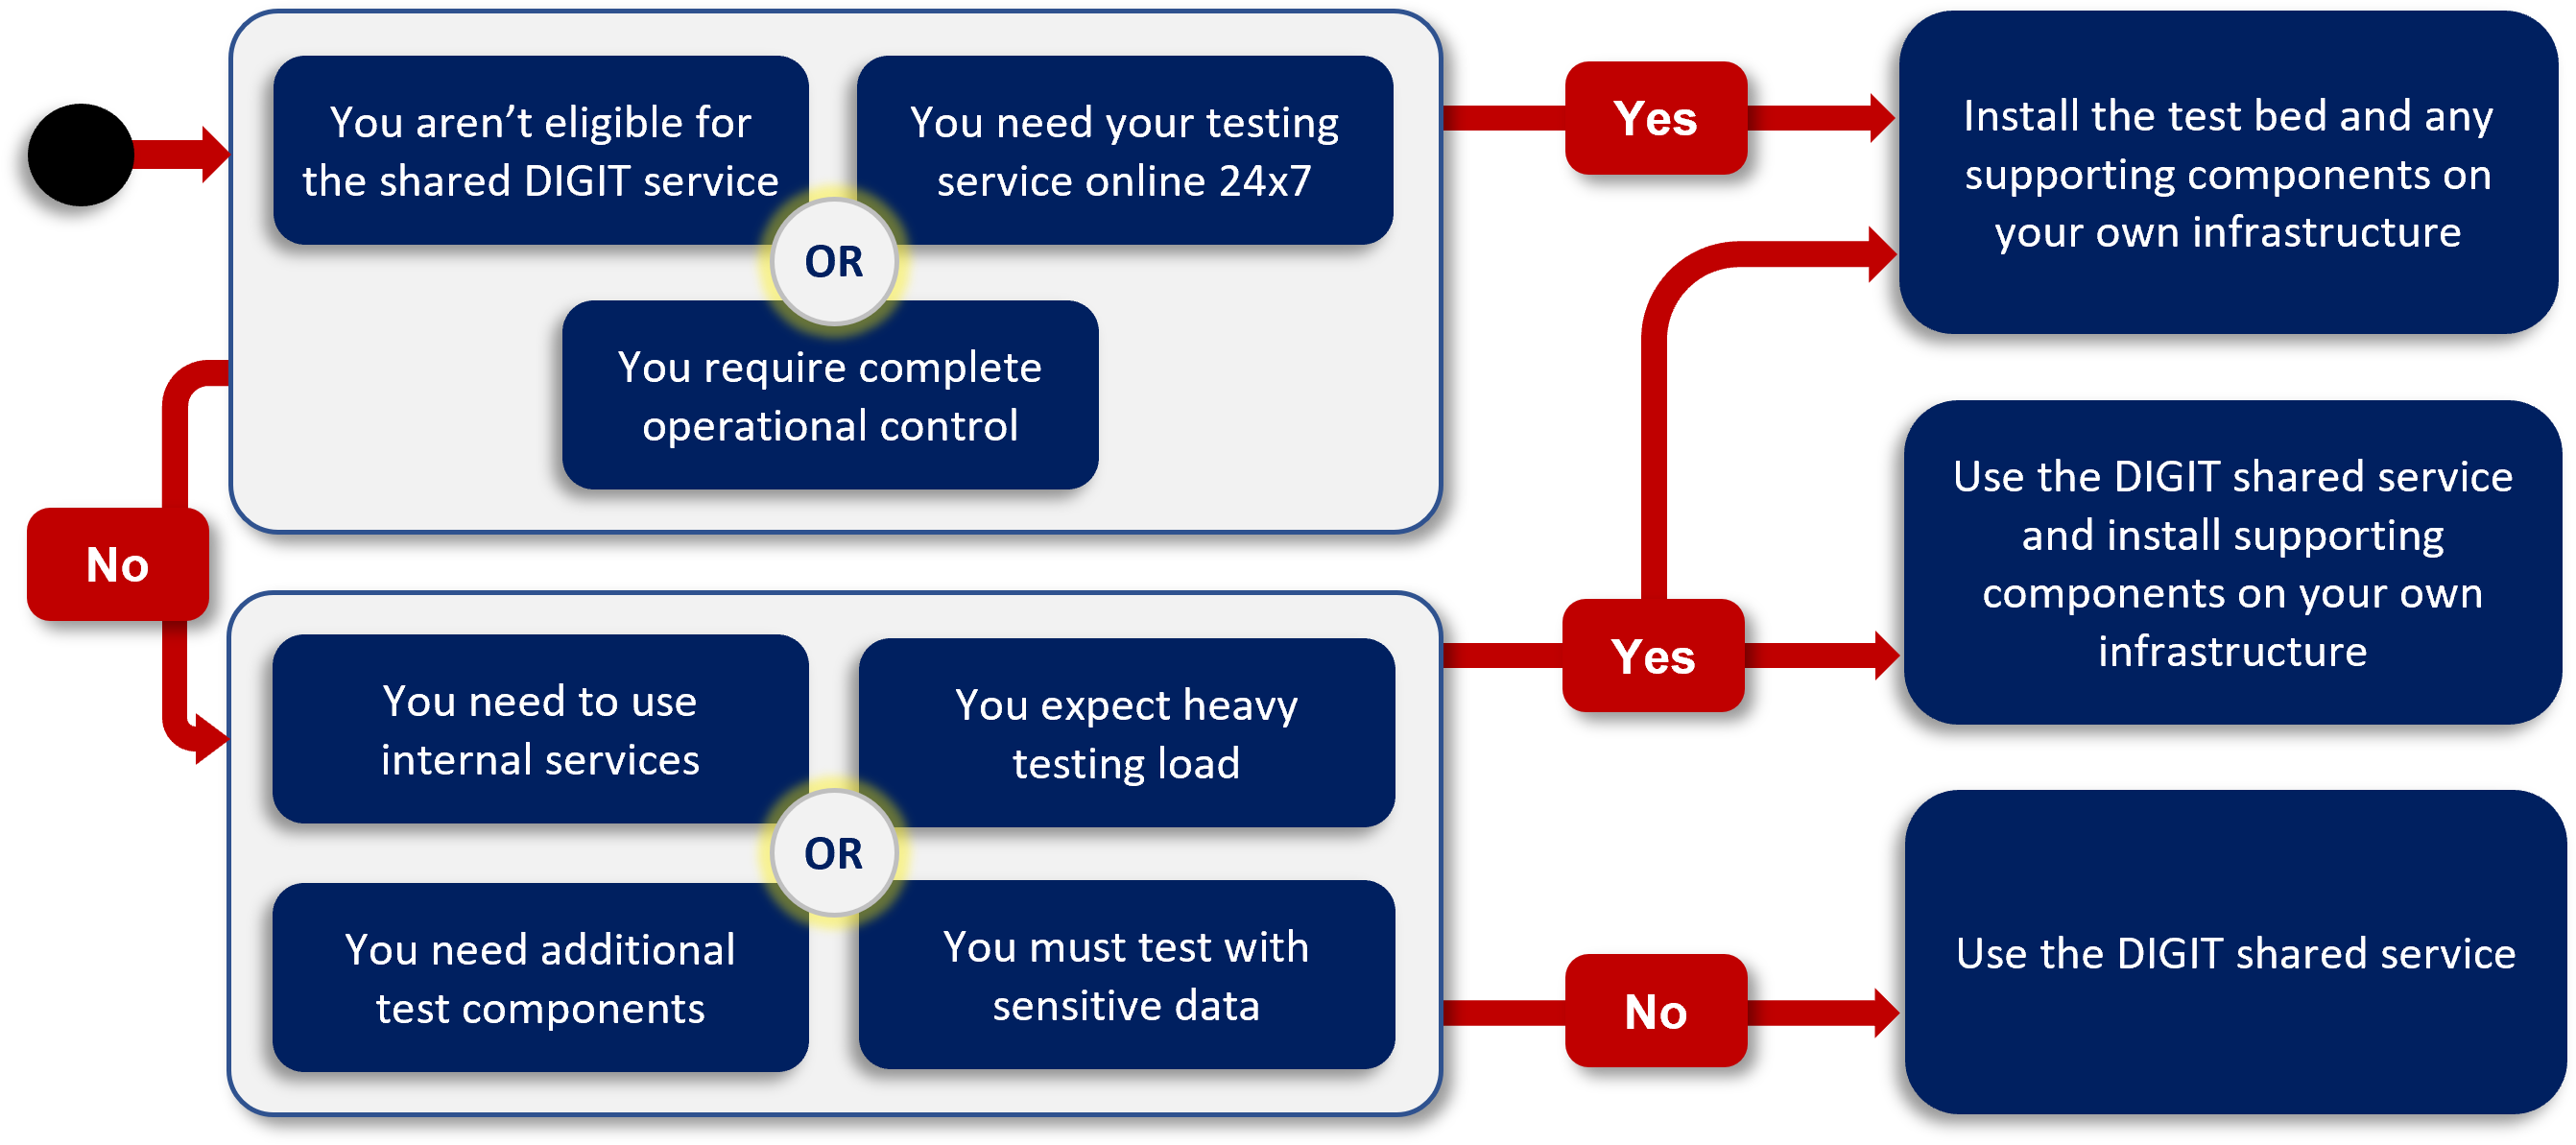
Overview
The following diagram provides an overview of your Test Bed deployment options based on your project’s needs and constraints.
Step 3: Initial contact
Once you believe that the Test Bed would be a good fit for you, the next step is to get in touch with the Test Bed team. To do this send an email to DIGIT-ITB@ec.europa.eu and include a brief description of your use case.
Once the Test Bed team receives your request you will be contacted back to arrange an introductory meeting to start the discussion.
Step 4: Introductory meeting
The purpose of this introductory meeting is to put you together for the first time with the Test Bed team’s experts. This is typically a one-hour meeting during which:
The Test Bed team will introduce to you the Test Bed and make a live demo.
You will present your project’s needs.
You will discuss with the Test Bed to determine the Test Bed’s suitability for your project and high-level deployment approach.
Assuming a good fit, the Test Bed team will explain the next steps to follow.
To be most effective you should join this meeting with the people who can speak of the conformance testing needs of your project and can decide on whether or not the Test Bed will be used. It is also typically helpful to provide a high-level overview of your project’s technical architecture as this helps clarify requirements and find similarities with existing Test Bed use cases. Note that you will not be expected to decide on the spot whether you will use the Test Bed. This will be followed up, with support from the Test Bed team, by means of a subsequent proof-of-concept.
During the introductory discussion the Test Bed team will also assess your eligibility to use the shared service operated by DIGIT. This sounds more elaborate than it actually is. In brief, the shared service is provided free-of-charge to all projects that aim to foster interoperability, and not to those of a personal or for-profit nature. In such cases the option of course remains to use the Test Bed as a component installed on your own infrastructure.
One thing that is important to clarify at this point is the role of each party in your project’s conformance testing. Specifically the Test Bed team will:
Support you in implementing a first limited version of your setup as a proof-of-concept.
Support you along your test development providing expert support on matters both technical and strategic.
Collect your feedback and implement, with priority, any feature requests that are important to your project.
Once you go live, provide continued operational, technical and management support to your team to ensure the success of your testing campaign.
On the other side, your project team is expected to:
Make available your experts to define, develop and validate the proof-of-concept with support from the Test Bed team.
Starting from the proof-of-concept, develop your test cases and test services (as needed) to realise your conformance testing setup.
Manage the configuration, operation and maintenance or any project-specific components that form part of your testing setup.
Manage, monitor and support your community’s users with their conformance testing progress.
Step 5: A proof-of-concept for your project
Assuming that after the introductory meeting you see that the Test Bed can be a good solution for your conformance testing needs, the next step will be to proceed with a proof-of-concept. This can either be developed by you with support from the Test Bed team, or by the Test Bed team on your behalf.
Developing your own proof-of-concept is typically the preferred approach. You will spend more time learning to use the Test Bed, but this effort pays off in the hands-on experience you will gain along the way. The Test Bed provides step-by-step guides to cover both simple and complex scenarios, and in any case you will be fully supported during your development (for example via direct chat and ad hoc screen sharing sessions).
The alternative is to have the Test Bed team develop the proof-of-concept for you. In this case, you will work with the Test Bed team to select a limited set of scenarios to cover, focusing on those that are characteristic and most complex. A meeting will also be foreseen to ensure the scenarios are well-defined, and that all technical information (e.g. API specifications, data schemas, sample messages) are available. Note that the purpose here is not to gain a full understanding of your project’s specifications but rather to provide just enough information to make the proof-of-concept meaningful and complete.
Regardless of the approach used, one point merits clarification. The term “proof-of-concept” is often used to label rapid experimentation work that although proves a solution’s suitability, is typically a low-quality effort to be replaced when real development starts. This is definitely not the case here. The proof-of-concept in question shall be a complete solution, fully documented, that is expected to serve as an example for your test developers. In fact the proof-of-concept typically addresses most of the complexity you will encounter and will serve as the starting point for you to replicate and enrich as you develop your testing setup. It will include both test cases as well as any custom services that may be needed to complement your setup.
Step 6: Proof-of-concept validation
Note
This step applies if the Test Bed team is implementing the proof-of-concept on your behalf.
With the proof-of-concept ready, the Test Bed team will organise at your convenience a one-hour review meeting for you to validate the results. This is an important point as it will give you a glimpse of the Test Bed used for your project, using your specifications, terminology and scenarios. In addition, the design approach of different elements such as custom test services will be discussed so that you have an understanding of the testing architecture.
The result of this meeting will be to definitively agree on using the Test Bed for your project and move forward with elaborating your test setup.
Step 7: Handover to your project team
Note
This step applies if the Test Bed team is implementing the proof-of-concept on your behalf.
With the proof-of-concept validated and your test development team ready to proceed, the next step is the handover workshop. This is a technical workshop, typically lasting two hours, in which your test developers will become familiar with the different concepts they need to begin test development. Concepts will be explained in general but then also made specific to your project by analysing in depth the different elements of the proof-of-concept. As part of this workshop your team will also install a development instance of the Test Bed to make sure that they can begin experimenting.
For this workshop it is also a good idea to define a testing lead that will not only participate but also be able to onboard other test developers if needed in the future (even though the Test Bed team will remain available for such support).
Step 8: Develop your test setup
At this point your team should be fully capable of realising your project’s test setup. During this phase your team will develop test cases and custom services to realise your test scenarios, gaining the expertise needed to adapt to any requirement. You will find that the Test Bed is very flexible and as you gain experience you will be able to tackle any kind of testing scenario. You will also likely discover additional ways to leverage the Test Bed such as defining sandbox instances for your users.
Note
Sandbox instances are fully configured Test Bed instances that can be bundled and provided to your users (e.g. different Industry parties or National administrations) to allow them to fully test on their own infrastructure. If something like this sounds interesting make sure to check out the Test Bed’s detailed sandbox definition guide.
During your test development phase the Test Bed team is available to help your team with any technical or design questions they may have. It could also be the case that during this phase you identify missing features that would facilitate your tests. Don’t hesitate to always discuss these with the Test Bed team; user feedback is always prioritised in the Test Bed’s change management and the team will ensure that such features are made available as soon as possible.
Step 9: Deploy your test setup
Having completed the development of your test setup, the next step will be to deploy this to the Test Bed instance you will be using. The Test Bed supports export and import features that allow you to easily migrate your complete setup to your target environment. In case this is the shared DIGIT Test Bed instance, the Test Bed team will create for you a “community” and assign you the necessary privileges.
As part of the rollout of your test setup, the Test Bed team will also ensure with you that any additional components are working together as expected. This will be the point to finalise deployments and configure accesses to complete your setup.
Step 10: Support from the Test Bed team
Once your testing setup goes live you are free to begin testing, managing and extending your test setup as necessary. It is important to understand that the Test Bed offers a self-service experience both to your users, as well as and you as administrators. You will never be blocked requiring actions from the Test Bed team and you will have complete control within your community.
After going live you will be expected to support your user community and monitor their testing progress. During this phase you can still rely on the Test Bed team for support on operational matters, or for expert advise on the evolution of your test setup.
Summary
Congratulations! You have just completed the Test Bed’s on-boarding guide for managers. In doing so you have been made aware of the steps in getting started with the Test Bed as well as key decisions you will need to take for your project.
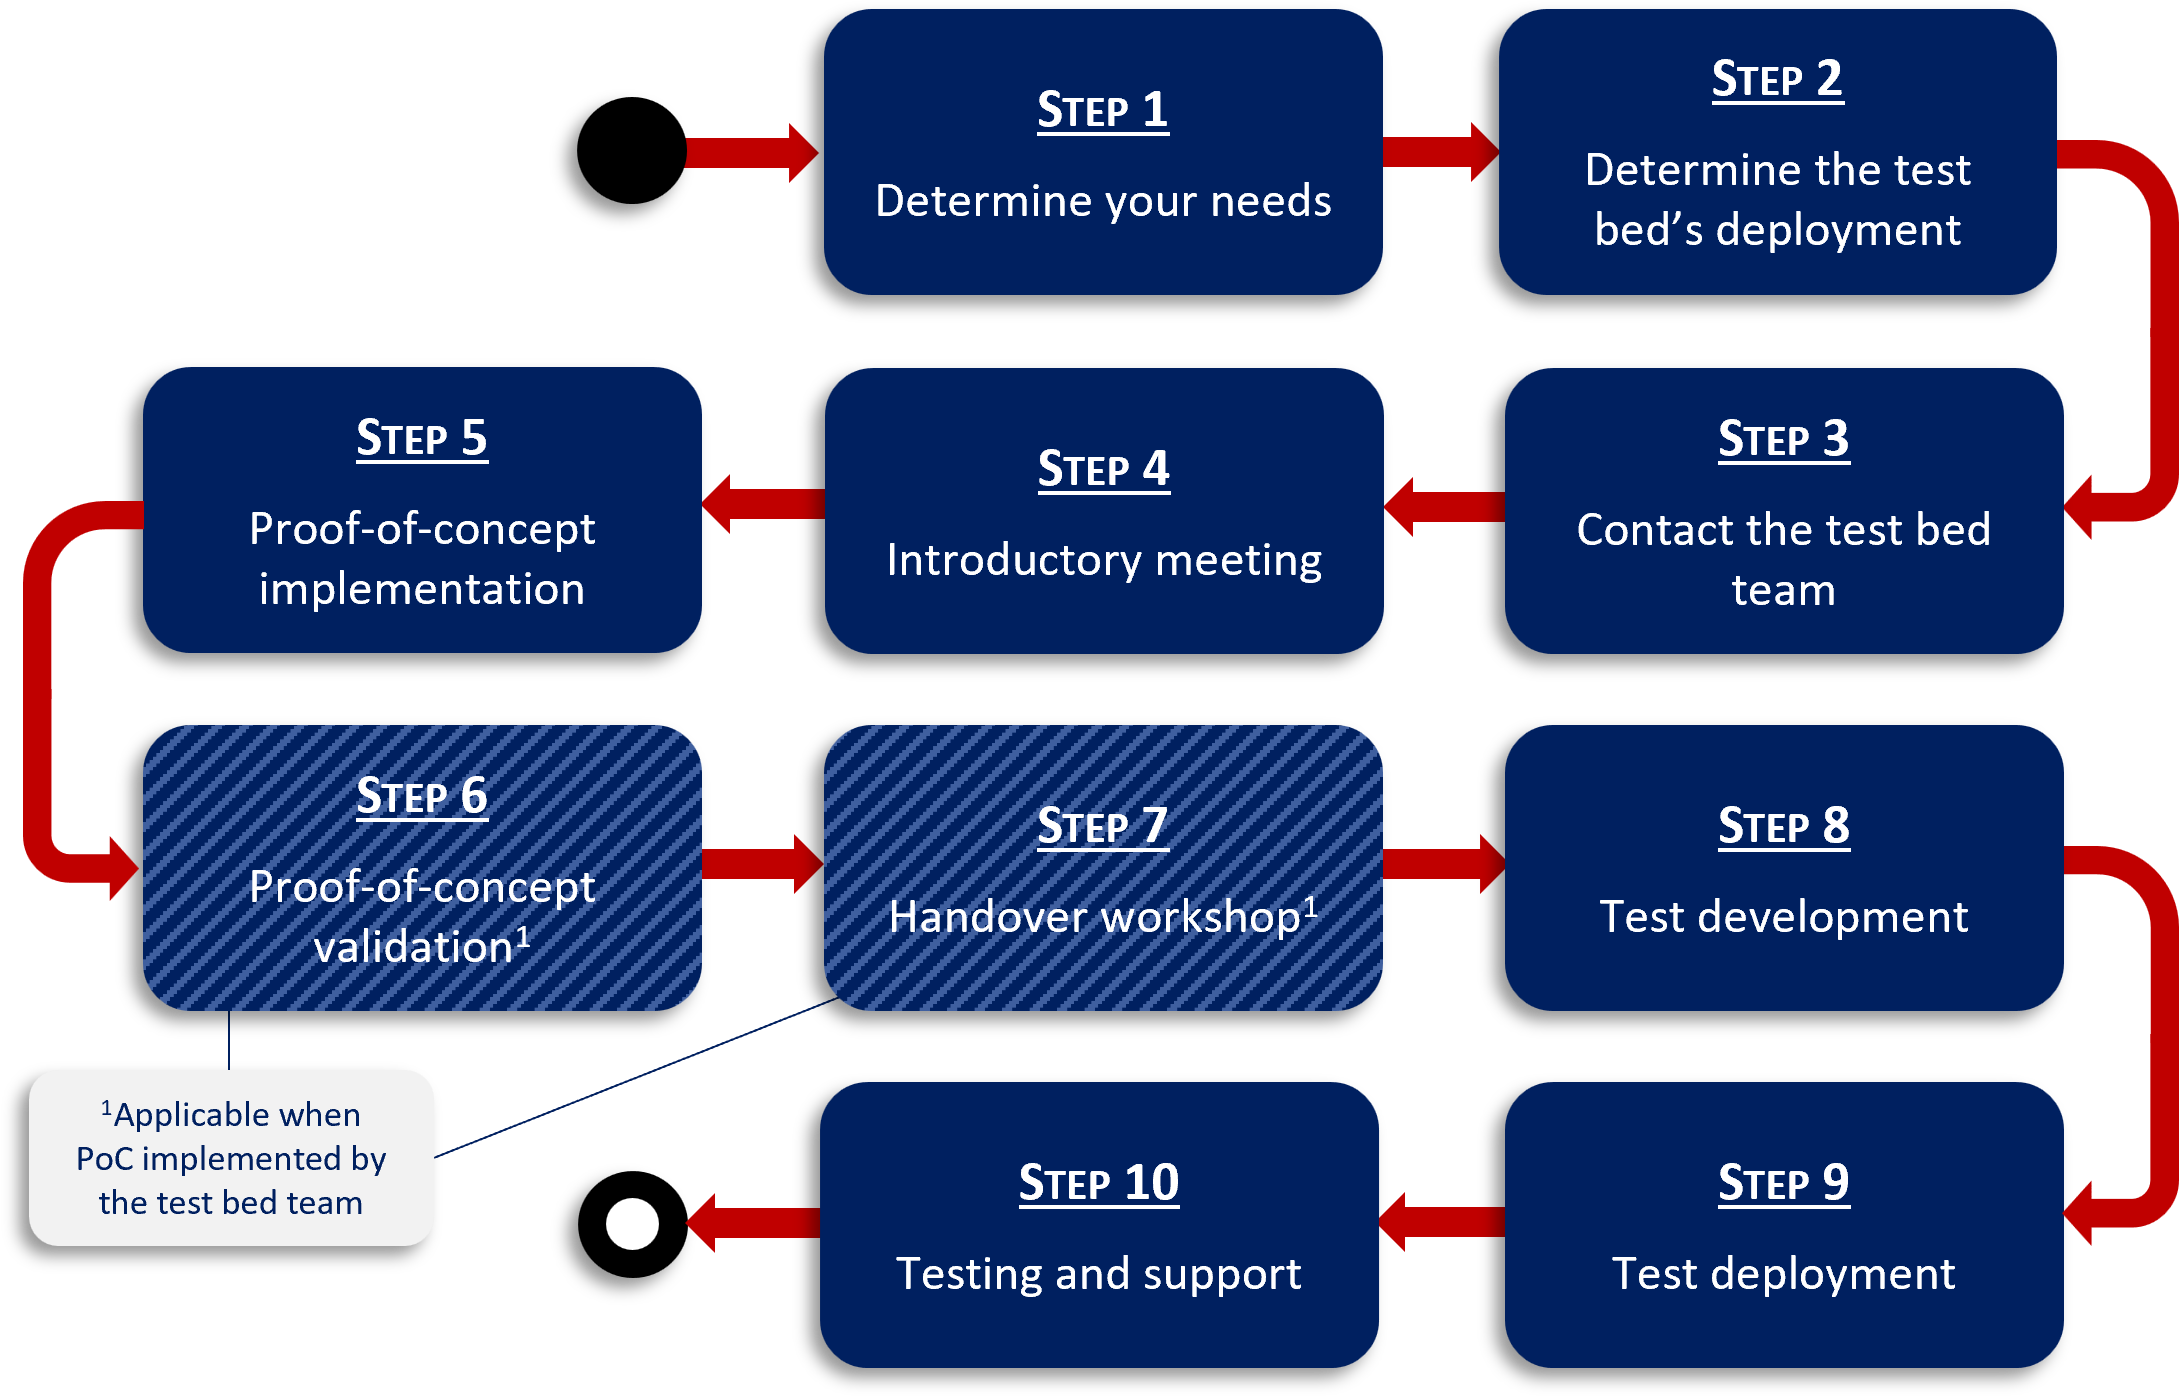
The following diagram provides an overview of the steps covered in this guide.
See also
If you want an overview of the Test Bed’s way of working, use cases, and services offered by the Test Bed team, be sure to check the Test Bed’s value proposition. For a feel of how users will be using the Test Bed, you can check the Test Bed’s user guide:
For users, the members of your community that will be launching tests.
For community administrators, the members of your team that will be managing your setup.
You may also connect to the DIGIT shared Test Bed service and try out one of the available demo scenarios.
If you want to already go into technical details you can check the online reference documentation:
The onboarding guide for developers acting as the entry point for all technical concepts.
The GITB TDL documentation for test cases.
The GITB test services documentation for Test Bed service extensions.
Finally, if your main drive is data validation, and not using the Test Bed for scenario-based conformance testing, you are invited to check the detailed guide per validator:
The XML validation guide using XML Schema and Schematron.
The RDF validation guide using SHACL shapes.
The JSON validation guide using JSON Schema.
The CSV validation guide using Table Schema.