Manage test configuration
As Test Bed administrator you are able to work in parallel with community administrators in setting up the specifications that organisations are expected to conform to as well as the test suites to verify this. Managing this information is possible through the Domain management screen, accessible by clicking the relevant link from the menu. Once you do so you will be presented with the listing of available domains.
Domains
The first screen you access is the display of the domains defined in the Test Bed. These are managed by you as Test Bed administrator but also by community administrators, assuming that their community has been linked to a given domain.
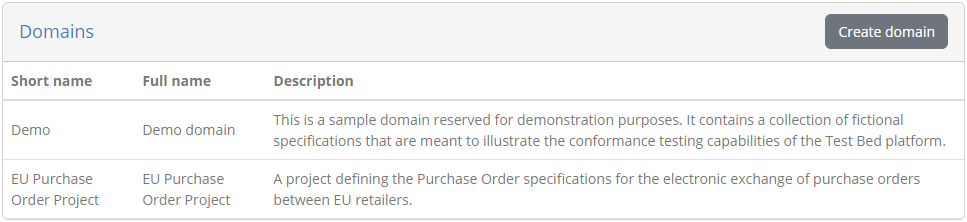
The presented table includes one row per domain for which the following information is displayed:
The short name for the domain, used when the domain is mentioned in list displays.
The full name for the domain, used in detail displays and reports.
A description for the domain to provide context over what the domain relates to.
The domain’s tag if one has been configured.
You can use the search box in the table’s header to filter domains based on their name and description. To view a domain’s details click its relevant row from the table, whereas to create a new domain click the Create domain button.
Note
Providing context to users: The information you provide for the domain as well as further concepts such as the specification and actor are important to provide context to Test Bed users. This information should summarise what they are testing for, whereas the name and description of test cases and test suites should summarise how they are supposed to test.
Create domain
To create a new domain click on the Create domain button from the domain list header.

Doing so presents you with an editable form in which you are expected to enter the information for the new domain.
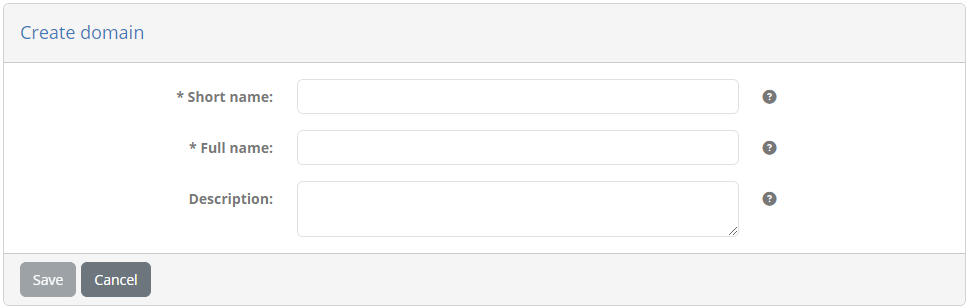
The information expected is the following:
The domain’s short name (required), displayed in lists.
Its full name (required), displayed in detail screens and reports.
Its description (optional), displayed in detail screens and reports.
Its report metadata (optional), included in XML reports.
A custom tag (optional) to visually distinguish the community (see below).
To complete the creation of the new domain, provide the required information and click on the Save button. Clicking on the Cancel button will discard pending changes and return you to the previous screen.
Manage domain details
The domain detail screen is where you can edit a domain’s properties. It is split in two sections:
The Domain details section, to view and edit the domain’s information.
Tabs for the information linked to the domain, notably the Specifications tab to manage its specifications, the Shared test suites tab to manage the domain’s shared test suites, the the Parameters tab to manage configuration parameters used in test cases, and the Test services tab to manage supporting test services.
In the Domain details section you are presented with a form to view and edit the domain’s information.
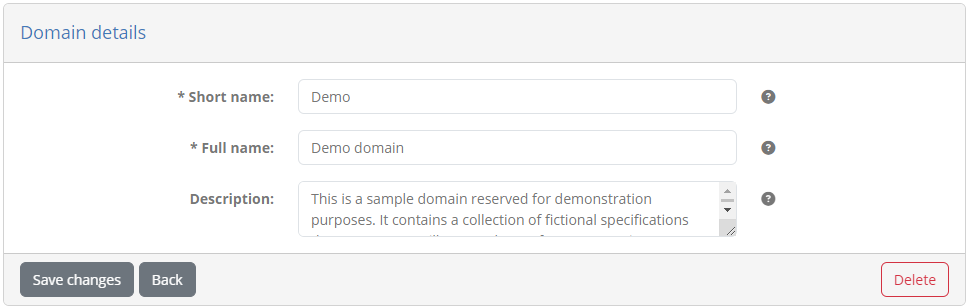
The following information is presented in corresponding form controls:
The domain’s short name (required), displayed in lists.
Its full name (required), displayed in detail screens and reports.
Its description (optional), displayed in details screens and reports.
Its report metadata (optional), included in XML reports.
A custom tag (optional) to visually distinguish the domain.
The domain’s API key, used to refer to it through the REST API and in data exports.
To edit the domain’s information, enter the new values you require and click the Save changes button. Clicking the Delete button will, following confirmation, delete the domain and all related information. The Back button does not make any changes but takes you back to the domain list screen.
Note
Providing context to users: The information you provide for the domain as well as further concepts such as the specification and actor are important to provide context to your users. This information should summarise what they are testing for, whereas the name, description and documentation of test cases and test suites should summarise how they are supposed to test.
The domain’s tag is an optional feature used to distinguish the domain from others. Tags are displayed only to administrators, and are used to convey some additional information regarding the domain. Typical use cases would be to provide a visual cue on the setup’s version or to highlight that a specific setup is the production configuration that organisation users can access.

If you select to add a tag you will be presented with a popup to provide its information. This includes the tag’s name, a description presented as a tooltip, as well as background and text colours used to style it when displayed. Clicking on Save will record the tag, whereas Cancel will close the popup without making changes.

When a tag has been added to the domain, you will see it presented in the form, with controls to remove or edit it. You also have choices here on whether this tag will be presented to community and/or Test Bed administrators.

When a tag is present for a domain, it will figure prominently in the header of all screens’ panels that relate to the domain’s configuration, as well as in lists that include the domain.

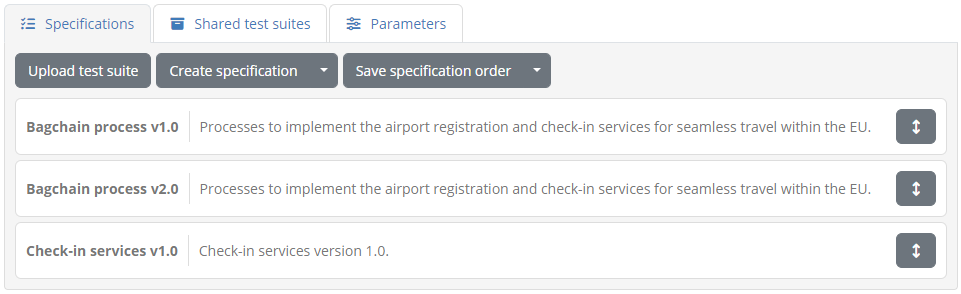
Specifications
The Specifications tab presents a table with the domain’s configured specifications. These represent the elements of your project’s specifications that you want organisations to conform to.
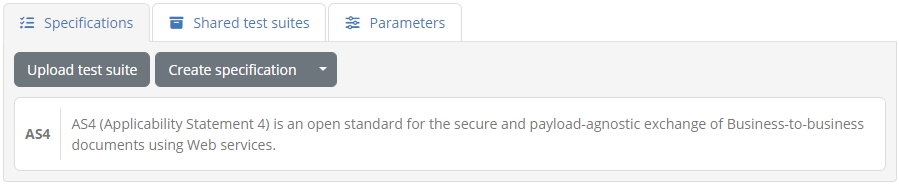
Each specification is presented in a separate row, in which the following information is provided:
The specification name (in bold).
Its description, used in detail screens and reports.
Whether or not the specification is hidden from users (represented as a “hidden” icon).
You can use the provided search box to search for specifications, filtering based on the specifications’ names in a case-insensitive manner, and supporting partial matching.
Clicking on a specification’s row will take you to its detail page. To create a new specification click the Create specification button, whereas to upload a new test suite for one or more specifications click the Upload test suite button. You can also manage from here the specifications’ ordering to control how they are displayed to users.
Create specification
Creating a new specification is done by clicking the Create specification button from above the specifications’ table.

Doing so presents you a screen in which you need to provide the information for the new specification.
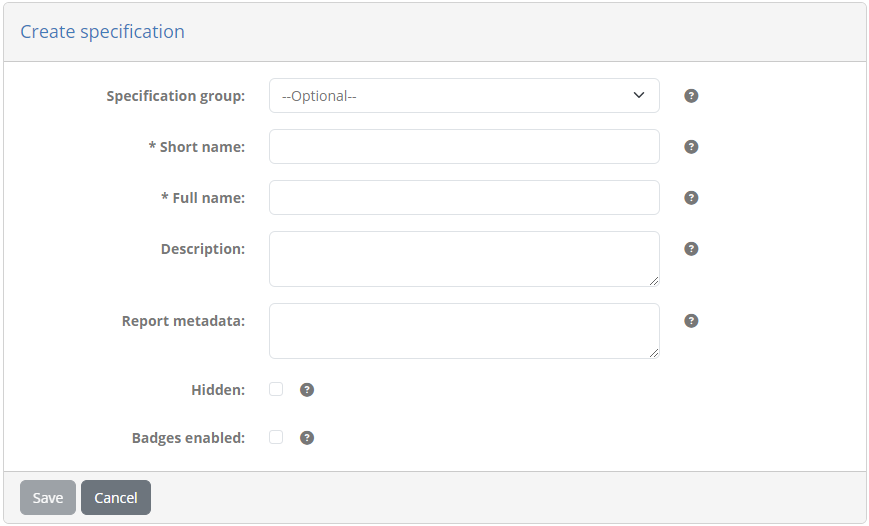
The information to provide for the specification is:
The specification’s short name (required), displayed in list views.
Its full name (required), displayed in detail screens and reports.
A description to provide more context on the specification (optional), displayed in detail screens and reports.
Custom report metadata that is included in XML reports.
Whether or not the specification is to be considered as hidden (by default set to false).
In case specification groups are defined in the domain, these will also be presented as a dropdown selection at the top. In case the specification is being created as an option to add to a group, the group in question will be preselected.
Setting a specification as hidden is typically meaningful for existing specifications as doing so will effectively deprecate it. Once set as hidden, a specification does not appear as available when creating new conformance statements, however any existing conformance statements or performed tests that refer to it remain unaffected. A good example of such a scenario is when you want to support versioning in specifications and, upon release of a new version, you want to ensure new conformance statements are only made for this latest version.
At the bottom of the form you may also find an option labelled Badges enabled which is by default unchecked. Checking this expands the form to show further controls to define badges.
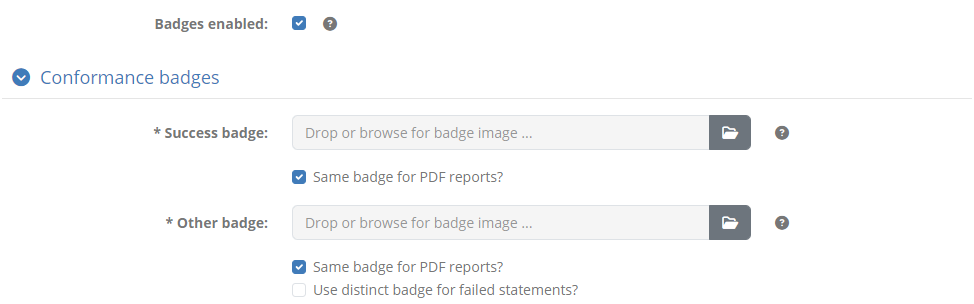
Badges are images that can be publicly looked up for a given organisation’s system to produce an image that visually represents its conformance status. If you choose to define such badges you need to provide at least a badge for the “successful” state and “other” (i.e. not successful) state. Optionally you may also provide a badge for the “failure” state, for which the “other” badge is used by default.
Badges can also be included in conformance statement certificates (and conformance overview certificates), which are PDF reports attesting to an organisation’s successful testing. In this case you may choose to use alternate badge images that are more appropriate for usage in PDF documents (as opposed to within an HTML page). For this purpose you have the option of selecting different badges for HTML and PDF display.
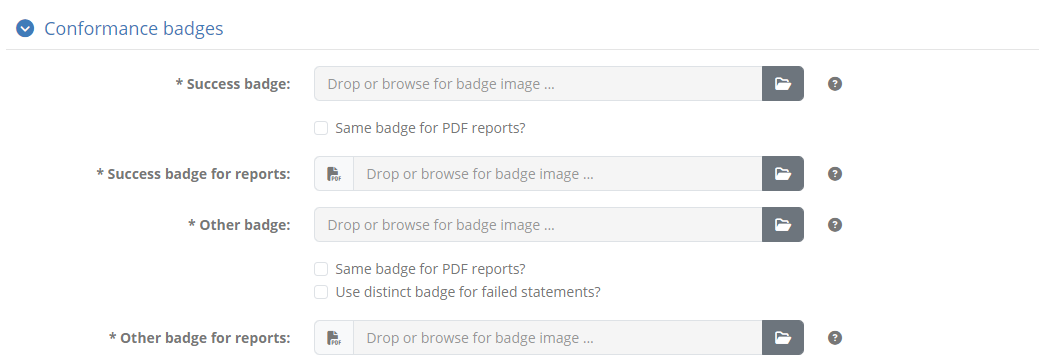
Once a badge is provided you will be presented with additional controls to delete and preview it.
A badge URL is of the form [TEST_BED_ADDRESS]/[SYSTEM_KEY]/[ACTOR_KEY]/[SNAPSHOT_KEY] with the [SNAPSHOT_KEY]
being optional. Such URLs can be copied by both administrators through the conformance dashboard,
as well as normal users through a conformance statement’s detail page.
Note
Badges can also be defined at actor level if this is more meaningful for your setup. If a badge is missing at actor level, the one configured for the specification will be used by default.
To complete the creation of the specification click the Save button. To cancel and return to the domain detail page click the Cancel button.
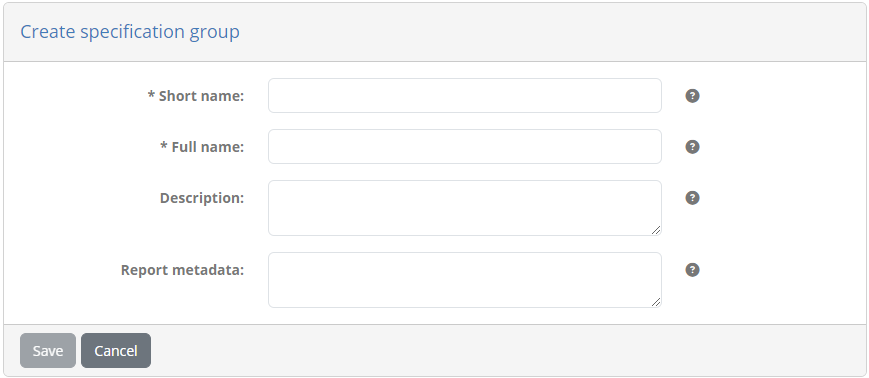
Specification groups
In case you need to add more depth to the specifications in your domain, you may create one or more specification groups. A specification group represents a set of related specifications that you may choose to define to facilitate searching and the definition of conformance statements. A typical example of using groups would be to define your project’s specifications as groups, within which you define specific versions. From the perspective of conformance statements, specifications map to the versions, but the extra grouping makes working with them more intuitive.
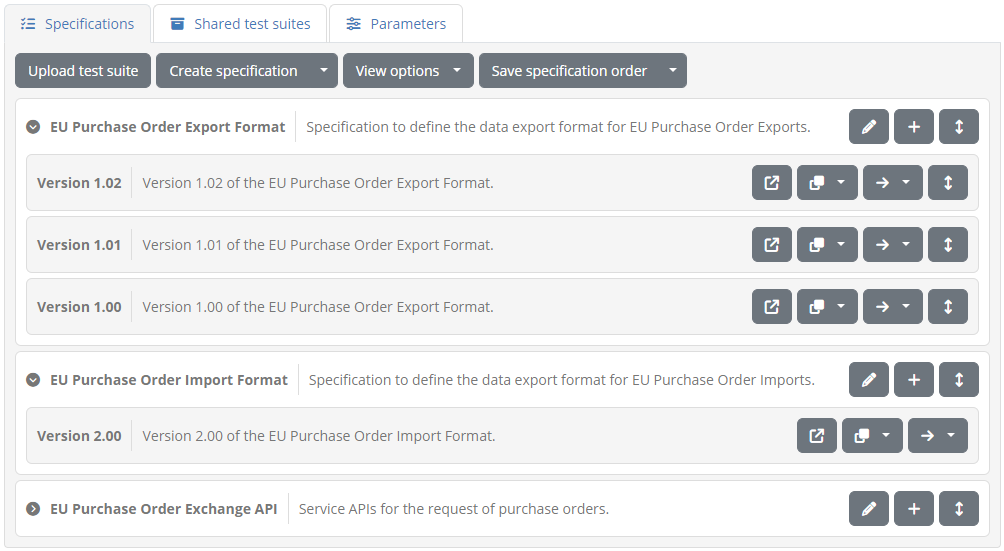
Specification groups are displayed separately from their contained specifications (termed by default as “options” when grouped) in search filters and when creating new conformance statements. Certain screen listing don’t present these as separate concepts, showing rather as a specification the concatenation between group and option (separated by a hyphen).
To define a specification group expand the Create specification options and select Create specification group.
Doing so will present you with the form to provide the group’s information, notably its short name, full name and description (optional), and custom XML report metadata (optional).
Once your domain defines at least one specification group, the listing of specifications changes. The table of specifications lists now the groups you have defined as well as any specifications that are not contained in groups. This is an interesting point as you don’t need to define a group for all specifications; you can use groups where meaningful and simple specifications where no grouping is useful.
Specification groups are presented as expandable rows that when clicked will show their contained (specification) options. Clicking a group’s option or a non-grouped specification will take you to its detail screen. Each specification group row presents options to edit it and add within it a new option. Each specification within a group (a group option), as well as non-grouped specifications presents controls to ungroup it (for options), copy it to a group, and move it to a group. Specifically regarding copying to a group, this is meant to simplify the definition of similar options by cloning the selected option’s details, actors, and parameters. Test suites however are not copied.
Selecting to edit a specification group takes you to its detail page where you are presented with its information.
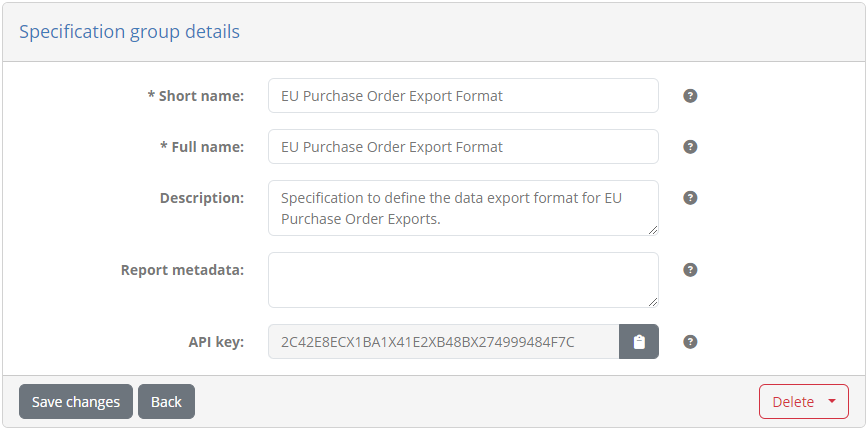
From this page you may select to Save changes or go Back, but you can also Delete the group altogether. When deleting you have the option of either deleting also the group’s options or only deleting the group itself. In the latter case, any specifications contained as options within the group will be set as being non-grouped.
Note
Specification groups and conformance statements: Test suites, conformance statements and executed tests are linked to specifications and options (specifications within groups). Specification groups have no direct link to these, and can be removed, replaced or switched without impacting users’ testing history.
Custom specification ordering
By default specifications are presented with alphabetic ordering to users based on their name. It is possible to override this by applying a specific presentation order that will be used in the following cases:
When reviewing available options while creating new conformance statements.
In conformance overview reports and certificates.
To change the specifications’ ordering click the Manage specification order button. Doing so will hide specification controls and present all specifications in a single list (in case paging was active). You may now drag and drop specifications to adapt their ordering, by clicking and holding them while dragging them to the desired spot.
In case you are using specification groups, you can manage the order both at the level of the groups, and within each group’s options. It is also possible to set a specific ordering when you have a mix of grouped and ungrouped specifications. In this case you can also use the View options button to show and hide group options.
When you are happy with the ordering, click on Save specification order to record the ordering. You can also choose from here Reset specification order to revert to the natural ordering. Clicking on Cancel will take you out of specification ordering mode without applying any changes.
Note
When specifications (grouped or not) are presented in table listings alongside other concepts such as organisations and test cases, the ordering applied is always alphabetic.
Deploy test suite to multiple specifications
In case you have more than one specifications defined for the domain you will also see in the specifications’ tab the option termed Upload test suite.
Clicking this allows you to upload a test suite to multiple specifications at once, without needing to make individual uploads. For details on the process to upload a test suite see Upload test suite.
Note
Deploying a test suite in this way is not the same as linking a shared test suite with multiple specifications. In this case the test suite will be separately deployed to each specification and subsequent tests will only count towards each test suite’s respective specification. The alternative of linking a shared test suite to multiple specifications will result in executed tests counting towards all linked specifications.
Shared test suites
The Shared test suites section presents the test suites that have been configured at the level of the domain. These are test suites that are meant to be shared across multiple specifications, for which executed tests will count commonly across specifications. This contrasts test suites defined at specification level whose tests are linked only to the specification in question. They are presented in a table with one row per shared test suite.

For each test suite the following information is displayed:
The ID of the test suite. This is an internal identifier used to reference the test suite and match it when uploading updates.
The name of the test suite. This is presented to users as a short name for the test suite.
Its description. This typically would include information on the purpose of the test suite and limited instructions relevant to all its test cases.
Its version. This is metadata that is recorded but not presented to users.
Test suites can be filtered using the provided search box, that will be applied against test suites’ identifiers and names in a case-insensitive manner and supporting partial matches. In terms of further actions, you may either upload a new test suite by clicking the Upload shared test suite button or view its details by clicking its row.
Upload shared test suite
To add or update a shared test suite for a domain you need to upload it using the Upload shared test suite button from the shared test suite section’s header.

Clicking this button opens a dialog prompting you to select the test suite archive to upload.
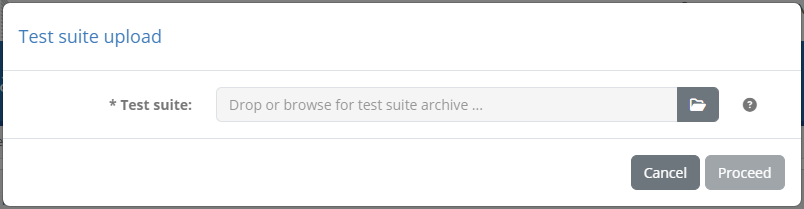
Once the archive is selected you can click on Proceed to proceed with the upload. Upon doing so the Test Bed will validate the archive to ensure it is a valid test suite. In case your uploaded test suite has errors or warnings these will be presented to you including for each:
An error code and description of the validation finding.
The relevant test suite file as the location of the problem.
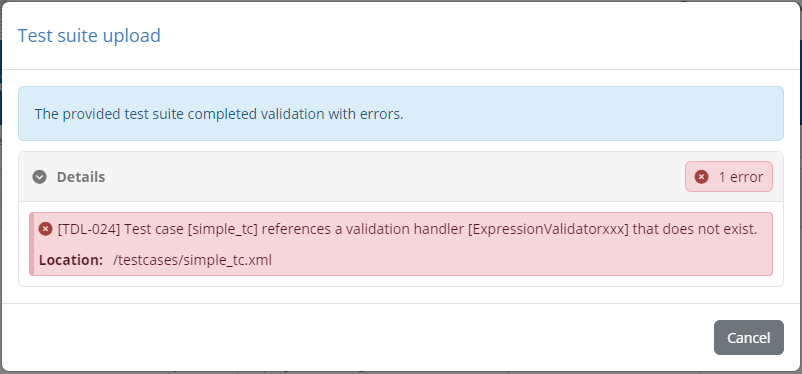
If the test suite is found to have errors you are not allowed to proceed further. If only warnings are found you can click the Proceed button to ignore them and continue to the next step. Validation warnings will not necessarily lead to test session errors but should nonetheless be reviewed to ensure nothing has been neglected. Examples of warnings are supporting resources that are not used in test cases or references to missing domain parameters.
Note
Uploading valid test suites: If an uploaded test suite is fully valid (i.e. its validation results in no errors or warnings) the validation report step is completely skipped.
For a valid test suite, or a test suite with warnings you have chosen to ignore, what takes place next depends on whether or not the test suite already exists. If this is the case you will be prompted with choices on how to proceed.
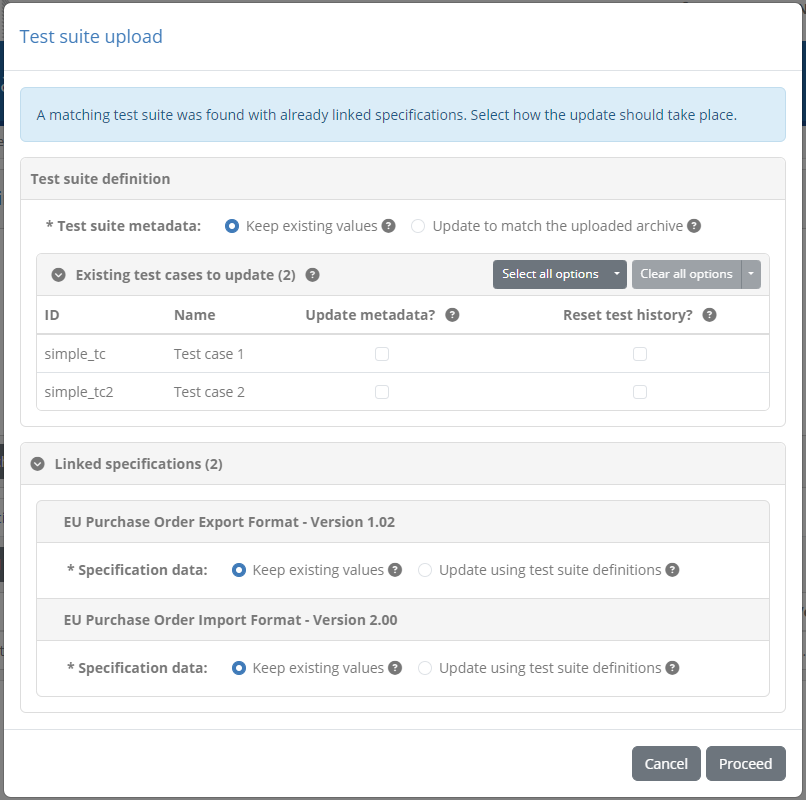
With respect to the test suite’s metadata (its name, description, version and documentation) you are presented with the option to keep existing values unchanged or to update them to match the data from the archive. Below this choice you are presented with three tables regarding the test suite’s test cases (displayed as applicable):
The existing test cases, matched from the archive, that will be updated.
The new test cases, present only in the archive, that will be created.
The missing test cases, not present in the archive, that will be deleted.
From these three tables the one showing matched existing test cases presents further choices per test case. For each such test case you can choose:
To update its metadata, setting its name, description, version and documentation to match the archive’s definition.
To reset its test history, that if selected will consider related test sessions as obsolete and reset accordingly linked conformance statements.
To proceed, review and complete the presented choices and click on Proceed. Clicking on Cancel will close the dialog without further actions.
Note
If any test case option to reset testing history is selected you will be prompted for a confirmation before proceeding. Resetting the testing history is not reversible.
Parameters
The Parameters section presents the configuration parameters defined at domain level. These are configuration values that are expected to be used within the GITB TDL test cases that you upload to the Test Bed. They typically relate to information you don’t want to include in test cases either because they would hinder portability (e.g. service URLs), they are sensitive (e.g. service authentication credentials), or they are settings that apply to all test cases that are subject to change.

The domain’s parameters are presented in a table with one parameter per row. The information provided for each parameter is:
Its name, used to identify the parameter and also refer to it through test cases.
Its description to provide context on the purpose of the parameter.
Its value, which in the case of sensitive parameters is hidden.
Whether or not the parameter is included in tests.
A service icon indication of whether this parameter is linked to a test service.
Note
Parameters not in tests: Typically domain parameters are meant to be used as global configuration values that are used in test cases. A parameter that is not meant to be used in tests could be used ti record arbitrary data within the Test Bed or as input to a trigger.
Parameters can be filtered using the provided search box, that will be applied against parameters’ names in a case-insensitive manner and supporting partial matches. To create a new parameter click the Create parameter button, whereas to edit an existing one click its corresponding table row.
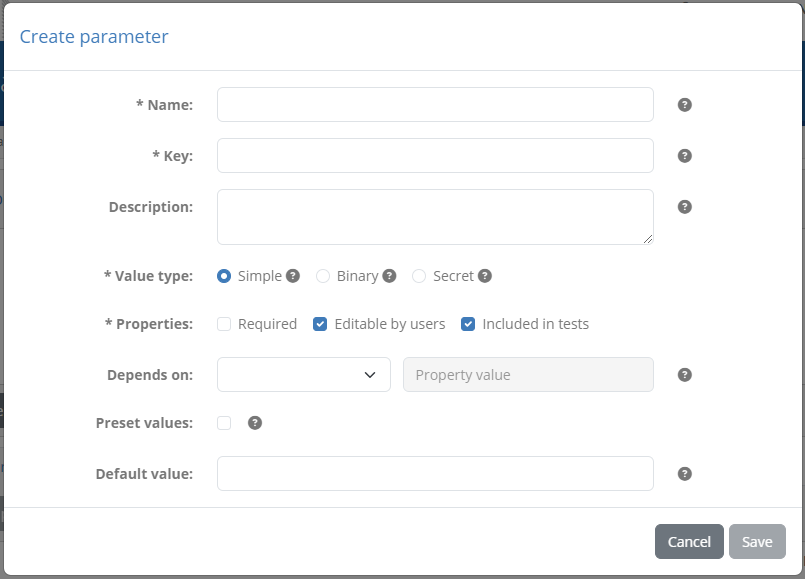
Create parameter
Creating a new domain parameter is done by clicking the Create parameter button from the Parameters list header.

Doing so presents you a screen in which you need to provide the information for the new parameter.
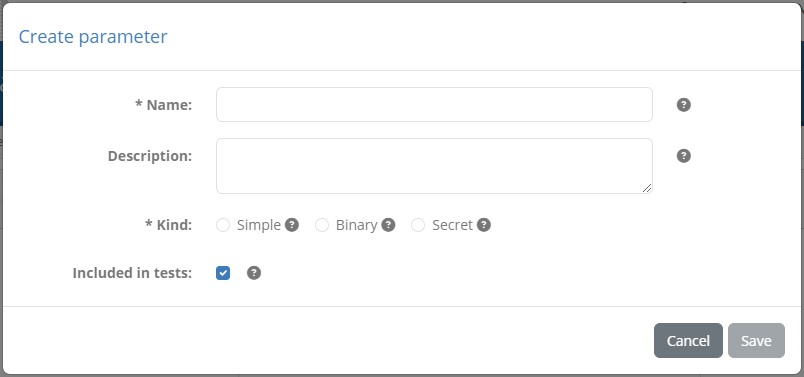
The information requested in this form is:
The name of the parameter (required), used to identify it and refer to it from test cases.
The description of the parameter (optional).
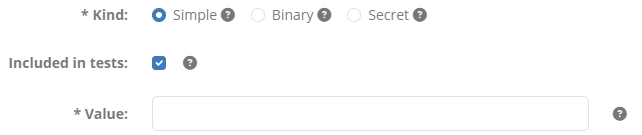
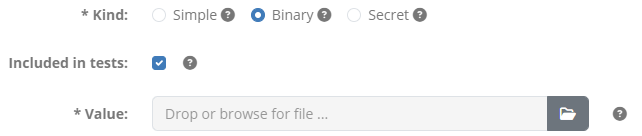
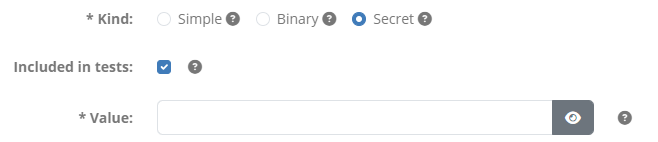
The kind of parameter it is, choosing from either “Simple”, “Binary” or “Secret” (required).
Whether or not the parameter is to be included in tests (by default yes).
Depending on whether you select that this is a “Simple”, “Binary” or “Secret” parameter the screen will be adapted to request its value. Selecting “Simple” means that this is a simple text value that can be entered and displayed as-is. In this case the screen will adapt to request additionally the parameter’s value (required)
If selected to be a “Binary” parameter, you are presented with an upload button to provide the file in question. Once set, the file can also be downloaded.
Finally, if you select that the parameter is “Secret”, the screen will adapt to request an obfuscated value (required). Hidden parameters are treated similar to passwords, in that they will never be presented on-screen.
To complete the creation of the parameter click the Save button. Clicking the Cancel button closes the popup without making changes.
Edit parameter
To edit a domain parameter click its corresponding row from the Parameters table.
Doing so will open a popup screen presenting you the parameter’s current information, provided in editable fields.
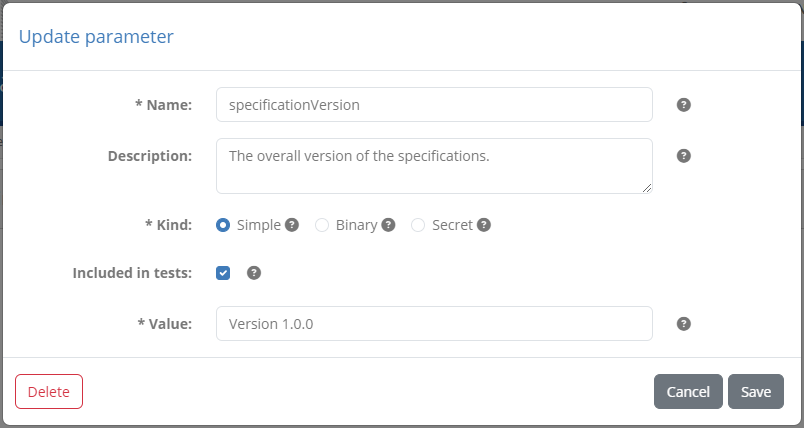
The fields presented for the parameter are:
The name of the parameter (required), used to identify it and refer to it from test cases.
The description of the parameter (optional).
The kind of parameter it is, choosing from either “Simple”, “Binary” or “Secret” (required).
Whether or not the parameter is included in tests.
The value of the parameter, presented either as a text input (if kind is “Simple”), a downloadable link (if kind is “Binary”) or a repeated text input (if kind is “Secret”).
Once you adapt the parameter’s information click the Save button to record your changes or the Cancel button to discard them. Clicking the Delete button removes, upon confirmation, the parameter.
Test services
Test services represent extensions to the Test Bed’s test engine, making available to test cases custom validation, messaging and processing capabilities that are not available out of the box. More concretely, these are web service endpoints implementing one or more GITB test service APIs that will be called by the Test Bed when used in test cases, and specifically in test steps defining them as service handlers.
In practice all that is needed to use such a service in a test case is to define its endpoint address as a test step’s handler.
The simplest way to do this in a configurable manner is to define this address as a domain parameter
which can then be referenced as $DOMAIN{myService}. Defining such an endpoint as a test service as opposed to a
domain parameter is identical regarding its use from test cases, but brings important benefits:
You can configure in a single location additional service settings such as authentication details.
Services can be listed and managed through the Test Bed’s REST API.
Additional metadata can be recorded for services to enable referencing from test suites.
Services can be monitored in the service health dashboard to ensure no disruptions to testing activities.
When a test service is defined it also defines a linked domain parameter with the same identifier. Test service definitions
are passed to the test engine when tests are executed, and are referenced through the DOMAIN map, exactly as you would
reference a domain parameter.
To manage the domain’s test services, select the Test services tab from the domain details screen.

The defined services are presented in a table, listing per service:
Its identifier, serving to identify it uniquely and reference it from test cases.
Its endpoint address, pointing to the address where the service’s endpoint is listening.
Its description, providing a short description on the purpose of the service.
Its service type, defining whether this is a validation, processing or messaging service.
To create a new test service definition click on Register service. Alternatively, you can also use the Register from parameter button in case you have already defined the service’s address as a domain parameter.
Create test service
Creating a test service is done by clicking the Register service button form the Test services tab.

Doing so will open a screen to input the test service’s information. Alternatively, if you want to convert an existing domain parameter to a test service, you can click the Register from parameter button which will allow you to look up and select an appropriate, existing parameter. In this case the resulting form will be prepopulated using the parameter’s information.

The core information requested in this form is:
The identifier of the service (required), used to identify it and refer to it from test cases.
The description of the service (optional).
The endpoint address (required) that is called when the service is used in test cases.
The service type, identifying this service as a validation, messaging or processing service as per the GITB test service APIs.
Whether the service health will be monitored through the service health dashboard.
In case the service requires authentication to be used, you can specify here how to authenticate. You can configure HTTP basic authentication, the WS-Security UsernameToken profile, or both.

Finally you can also specify optional metadata for the service, notably a reference identifier and version that are recorded and reported as information for the service, but that are not otherwise used within the Test Bed.
Having provided the requested information you can click on Test to check whether the test service responds successfully, Save to persist your changes, or Cancel to close without creating the service. Once the test service is created you will also see that it created in addition a domain parameter, with the same name (service identifier), value (endpoint address) and description as the service.

Edit test service
To edit en existing test service select its row from the test service’s list.
Doing so will open a popup screen presenting you the service’s current information, provided in editable fields.

You can use this form to review and edit the service’s information, specifically:
The identifier of the service (required), used to identify it and refer to it from test cases.
The description of the service (optional).
The endpoint address (required) that is called when the service is used in test cases.
The service type, identifying this service as a validation, messaging or processing service as per the GITB test service APIs.
The authentication settings.
The reference identifier and version as additional service metadata.
Similar to when you are creating a service, you can click on Test to check whether the test service responds successfully, Save to persist your changes, or Cancel to close without making changes.
Manage specification details
To view a specification’s details and edit its information you need to click on the specification’s row, displayed in the Specifications table of the domain details page.
Doing so will take you to the specification details screen. This is split in three sections:
The Specification details section, presenting the specification’s information.
The Test suites section, listing the test suites configured for this specification.
The Actors section, listing the actors configured for the specification.
In the Specification details section you are presented with a form to view and edit the specification’s information.
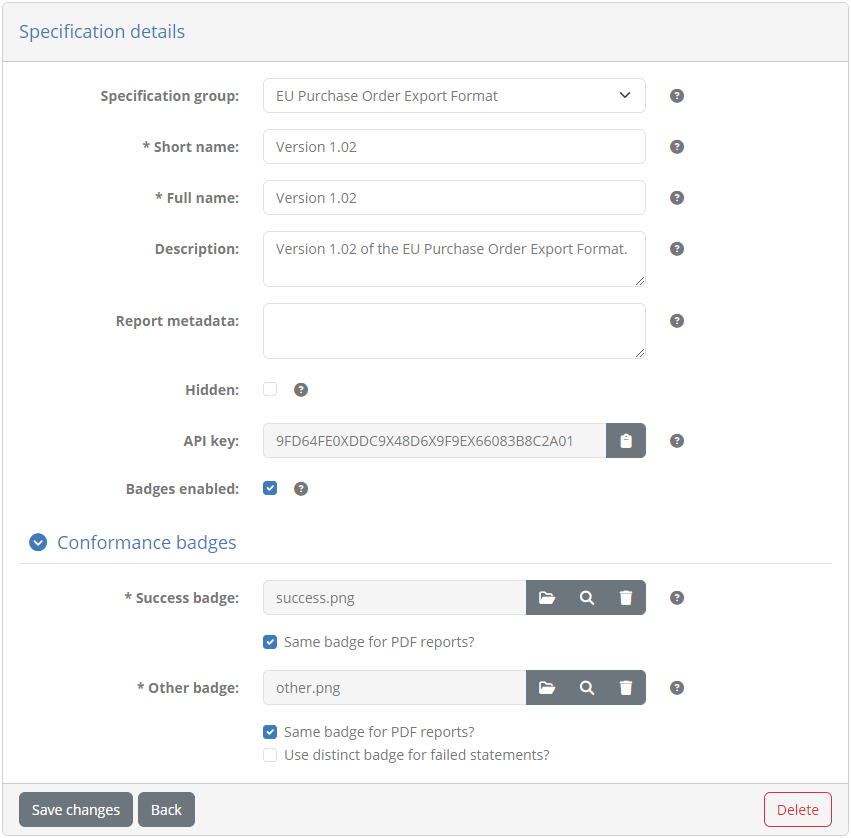
The following information is presented in corresponding form controls:
The specification’s short name (required), displayed in list views.
Its full name (required), displayed in detail screens and reports.
A description to provide more context on the specification (optional), displayed in detail screens and reports.
Custom report metadata included in XML reports.
Whether or not the specification is to be considered as hidden (by default set to false).
The specification’s REST API key that is used to identify the specification when managing test suites via the Test Bed’s REST API (if enabled by the Test Bed administrator). The readonly key value is automatically generated, and can be copied to your clipboard using the provided copy control.
In case specification groups are defined in the domain, these will also be presented as a dropdown selection at the top, with the specification’s group (if defined) being preselected.
Whether or not conformance badges are enabled for the specification (see their explanation in the specification creation screen).
Setting a specification as hidden is typically meaningful for existing specifications as doing so will effectively deprecate it. Once set as hidden, a specification does not appear as available when creating new conformance statements, however any existing conformance statements or performed tests that refer to it remain unaffected. A good example of such a scenario is when you want to support versioning in specifications and, upon release of a new version, you want to ensure new conformance statements are made for this latest version.
To edit the specification’s information, enter the new values you require and click the Save changes button. Clicking the Delete button will, following confirmation, delete the specification and all related information. The Back button does not make any changes but takes you back to the specification domain’s detail screen.
Test suites
The Test suites section presents the test suites that have been configured for the specification. These include test suites specific to the current specification, or shared test suites that apply to multiple linked specifications. All test suites are presented in a table with one row per test suite.
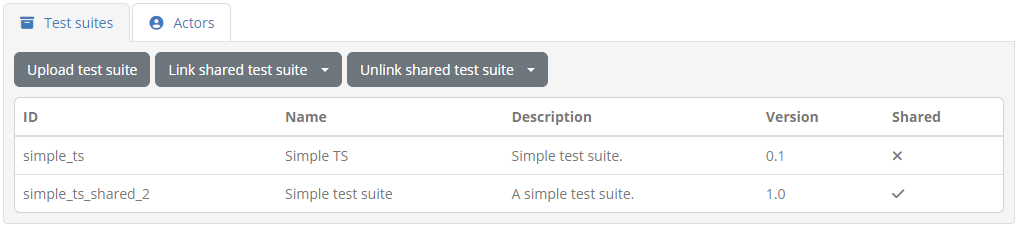
For each test suite the following information is displayed:
The ID of the test suite. This is an internal identifier used to reference the test suite and match it when uploading updates.
The name of the test suite. This is presented to users as a short name for the test suite.
Its description. This typically would include information on the purpose of the test suite and limited instructions relevant to all its test cases.
Its version. This is metadata that is recorded but not presented to users.
An indication of whether this test suite is (or could be) shared with other specifications.
You can use the provided search box to filter test suites based on their identifier and name. In addition, you may proceed to upload a new test suite by clicking the Upload test suite button or view its details by clicking its row. In case the domain defines shared test suites you may also:
Link a shared test suite to the specification.
Unlink one of the already shared test suites from the specification.
Clicking on either of these options opens up a list to select the test suite to link or unlink. In case linking a shared test suite requires a confirmation you will be presented with a relevant dialog. This will either inform you that linking the test suite is not possible (in case another test suite has the same identifier), or will prompt you to choose whether matching actor, endpoint and endpoint parameter data should be maintained or replaced.
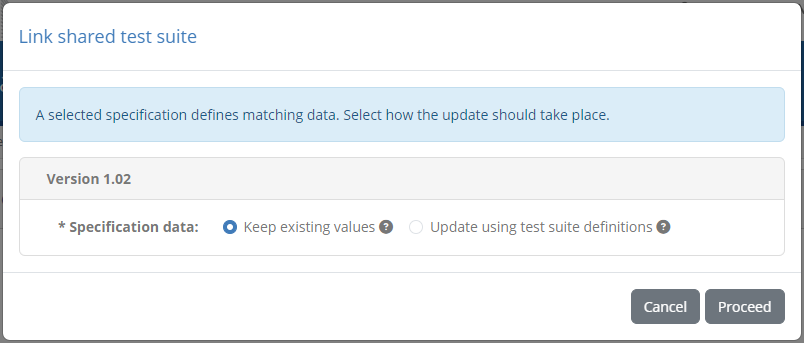
To proceed with the link, review and complete the presented choice and click on Proceed. Clicking on Cancel will close the dialog without taking further actions.
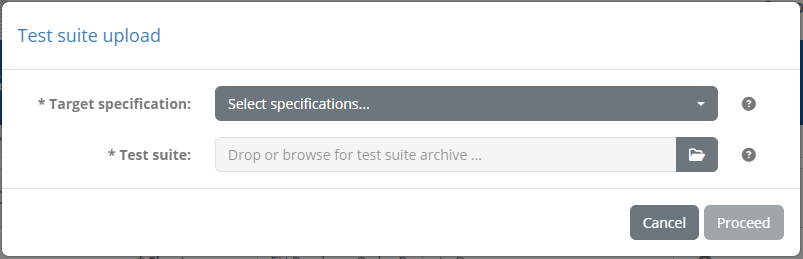
Upload test suite
To add or update a test suite for a specification you need to upload it using the Upload test suite button from the test suite section’s header.

Recall that test suites are ZIP archives containing a test suite’s XML file, one or more test case XML files, and the resources they use. The test suite and test case XML files are authored in the GITB TDL which includes detailed instructions and examples on test suite packaging and deployment.
Clicking on the Upload test suite button opens a dialog that displays the current Target specification as readonly and a file upload control to select the test suite archive.
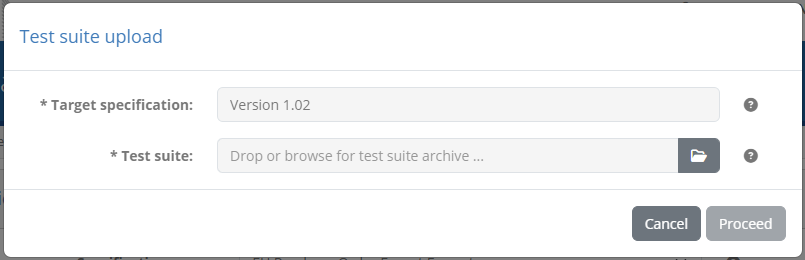
Note that in case you are uploading a test suite for multiple specifications from the domain details page, this screen presents the domain’s specifications as a multiple selection list.
Once the archive is selected you can click on Proceed to proceed with the upload. Upon doing so the Test Bed will validate the archive to ensure it is a valid test suite. In case your uploaded test suite has errors or warnings these will be presented to you including for each:
An error code and description of the validation finding.
The relevant test suite file as the location of the problem.
If the test suite is found to have errors you are not allowed to proceed further. If only warnings are found you can click the Proceed button to ignore them and continue to the next step. Validation warnings will not necessarily lead to test session errors but should nonetheless be reviewed to ensure nothing has been neglected. Examples of warnings are supporting resources that are not used in test cases or references to missing domain parameters.
Note
Uploading valid test suites: If an uploaded test suite is fully valid (i.e. its validation results in no errors or warnings) the validation report step is completely skipped.
For a valid test suite, or a test suite with warnings you have chosen to ignore, what takes place next depends on whether or not the test suite or the data it refers to already exist. If this is the case you will next be prompted with a choice per target specification on how the upload should proceed.
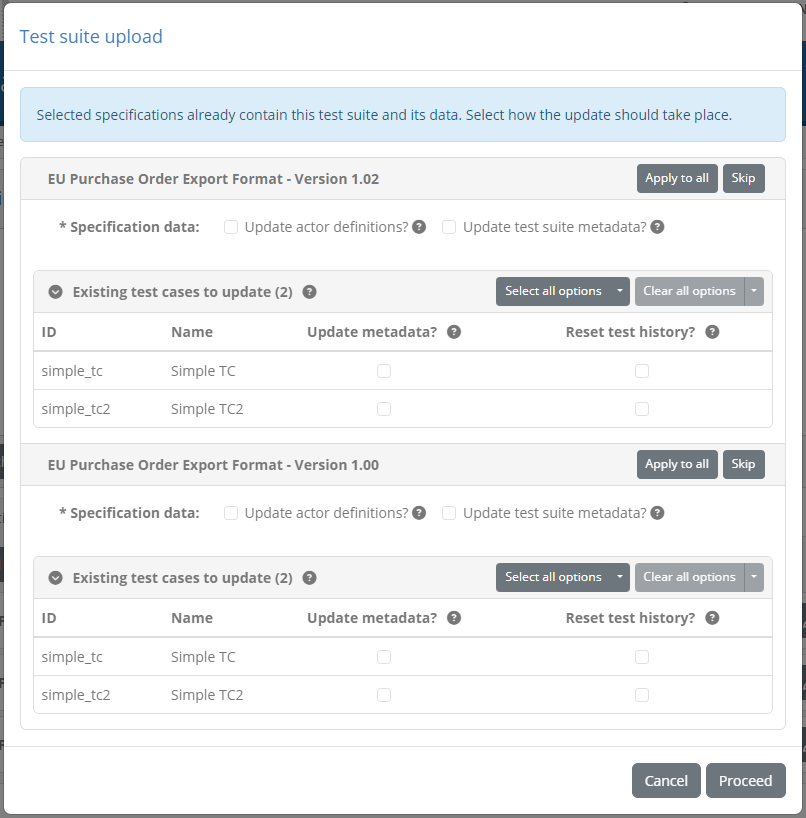
For each specification you have two possible choices regarding the specification’s data:
Update the actor definitions, displayed in case actors with the same identifiers as those in the test suite are found. Select this option to update the definitions of actors, endpoints and parameters to match the definitions from the archive.
Update test suite metadata, displayed in case the test suite already exists. Select this option to update the test suite’s metadata (name, description, documentation, version) to match the archive.
In case an existing test suite is found you are also presented with tables concerning the test suite’s test cases (displayed as applicable):
The existing test cases, matched from the archive, that will be updated.
The new test cases, present only in the archive, that will be created.
The missing test cases, not present in the archive, that will be deleted.
From these three tables the one showing matched existing test cases presents further choices per test case. For each such test case you can choose:
To update its metadata, setting its name, description, version and documentation to match the archive’s definition.
To reset its test history, that if selected will consider related test sessions as obsolete and reset accordingly linked conformance statements.
Note
If any test case option to reset testing history is selected you will be prompted for a confirmation before proceeding. Resetting the testing history is not reversible.
When reviewing the choices for matching data you may also choose to replicate one set of choices to all specifications through the Apply to all button. In addition, you can click the Skip button to avoid making any changes to the specification in question. Doing so will grey out the specification’s entry and display a Process button in case you finally choose to proceed with the changes. Once you are satisfied with your choices you can click the Proceed button to complete the upload.
Once the upload is completed the dialog will close and the listed test suites will be refreshed. At any point during the test suite upload wizard you can stop the operation by clicking the Cancel button that closes the popup without making any updates.
Note
Deleting specification data: Specification data that is not matched through the test suite upload can only be created or updated. Data that exists but that is not matched in the test suite remains unaffected.
Manage test suites via REST API
Apart from managing test suites through its user interface, the Test Bed also provides a REST API allowing you to deploy and undeploy test suites via REST calls. Managing test suites in this way is primarily used during test suite development, to allow the deployment of test suites via automation processes. Specifically you may use the API to:
Deploy test suites (shared and specification-specific).
Undeploy test suites (shared and specification-specific).
Link shared test suites to specifications.
Unlink shared test suites from specifications.
Details on each operation, including sample requests and responses, are provided in the REST API documentation.
Note
Using the Test Bed’s REST API is an advanced feature needs to first be enabled before it can be used. This is done by setting the AUTOMATION_API_ENABLED property to true in the Test Bed’s configuration or via the system configuration screen.
Actors
The Actors section presents the actors configured for the specification. They are presented in a table with one row per actor.
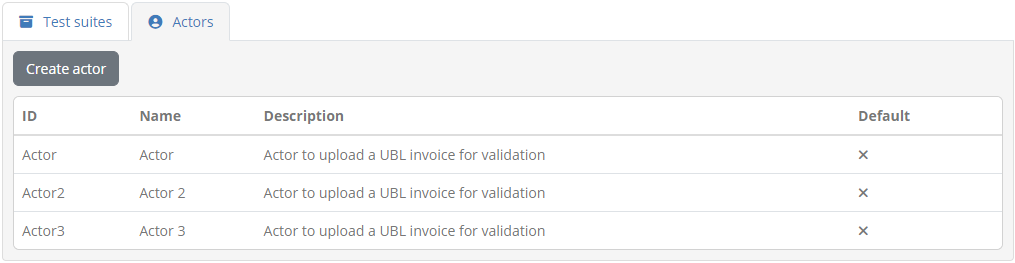
For each actor the following information is displayed:
The ID of the actor, used for display purposes as a short name and also to reference the actor from test suites.
Its name, as the complete actor name to show in detail screens and reports. This is also the name presented to users during test execution, unless this is overridden at test case level.
Its description, displayed in details screens and reports to provide more details on the actor.
Whether or not the actor is the specification’s default. The default actor is the one that will be preselected as the SUT when creating new conformance statements for the specification.
Whether or not the actor is set as hidden (presented as a “hidden” icon). Hidden actors are not presented to users during the creation of conformance statements.
Clicking on an actor’s row will take you to its detail page. To manually create a new actor click the Create actor button from the table’s header.
Note
Automatic vs manual actor creation: Actors can also be created automatically during test suite upload as long as their complete information is provided. If you prefer to manually create actors through the Test Bed’s interface you should opt to refer to these using their ID rather than define them fully from within test suites (see the GITB TDL documentation for more details).
Create actor
To create a new actor manually (as opposed to automatically via test suite upload) click the Create actor button from the Actors list header.

Doing so presents you a screen in which you need to provide the information for the new actor.
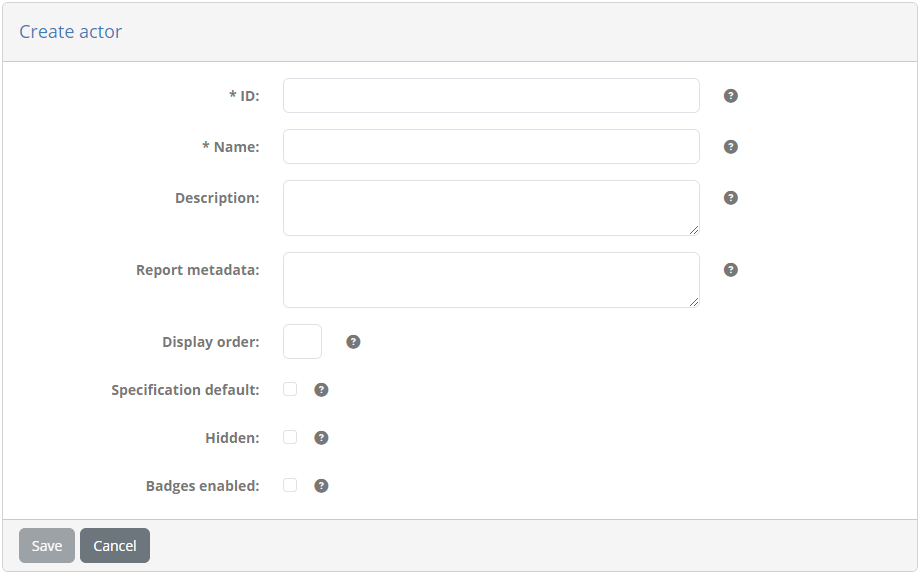
The information to provide for the actor is:
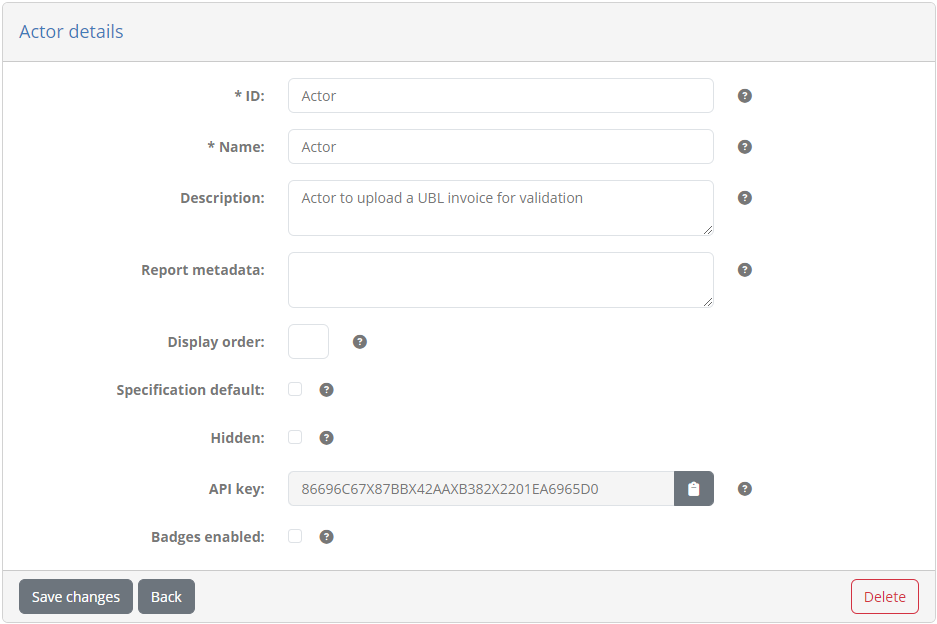
The actor’s ID (required), displayed in list views and used to reference the actor within test suites.
Its name (required), displayed in detail screens and reports, as well as in the test execution screen (unless overridden at test case level).
A description to provide more context on the actor’s purpose (optional), displayed in detail screens and reports.
Custom report metadata to include in XML reports.
The actor’s display order (optional), used to determine where the actor should be displayed in the test execution diagram (see Execute tests). If provided this should be an integer that will be compared to the other specification actors’ display order to determine the presentation order. An actor with a configured value will be displayed before actors with a larger value or ones that have no value configured.
Whether or not the actor is the specification default. Only one default actor can be defined for a specification which will be preselected when creating new conformance statements.
Whether or not the actor should be hidden. Hidden actors are valid for reference purposes but are not presented to users when creating conformance statements. They can be used to hide simulated actors or deprecate ones that have been previously used without affecting existing test sessions.
At the bottom of the form you may also find an option labelled Badges enabled which is by default unchecked. Checking this expands the form to show further controls to define badges.
Badges are images that can be publicly looked up for a given organisation’s system to produce an image that visually represents its conformance status. If you choose to define such badges you need to provide at least a badge for the “successful” state and “other” (i.e. not successful) state. Optionally you may also provide a badge for the “failure” state, for which the “other” badge is used by default.
Badges can also be included in conformance statement certificates (and conformance overview certificates), which are PDF reports attesting to an organisation’s successful testing. In this case you may choose to use alternate badge images that are more appropriate for usage in PDF documents (as opposed to within an HTML page). For this purpose you have the option of selecting different badges for HTML and PDF display.
Once a badge is provided you will be presented with additional controls to delete and preview it.
A badge URL is of the form [TEST_BED_ADDRESS]/[SYSTEM_KEY]/[ACTOR_KEY]/[SNAPSHOT_KEY] with the [SNAPSHOT_KEY]
being optional. Such URLs can be copied by both administrators through the conformance dashboard,
as well as normal users through a conformance statement’s detail page.
Note
Badges can also be defined at specification level if this is more meaningful for your setup. If a badge is missing at actor level, the one configured for the specification will be used by default.
To complete the creation of the actor click the Save button. To cancel and return to the specification’s detail page click the Cancel button.
Manage test suite details
To view a test suite and edit its metadata click its row from the specification’s test suite listing.
In case of a shared test suite, the entry point to its details would be to click the test suite’s row from the domain’s listing of shared test suites.
For both shared and specification-specific test suites, details are presented in an editable form followed by:
A listing of its included test cases.
A listing of its linked specifications (for a shared test suite).
In case this is a shared test suite you are also presented with a message highlighting that any changes made would apply to all linked specifications.
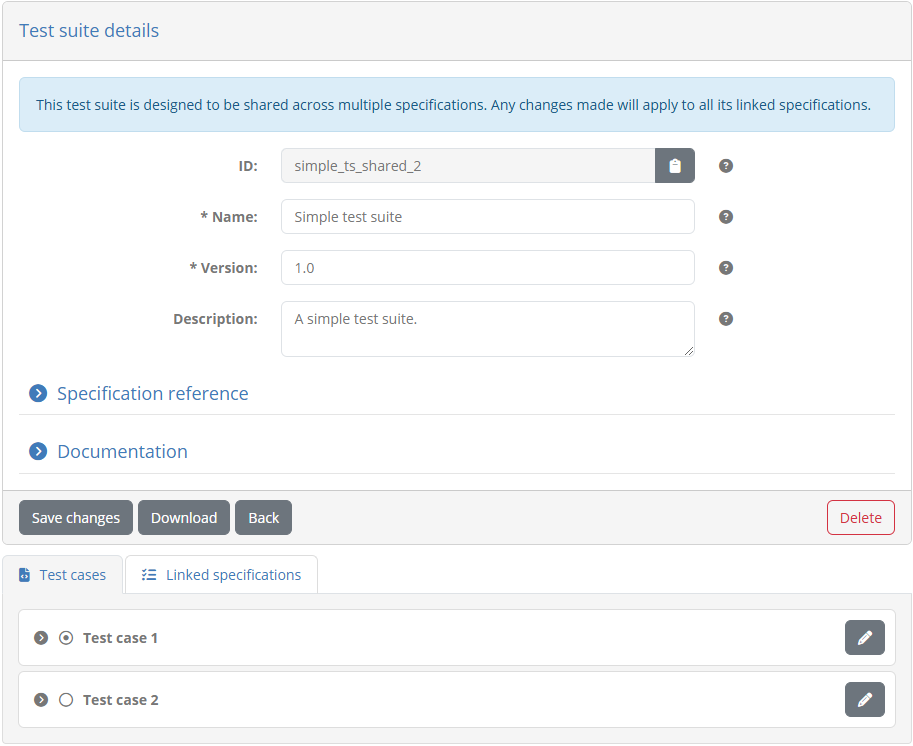
Using the provided form you can edit the test suite’s metadata, specifically:
Its ID, a non-editable identifier set via test suite upload that is used to reference and match the test suite in subsequent uploads.
Its name (required), a short text presented to users to identify the test suite.
Its version (required), a version identifier for the test suite presented only to administrators.
Its description (optional), a text providing context on the test suite and a brief overview of its purpose and contained test cases.
Its relative order (required), determining the test suite’s display and execution order compared to other test suites.
You can also include here an additional set of properties related to the test suite’s normative specification reference. This information forms part of the test suite’s metadata, that if completed will figure in the test suite’s definition file, reports, and on-screen displays.
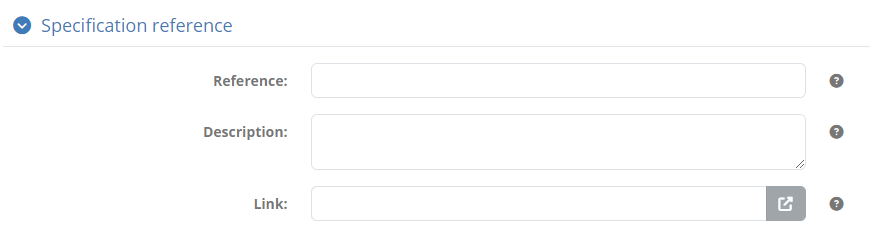
You can provide here as part of this information a reference code, a description, as well as a link to an online resource where more information can be found. Providing this information is optional, and depending on what you provide it will be displayed accordingly. For example providing all information will show the reference code as a link followed by the description, whereas if only a link is provided this will be displayed as a link icon to follow.
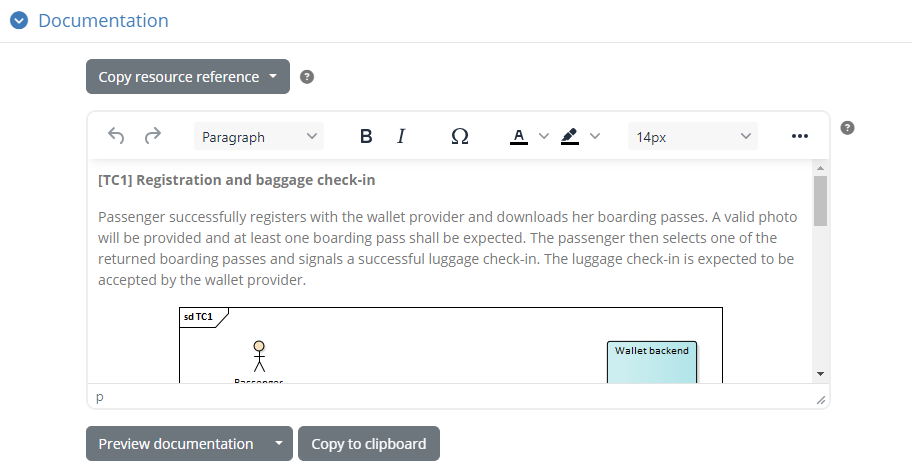
You may also view and edit here the test suite’s documentation. This is displayed to users as part of the conformance statement detail page, its purpose being to add extended rich documentation that describes the steps to follow and reference external resources. To display the existing documentation check the Documentation header, which will expand to display a rich text editor.
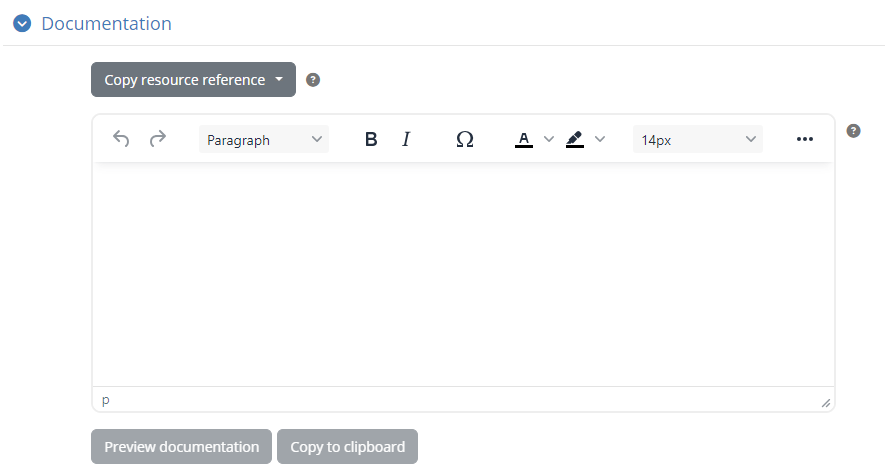
Above the rich text editor you have a Copy system-wide resource reference control that allows you to search in-place your system resources, such as images to include or files to add download links for. Once you find the resource you’re looking for you can click it to copy its reference to the clipboard. You can then use this reference as e.g. the source of an image file or the target of a link.
Note
Unlike community administrators, you cannot search and include community-specific resources here because the relevant domain could be linked to multiple communities.
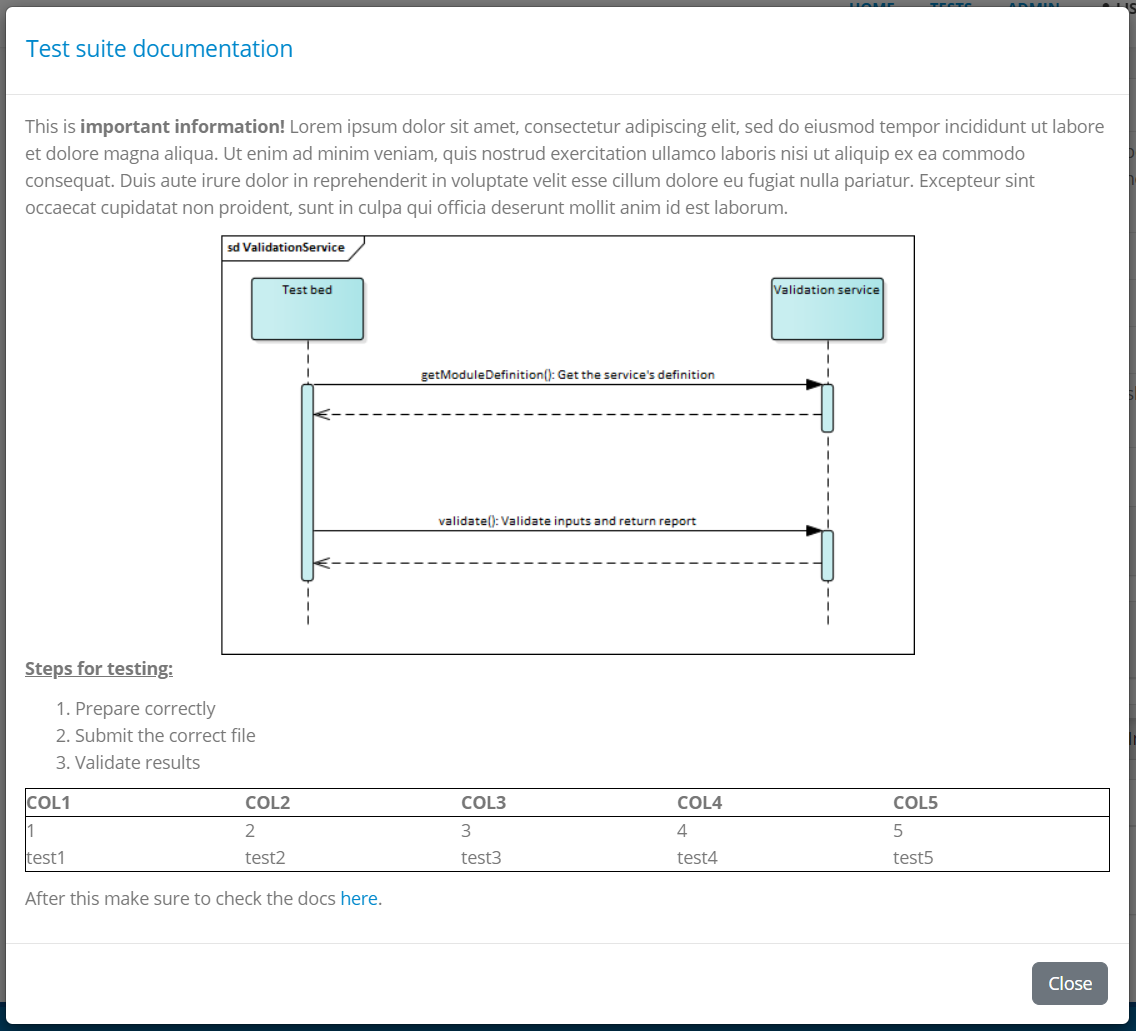
If you choose to provide such documentation you may also click the Preview documentation to ensure it matches your expectations. Doing so presents a popup with the documentation, displaying it exactly as when viewed by your users.
Once you have introduced documentation for the test suite you may also click the Copy to clipboard button that will copy the documentation’s HTML source. You can use this to inspect the documentation in an editor or to store it within your test suite archive (in case you refer to the documentation from the test suite definition file).
If you make changes to the test suite’s metadata you can apply them by clicking the Save changes button. From here you can also click Download to download the test suite’s ZIP archive. Clicking Delete will delete, upon confirmation, the test suite rendering linked test results as obsolete, whereas clicking on Back will discard any pending changes and return you to the specification detail page (for a specification’s test suite) or the domain detail page (for a shared test suite).
Note
Update via test suite upload: A test suite’s name, description and documentation can also be updated via test suite upload. When uploading a new version for a test suite you can choose whether such values provided through the user interface are to be kept or replaced. Note that the content and execution order of the test suite’s test cases can only be changed via upload.
In the case of a non-shared test suite, the available controls also include options to:
Move the test suite from the current specification to another one.
Convert the test suite to a shared test suite.

Both these operations can be useful when reorganising your tests and specifications. You may want to move test suites across specifications if you realise that certain tests are best placed under another specification. Similarly, converting to a shared test suite can be useful if you want to associate this test suite with multiple specifications without requiring the re-execution of its tests. In case the test suite is already shared, these two options are replaced by the option to convert to a non-shared test suite. This acts as the opposite of what we saw previously, allowing you to link the test suite with a specific specification. This could be interesting if you want to have a test suite re-executed per linked specification.

It is important to note that moving test suites across specifications, as well as converting to and from being shared, maintains the current test history. You can also effectively always undo such actions by reversing them once complete (e.g. converting to shared and then back to non-shared). In addition, the scenarios when you will be unable to make such changes will be highlighted in advance. For example a test suite cannot be converted to being shared if one already exists with the same identifier, whereas converting from to non-shared is not allowed if the test suite is already linked to multiple specifications.
Test cases
The Test cases section presents the test cases included in the test suite.
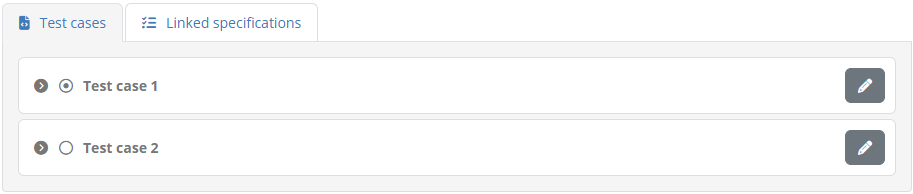
The presentation of test cases is the same as what you would see in a conformance statement detail page. Test case are displayed following their execution sequence, displaying per test case:
Its name, displayed to users as a short name for the test case.
Its description, displayed to users to provide context on the purpose of the test case and a brief summary of its steps. This becomes visible once a test case is clicked to be expanded.
Indicators on whether a test case is optional and/or disabled.
Its group indicator and name in the test case is defined within a group.
Its tags to highlight interesting aspects of the test case.
A button to view its documentation, if such documentation is defined.
Each test case also provides an edit button that you can click to proceed to its detail page. You can also use use the provided search box to filter the displayed test cases based on their name.
Note
Creating a test case: Creating a new test case is only possible through test suite upload.
Linked specifications
For a shared test suite, the Linked specifications tab presents the specifications with which the test suite is currently linked. These are the specifications for which the test suite’s test results will count towards, without needing to be re-executed per specification. Specifications are presented in a row showing per specification its name and description, that can be also clicked to display its details.
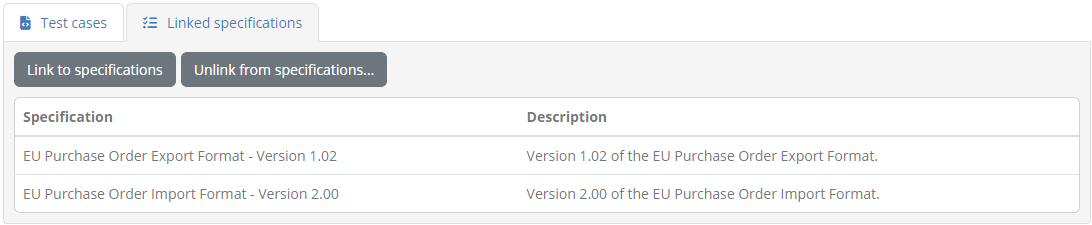
To link the test suite with another specification click the Link to specifications button. Doing so will present a dialog with the specifications available to link the test suite with.
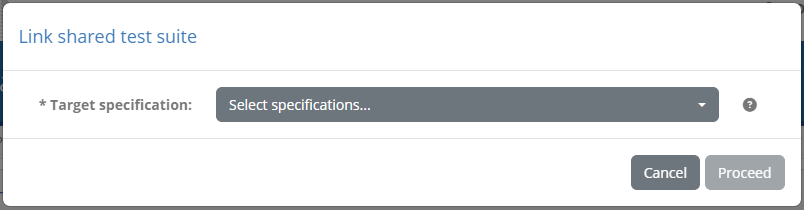
To proceed select the desired specification(s) and click on Proceed. At this point you may be presented with an additional confirmation screen in case matching information is found in any of the selected specifications. Specifically:
In case a specification defines a different test suite with the same identifier you will see this highlighted and the linking marked as skipped.
In case a specification already defines actors, endpoints and endpoint parameters matching the test suite’s data, you will be prompted to choose whether these will remain unchanged or will be updated to match the test suite archive.
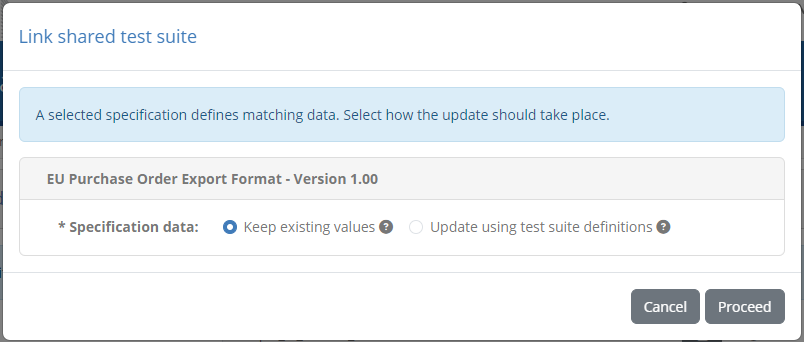
Once you have reviewed and completed these choices you may click on Proceed to complete the link. Clicking on Cancel at any time will close the dialog without any actions.
To unlink a test suite from one or more specifications you may click the Unlink from specifications… button. Doing so will present checkboxes alongside each specification allowing you to unlink multiple specifications in one go.
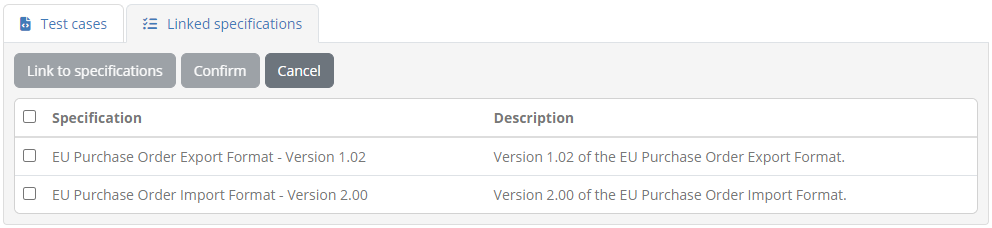
To proceed, select one or more specifications and click on Confirm. Note that unlinking a test suite from a specification does not delete the test suite itself nor does it affect its recorded tests.
Manage test case details
To view a test case’s details and update its metadata you need to click on the test case’s row, displayed in the Test cases tab of the test suite details page.
Doing so will present you with the test case details screen where you can view and edit the test case’s information.
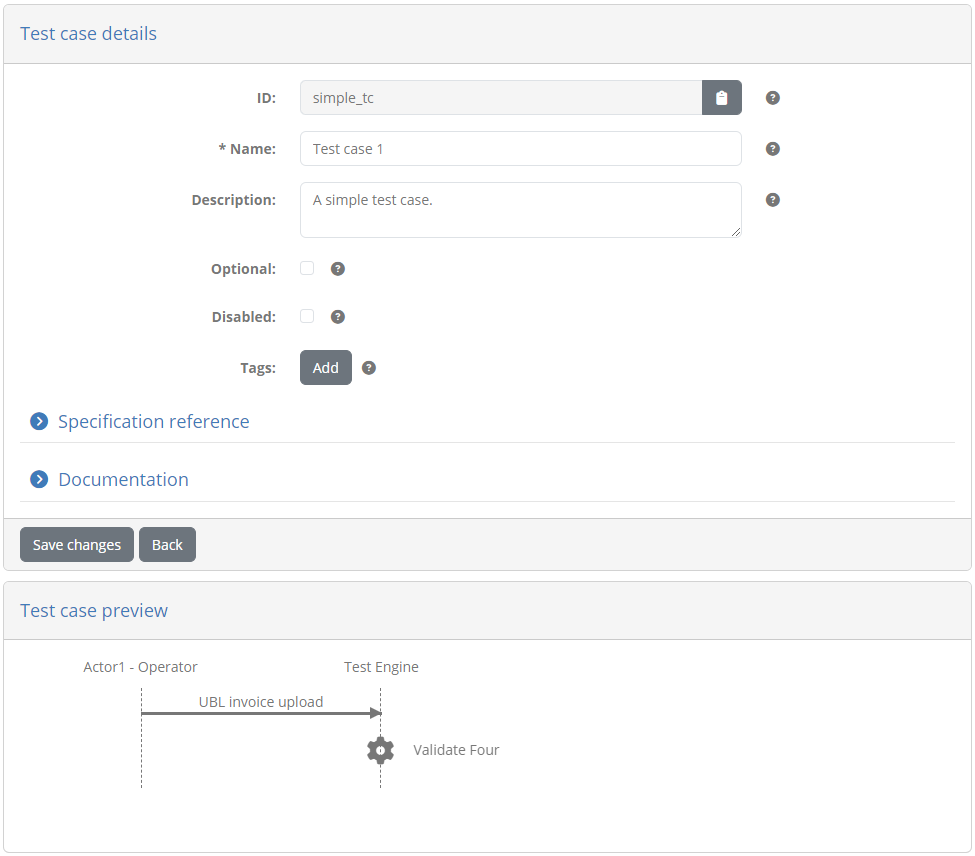
An editable form is presented here that displays the metadata for the test case, specifically:
Its ID, used for internal reference by its test suite and to match the test case during uploads. This is a readonly value that is set during initial test suite upload.
Its name (required), that you can edit to provide a user-friendly short identifier for the test case. This is presented to users in the conformance statement details page and during test execution.
Its description (optional), displayed alongside the test case’s name in the conformance statement details page and during test execution. The purpose of this description is to summarise its purpose and steps.
Whether or not the test case is optional. Optional test cases can be executed but are not counted towards a conformance statement’s status.
Whether or not the test case is disabled. Disabled test cases are by default hidden and cannot be executed.
One or more tags you can define to highlight traits for the current test case.
If you choose to define tags you can add new ones through the Add button that opens up a popup to provide the tag’s information.
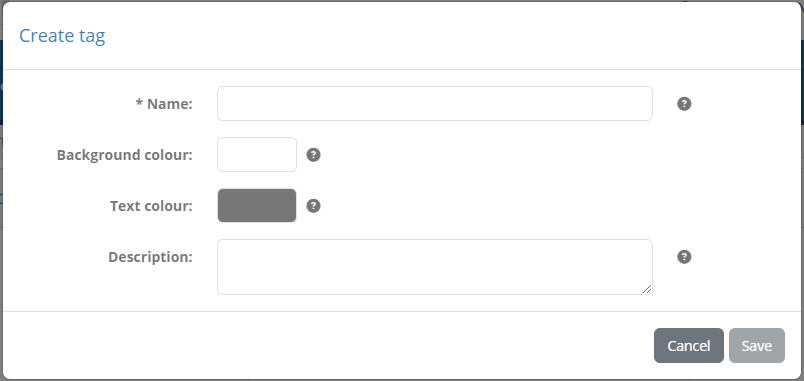
The information to provide here consists of the tag’s name that will be displayed on the tag, its background and text colour, as well as an optional description to display in tooltips and report legends. To create the tag click on Save, or click on Cancel to close the popup without making changes.
Once tags are defined you can see an editable preview of each along with edit and delete buttons.

You can also include here an additional set of properties related to the test case’s normative specification reference. This information forms part of the test case’s metadata, that if completed will figure in the test case’s definition file, reports, and on-screen displays.
You can provide here as part of this information a reference code, a description, as well as a link to an online resource where more information can be found. Providing this information is optional, and depending on what you provide it will be displayed accordingly. For example providing all information will show the reference code as a link followed by the description, whereas if only a link is provided this will be displayed as a link icon to follow.
You may also view and edit here the test case’s documentation. This is displayed to users as part of the conformance statement detail page, its purpose being to add extended rich documentation that describes the steps to follow and reference external resources. To display the existing documentation click the Documentation section, to reveal a rich text editor.
Above the rich text editor you have a Copy system-wide resource reference control that allows you to search in-place your system resources, such as images to include or files to add download links for. Once you find the resource you’re looking for you can click it to copy its reference to the clipboard. You can then use this reference as e.g. the source of an image file or the target of a link.
Note
Unlike community administrators, you cannot search and include community-specific resources here because the relevant domain could be linked to multiple communities.
If you choose to provide such documentation you may also click the Preview documentation to ensure it matches your expectations. Doing so presents a popup with the documentation, displaying it exactly as when viewed by your users.
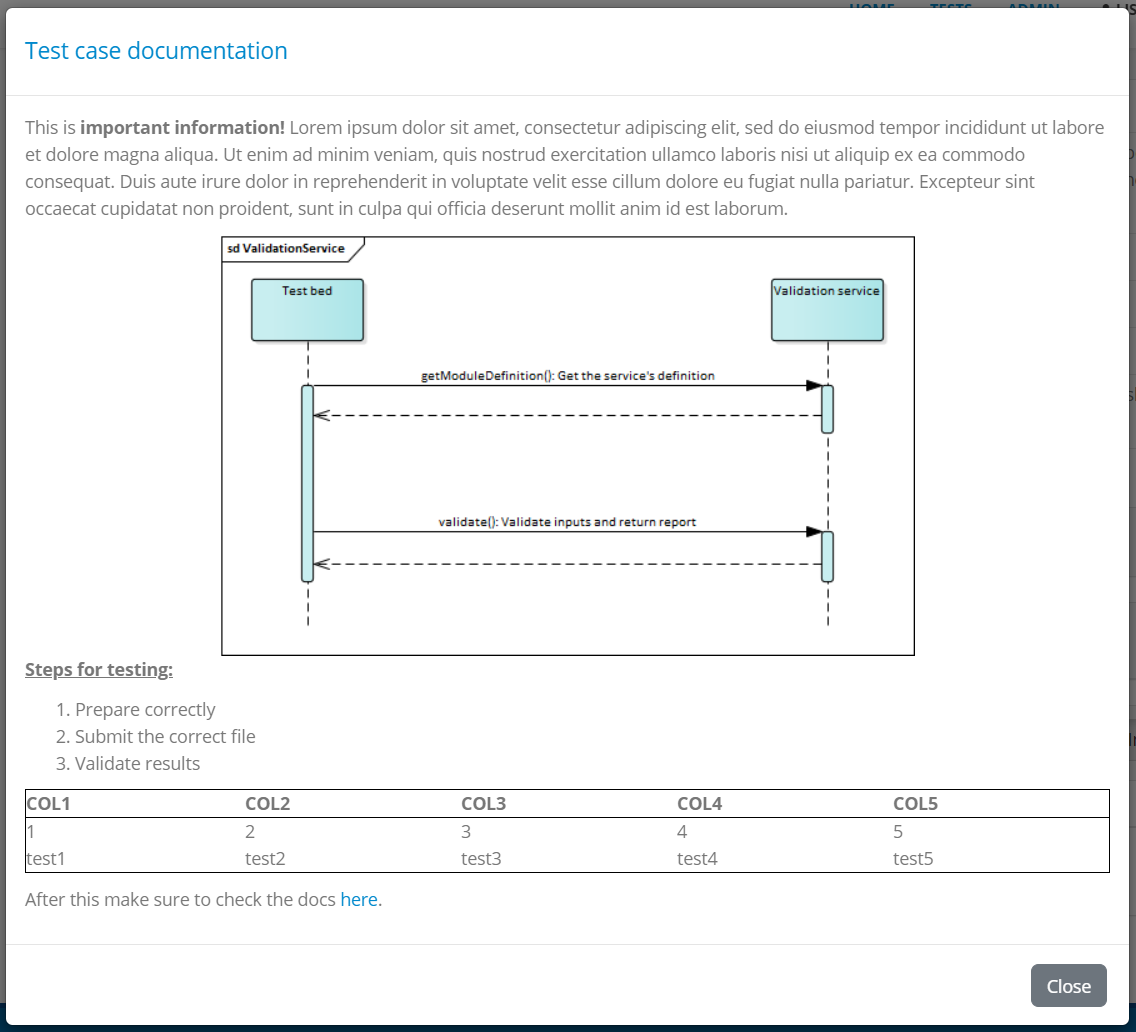
The Preview documentation button offers also a secondary option termed Preview documentation in PDF report. This allows you to preview how the documentation will display in PDF exports, given that test case reports include their documentation as an annex. Selecting the option will generate a PDF report that you can inspect to ensure everything appears as expected.
Note
Image display problems in PDF reports: If you notice that PDF reports fail to render defined images you may need to adapt slightly your HTML content. This may occur for an image whose size is specified as a percentage and that is included in a table. If this is the case either specify a fixed pixel width for the image, or move it outside the table.
Once you have introduced documentation for the test case you may also click the Copy to clipboard button that will copy the documentation’s HTML source. You can use this to inspect the documentation in an editor or to store it within your test suite archive (in case you refer to the documentation from the test case definition file).
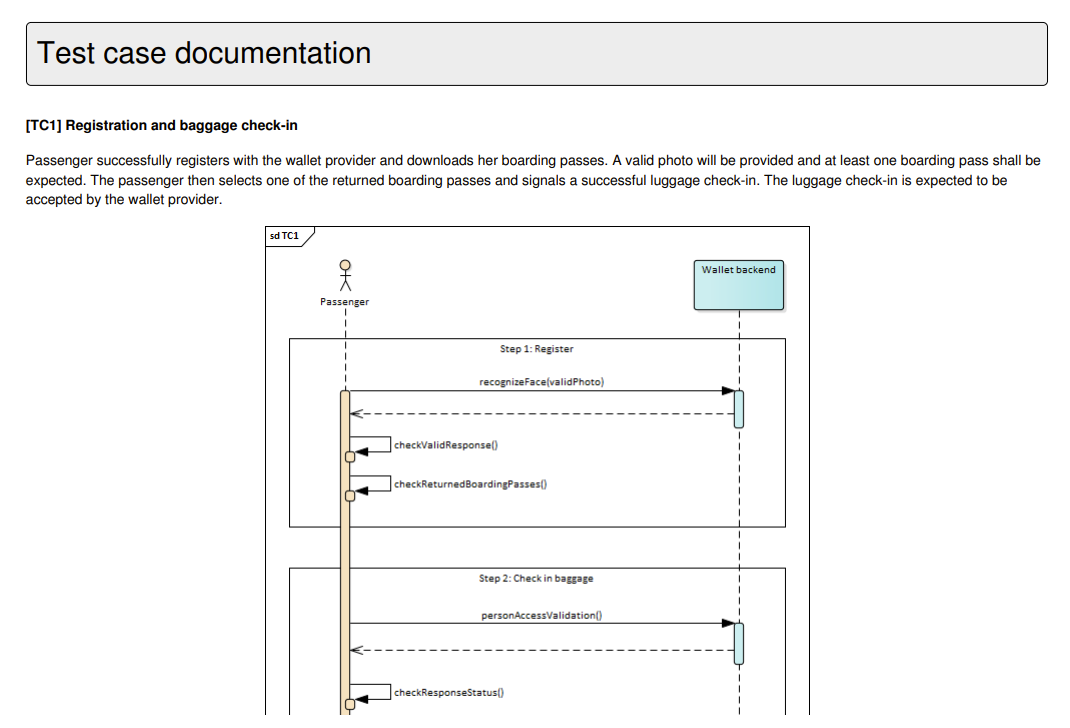
Beneath the test case details’ form you are presented also with an additional panel to preview the test case. This displays the test execution diagram for the test case, as it will be presented to users, allowing you to visualise its steps.
Note
Update via test suite upload: A test case’s name, description and documentation can also be updated via test suite upload. When uploading a new version for a test suite you can choose whether the values you have been editing through the user interface are to be kept or replaced. The test case’s content (i.e. its steps) on the other hand can only be changed via upload.
To persist your changes click on the Save changes button. Clicking on Back will discard any changes and return you to the test suite details page.
Manage actor details
To view an actor’s details and edit its information you need to click on the actor’s row, displayed in the Actors table of the specification details page.
Doing so will take you to the actor details screen. This is split in two sections:
The Actor details section, presenting the actor’s information.
The Configuration parameters tab, listing the parameters configured for this actor.
In the Actor details section you are presented with a form to view and edit the actor’s information.
The following information is presented in corresponding form controls:
The actor’s ID (required), used for display purposes and to refer to the actor in test suites.
A name (required), displayed in detail screens and reports, as well as the test execution screen.
A description to provide more context on the actor’s purpose (optional), displayed in detail screens and reports.
Custom report metadata to include in XML reports.
The actor’s display order (optional), used to determine where the actor should be displayed in the test execution diagram (see Execute tests). If provided this should be an integer that will be compared to the other specification actors’ display order to determine the presentation order. An actor with a configured value will be displayed before actors with a larger value or ones that have no value configured.
Whether or not the actor is the specification default. Only one default actor can be defined for a specification which will be preselected when creating new conformance statements.
Whether or not the actor should be hidden. Hidden actors are valid for reference purposes but are not presented to users when creating conformance statements. They can be used to hide simulated actors or deprecate ones that have been previously used without affecting existing test sessions.
The actor’s REST API key that is used to identify the actor when launching tests via the Test Bed’s REST API (if the REST API is enabled). The readonly key value is automatically generated, and can be copied to your clipboard using the provided copy control.
Whether or not conformance badges are enabled for the actor (see their explanation in the actor creation screen).
To edit the actor’s information, enter the new values you require and click the Save changes button. Clicking the Delete button will, following confirmation, delete the actor and all related information. The Back button does not make any changes but takes you back to the specification’s detail screen.
The Configuration parameters tab presents actor-related information that varies per conformance statement. They are displayed in a table with one row per parameter.
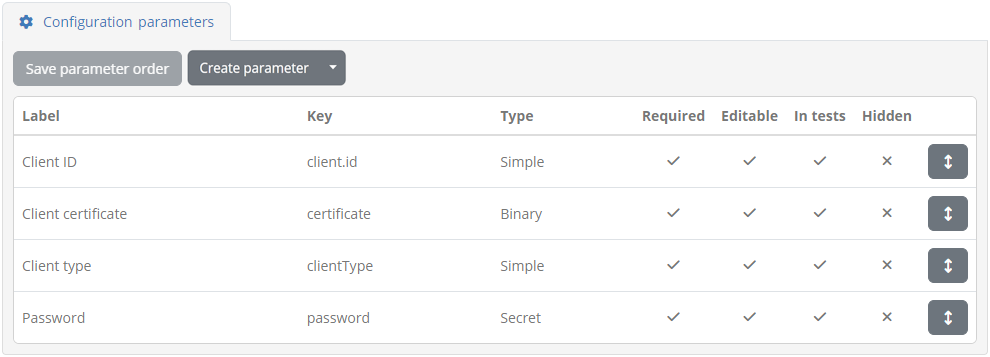
For each parameter the following information is displayed:
Its name, used for display purposes and as an identifier when referring to the parameter (e.g. within test cases).
Its description, used to provide context to users on the parameter’s purpose.
Its type, either “Simple” for a simple text value, “Binary” for files or “Secret” for secret texts.
A required flag, determining whether the parameter needs to be provided before executing tests.
An editable flag, determining whether the parameter can be edited by users or is reserved to administrators.
An included in tests flag, determining whether or not the parameter is included as a variable within test sessions.
A hidden flag, determining whether or not a non-editable parameter is is also to be hidden from organisation users.
Clicking on a parameter’s row will open a popup to view and edit its information. To manually create a new parameter click the Create parameter button.
Note
Automatic vs manual parameter creation: Actor configuration parameters can also be created automatically during test suite upload.
Create parameter
To create a new actor parameter manually (as opposed to automatically via test suite upload) click the Create parameter button.

Doing so opens a popup screen in which you need to provide the information for the new parameter.
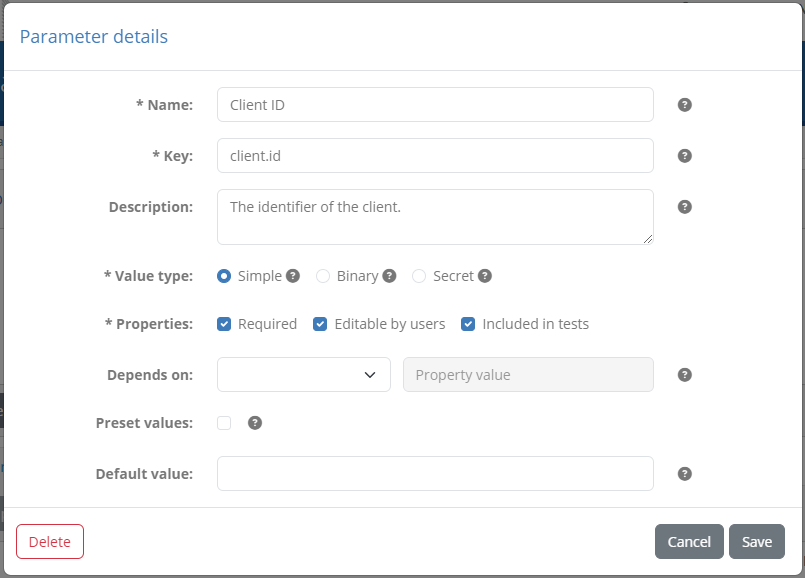
The information to provide for the parameter is:
Its name (required), used for display purposes.
The key (required), used to refer to the parameter within test cases.
Its description (optional), used to provide context to users on the parameter’s purpose.
Its value type (required), either “Simple” for a simple text value, “Binary” for files or “Secret” for secret texts.
Its properties, specifically whether is is required, editable by users, included in test sessions and hidden.
Whether or not parameters are set as editable and included in test sessions provides flexibility in collecting, setting and sharing configuration by and towards users. A parameter set as not editable could be used by administrators as a way to provide a user with a given input that is needed during test execution (e.g. a generated certificate). Furthermore, non-editable parameters set as hidden are never presented to organisation users and as such are ideal as control flags. Such flags could set manually by administrators when managing the tests of an organisation and viewing a conformance detail page or automatically via a conformance statement trigger.
Note
Organisation and system properties: Actor parameters can be seen as input and configuration properties that are relevant to a system’s specific conformance statement. For information that is more high-level, you may also use system or organisation properties when this is linked, respectively, to a system or a complete organisation. Finally, parameters can also be set at domain level, applying to a complete domain or community.
All configuration parameters can be edited manually but also automatically through triggers.
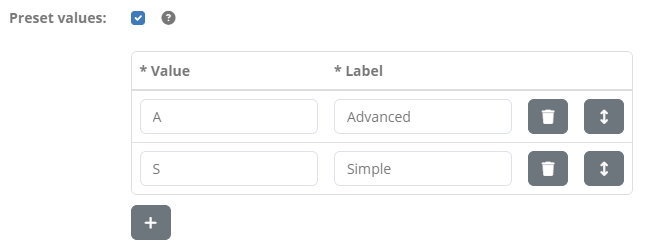
The Preset values apply to simple parameters (i.e. text) and allow you to define a preset list of values for the parameter that will appear as a dropdown selection list. For each such value you can define a user-friendly label and the property’s actual value, using the provided controls to add new values, remove existing ones or change their display order.
The Depends on field is optional and allows you to define a prerequisite condition for this parameter. To set such a prerequisite you need to select another parameter from the provided list and specify to its left in the provided text field (or dropdown selection if the parameter has preset values) the value that it needs to have for the current parameter to be enabled. A parameter that misses any of its prerequisite conditions (i.e. its direct prerequisite or a prerequisite’s prerequisite) will be considered inactive, even if set as required, and will be excluded from input forms and test sessions. Using such dependencies is a powerful mechanism to define conditional inputs based on other parameters or external processing (e.g. via triggers).
Note
Properties of binary or secret type cannot be used as prerequisites.
The Default value input is available for simple text properties and represents the parameter’s default value for new conformance statements. Users may override this value when editing their conformance statement’s configuration.
To complete the creation of the parameter, click the Save button. To cancel and close the popup click the Cancel button.
Edit parameter
To edit a parameter click its corresponding row from the Parameters table.
Doing so opens a popup screen presenting the details of the parameter in editable form fields.
The purpose of all fields and usage of available controls is identical to the create parameter case. To edit the parameter’s information, enter the new values you require and click the Save button. Clicking the Delete button will, following confirmation, delete the parameter. The Cancel button closes the popup without making any changes.
Change parameter ordering
By default parameters are ordered alphabetically based on their name. You may override this default ordering by reordering the parameters as needed and saving their relative positions. This is done through the table listing the parameters, by using the move buttons at each row’s right end, to drag and drop them into their desired ordering.
Once you have reordered parameters in this way you will notice that the Save parameter order button becomes enabled. You will need to click this to confirm and persist the displayed ordering.
Parameter endpoints
You may have noticed when creating a parameter that the Create parameter button offers also a second option titled Create endpoint.
Endpoints are a feature that was deprecated as of release 1.24.0 as it offered little additional value and made actor-specific configuration properties less accessible. Endpoints are a means of grouping together configuration properties, of which you could in theory have multiple. In practice you should only ever need one, so when you define an actor, an implicit config endpoint is also created and subsequently hidden from view.
For backwards compatibility reasons you can still directly create and subsequently manage endpoints, although you are advised not to do so. For the same reason, the endpoint management screens are not documented here given that the meaningful actions - managing parameters - is identical to those performed directly under actors.
Note
Endpoints defined in the GITB TDL: Even though direct management of endpoints via the user interface is not advised, this still remains the way to define actor configuration properties in GITB TDL test suite definitions. Once defined however, the endpoint as a concept will be hidden on the user interface, displaying instead directly the parameters.