Monitor conformance status
The conformance status for your community is the summary of latest test results by all your member organisations for their declared conformance statements. Monitoring this summary is possible by means of the Conformance dashboard, accessible via the relevant menu link.
You can view your conformance dashboard in two ways, depending on your preference:
View per organisation, displaying all statements grouped and split according to their specifications for a specific organisation. This approach is best if you are interested in a specific organisation.
List view, displaying all statements for all organisations as a flat table. This approach os more suitable if you want to make complex filtering covering both organisations and specifications.
The default dashboard presentation is per organisation, considering that this is the most common dashboard use case. You can switch between both dashboard presentation modes by toggling the List view control from the page’s header.

Note
Conformance dashboard vs session dashboard: A significant benefit of the conformance dashboard is that the focus is placed on the latest result and also that even non-executed test cases are displayed. This allows you to get a clear picture of an organisation’s testing progress without needing to extrapolate information.
View per organisation
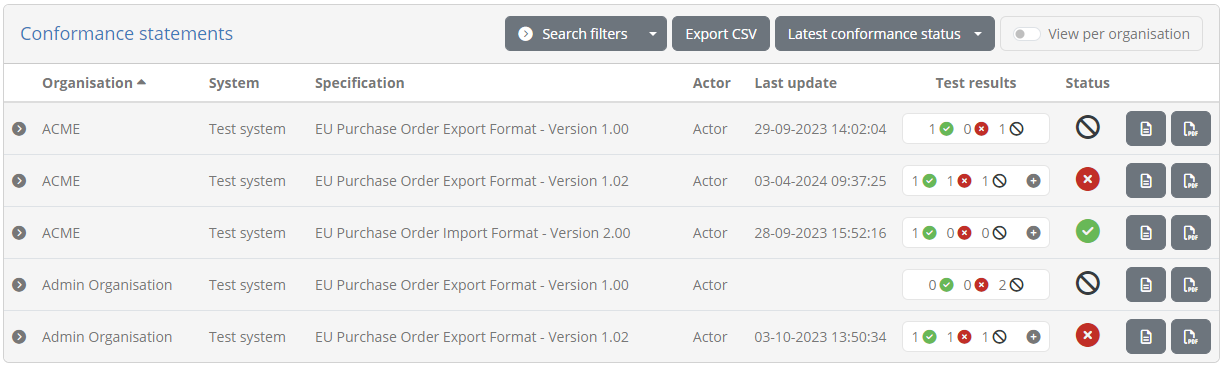
The dashboard display per organisation is the presentation mode active by default. It allows you to select a specific organisation and system within the community, to display the complete set of its conformance statements. These statements are grouped and split according to the organisation of your domains, specification groups, specifications and actors.
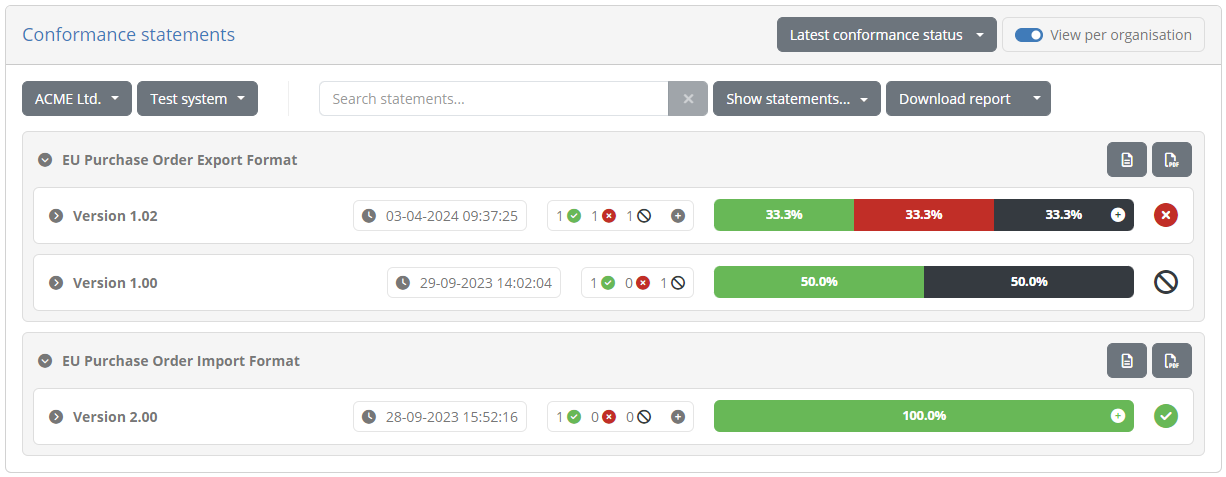
Assuming there are conformance statements defined, these will be presented in expandable panels, split and grouped based on their relevant specifications, specification groups and options (if applicable). If you do indeed see such groupings, they can be expanded and collapsed by clicking on their relevant titles.
For each statement you can see besides the name of the specification, an overview of the system’s current testing status. This overview consists of:
The last update time, corresponding to the last time the status of the conformance statement was updated.
The result counts, showing the number of tests in the conformance statement that are completed, failed or incomplete.
The result ratios, illustrating the same results but as a percentage of the total tests in the statement.
The overall status of the statement which can be successful, failed, or incomplete, based on the latest test results.
Clicking on the statement row will take you to the conformance statement detail screen. Besides viewing its details you also can access further actions relevant to the conformance statement through the option button on the right. The available actions are as follows:
Download the statement report or certificate.
Navigate to the related system, organisation, community, actor, specification or domain.
Copy or preview the conformance badge for the statement.
In case numerous statements are defined, you can use the provided search controls to filter them based on:
The specifications’ name.
The overall status.

It could be that certain statements include optional test cases. Such tests can be consulted but are not counted towards the conformance testing status. If statements with optional tests exist, the displayed counts and ratios will present a plus button to expand their display allowing you to consult both mandatory and optional test results.


From the organisation view of the conformance dashboard you can also generate conformance overview reports and conformance overview certificates. These reports capture the aggregate testing status covering multiple related conformance statements.
Conformance overview reports
Conformance overview reports are a complement to the conformance statement reports available when viewing a specific conformance statement, focusing rather on a set of related conformance statements. Such overview reports are available at different levels depending on how specifications are configured, specifically (per decreasing aggregation level):
The selected system’s overall status (always available).
A domain, when conformance statements can cover more than one domains.
A specification group, if groups are defined.
A specification, when multiple actors can be tested for.
A report of the selected system’s overall conformance status can be produced by clicking on the Download report button presented above the listing of statements. By default this will produce a PDF report, but clicking the presented caret for additional options allows you to also download the report in XML format.

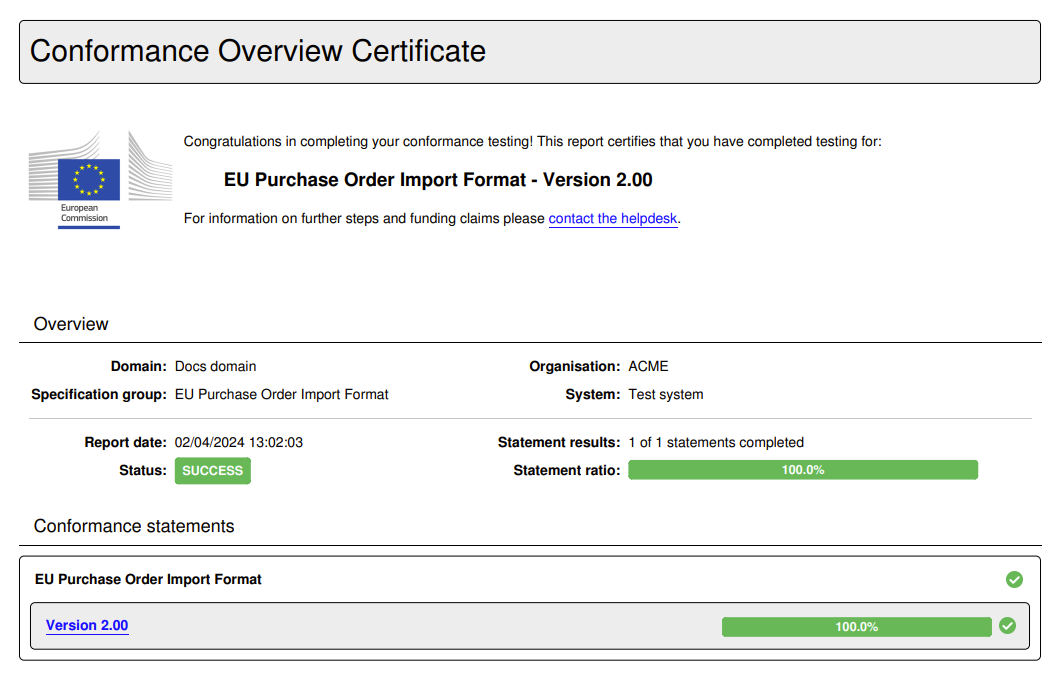
The PDF report includes an overview summarising the report’s context and status. This includes:
The organisation and system the report refers to.
The selected domain, specification group, or specification (skipped if the report refers to the overall status).
The report date and status.
The summary of conformance statement results, as counts and also percentage ratios.
Below the overview section, the report includes the listing of conformance statements presented in the same grouping as the on-screen display. Each statement includes its name and test result ratio and status.
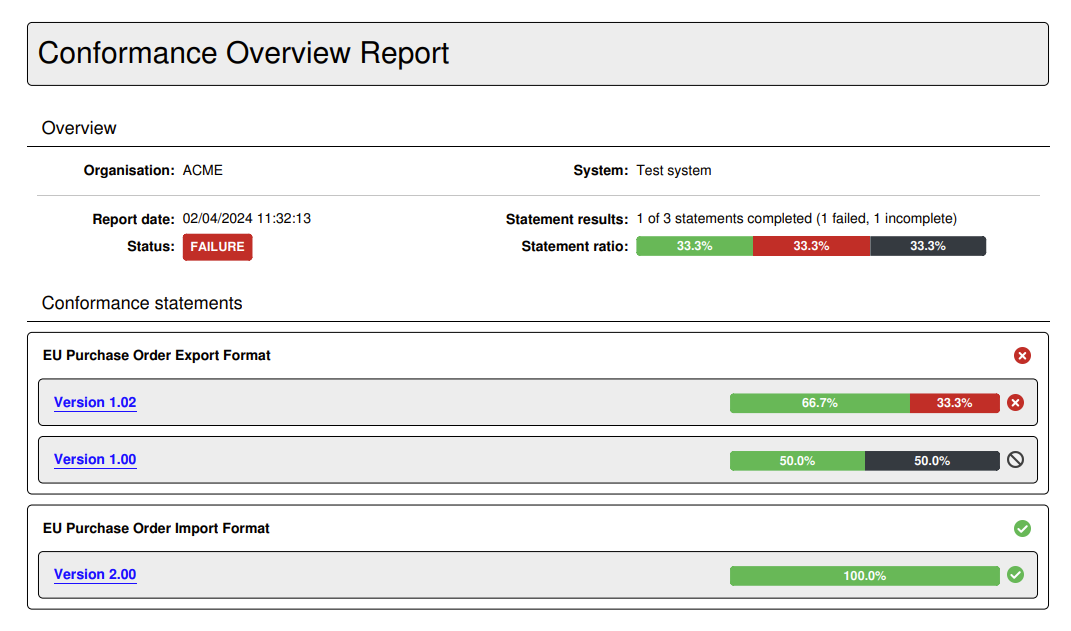
Following the summary of conformance statements, the report includes each individual statement report that lists its specific status, test suites and test cases. In fact the name of each presented conformance statement from the summary is a link you may click to access the page of the relevant statement report.
Note
Each conformance statement report included in the overview report, matches the report you can produce separately for the statement’s detail screen. When included in an overview report there are however no extended details for specific test cases.
An alternative to producing the report in PDF is to select the Download report as XML option. The format of this report is defined by the GITB Test Reporting Language (GITB TRL), and allows simpler machine-based processing. The following XML content is a sample of such a report:
<?xml version="1.0" encoding="UTF-8"?>
<ConformanceOverviewReport xmlns="http://www.gitb.com/tr/v1/"
                            xmlns:ns2="http://www.gitb.com/core/v1/"
                            xmlns:ns3="http://www.gitb.com/tbs/v1/">
   <metadata>
      <reportTime>2024-04-02T11:53:07.170+02:00</reportTime>
   </metadata>
   <overview>
      <definition>
         <party>
            <organisation>
               <name>ACME</name>
            </organisation>
            <system>
               <name>Test system</name>
               <version>v1.0</version>
               <description>A system for test purposes.</description>
            </system>
         </party>
      </definition>
      <summary>
         <status>FAILURE</status>
         <succeeded>1</succeeded>
         <failed>1</failed>
         <incomplete>1</incomplete>
      </summary>
      <statementOverview>
         <domain>
            <name>Docs domain</name>
            <description>A demo domain for documentation purposes.</description>
            <result>FAILURE</result>
            <specificationGroup>
               <name>EU Purchase Order Import Format</name>
               <description>Specification to define the data export format for EU Purchase Order Imports.</description>
               <result>SUCCESS</result>
               <specification>
                  <name>Version 2.00</name>
                  <description>Version 2.00 of the EU Purchase Order Import Format.</description>
                  <result>SUCCESS</result>
                  <actor statement="1">
                     <name>Actor</name>
                     <description>Order supplier.</description>
                     <result>SUCCESS</result>
                  </actor>
               </specification>
            </specificationGroup>
         </domain>
      </statementOverview>
      <statementDetails>
         <statement id="1">
            <definition>
               <party>
                  <organisation>
                     <name>ACME</name>
                  </organisation>
                  <system>
                     <name>Test system</name>
                     <version>v1.0</version>
                     <description>A system for test purposes.</description>
                  </system>
               </party>
               <domain>
                  <name>Docs domain</name>
                  <description>A demo domain for documentation purposes.</description>
               </domain>
               <specificationGroup>
                  <name>EU Purchase Order Import Format</name>
                  <description>Specification to define the data export format for EU Purchase Order Imports.</description>
               </specificationGroup>
               <specification>
                  <name>Version 2.00</name>
                  <description>Version 2.00 of the EU Purchase Order Import Format.</description>
               </specification>
               <actor>
                  <name>Actor</name>
                  <description>Order supplier.</description>
               </actor>
            </definition>
            <summary>
               <status>SUCCESS</status>
               <succeeded>1</succeeded>
               <failed>0</failed>
               <incomplete>0</incomplete>
            </summary>
            <lastUpdate>2023-09-28T15:52:16.000+02:00</lastUpdate>
            <testOverview>
               <testSuite>
                  <metadata>
                     <ns2:name>Simple test suite</ns2:name>
                     <ns2:version>1.0</ns2:version>
                     <ns2:description>A simple test suite.</ns2:description>
                  </metadata>
                  <result>SUCCESS</result>
                  <testCases>
                     <testCase>
                        <metadata>
                           <ns2:name>Test case 1</ns2:name>
                           <ns2:version>1.0</ns2:version>
                           <ns2:description>A simple test case.</ns2:description>
                        </metadata>
                        <result>SUCCESS</result>
                        <lastUpdate>2023-09-28T15:52:14.000+02:00</lastUpdate>
                     </testCase>
                     <testCase optional="true">
                        <metadata>
                           <ns2:name>Test case 2</ns2:name>
                           <ns2:version>1.0</ns2:version>
                           <ns2:description>Description for the second simple test case.</ns2:description>
                        </metadata>
                        <result>SUCCESS</result>
                        <lastUpdate>2023-09-28T15:52:16.000+02:00</lastUpdate>
                     </testCase>
                  </testCases>
               </testSuite>
            </testOverview>
         </statement>
      </statementDetails>
   </overview>
</ConformanceOverviewReport>
Note
You can also define custom formats for any kind of XML report. This is managed as part of the community’s report settings.
Producing a conformance overview report for a specific domain, specification group or specification, is achieved through the option button presented at the right side of the statements’ display.

The reports in either case are structured in the same way as the overall reports discussed above. The only difference is that a report at a specific aggregation level (e.g. a specification group) will also list the relevant level as part of the report’s overview information.

Conformance overview certificates
Depending on the community’s report settings you may also produce a conformance overview certificate for statements at different aggregation levels . This certificate is a report (in PDF format) that attests to the fact that the selected system has successfully completed testing for all relevant conformance statements.
To produce a certificate you click on the PDF report generation buttons, either at the overall level or for a specific domain, specification group or specification. If generating a certificate is enabled you will be prompted with a choice to select the kind of report to produce.
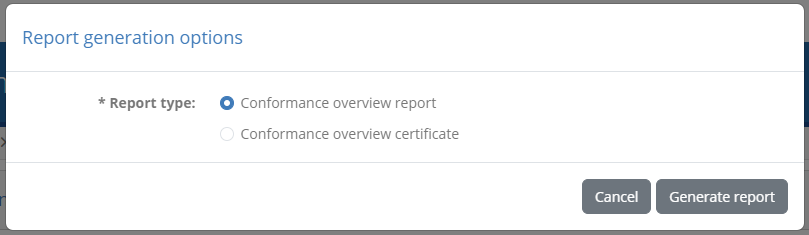
Selecting Conformance overview certificate will display an additional section to confirm, and if desired adapt, the certificate’s settings. The presented settings are pre-populated based on the values already configured for the community (see Edit report settings), and can all be adapted except for the signature settings.
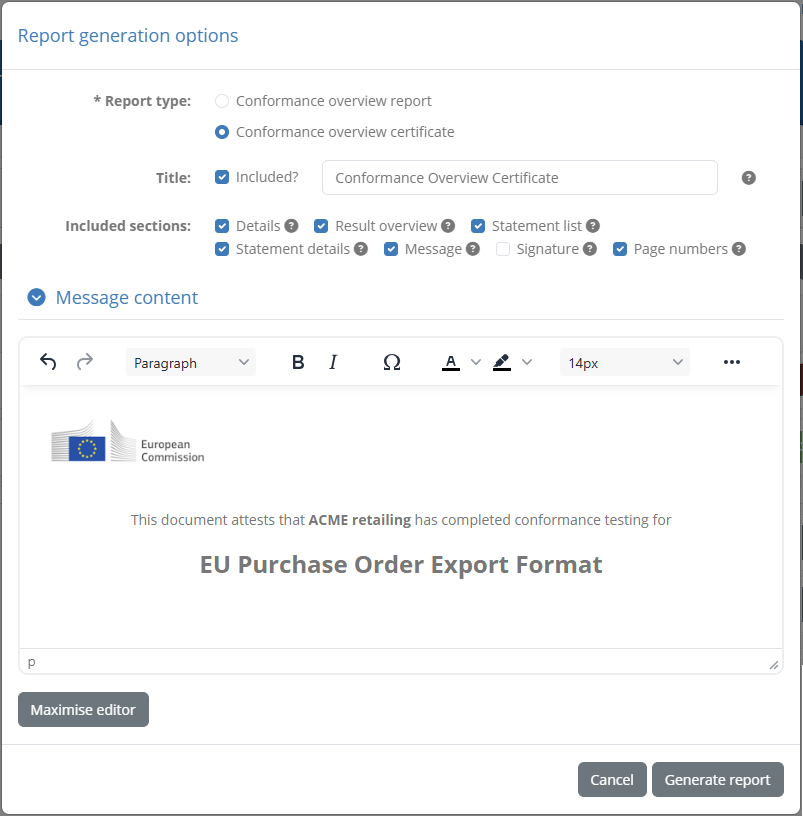
In case you have defined an elaborate custom message, acting for example as a full cover page for your certificate, it may be difficult to view and edit it in the editor. For this purpose you are provided with the Maximise editor button that when clicked will expand the editor to take up the full screen.
Once the settings are reviewed and adapted, clicking Generate report will produce the certificate.
Note
The Conformance overview report option is the default if no certificate is enabled at the selected aggregation level. In such a case clicking a PDF report download button will skip the report type prompt and directly download the overview report.
List view
You can switch to the list view at any time by toggling the List view control from the page’s header.
Doing so presents the community’s conformance statements in a table, and enables advanced search filters allowing you to inspect specific statements of interest. The table listing statements is paged and includes one row per conformance statement.
Statements are presented in a paged table sorted based on the organisation’s name. Custom sorting can be applied by clicking the title of each column; clicking a column header for the first time will sort by it in ascending manner and clicking it again will switch to descending. The active sort column and type are indicated using an arrow next to the relevant column header. The table offers controls to go to specific pages as well as the first, previous, next and last ones (as applicable), while showing in the bottom right corner the total and currently displayed test counts.
The information displayed for each conformance statement is:
The organisation linked to the statement.
The system that is the focus of the testing activities.
The specification that the system is selected to conform to.
The actor of the specification the system is expected to act as.
The date and time when the conformance statement’s status was last updated.
The statement’s test results showing how many configured tests are successful, failed, or incomplete. This can also be hovered over to view a text summary of the displayed counts.
The statement’s overall status (success, failure or incomplete).
Finally, each row also provides on the right side an option button to trigger the actions supported for each statement. The available actions are as follows:
Download the statement report or certificate.
Navigate to the related system, organisation, community, actor, specification or domain.
Copy or preview the conformance badge for the statement.
Clicking on a statement row will take you to the conformance statement detail screen.
Export all conformance statements
It is possible to generate a CSV export including all the conformance statements currently displayed. To do so click the Export CSV button from the conformance statements’ header.

Note that the CSV export will include the conformance statement information as well as the information on the individual related test cases. If you have defined custom properties for the community applicable to organisations or systems (see Edit custom member properties) these may also be included in CSV exports. To include a custom property:
It must be a Simple text value (i.e. not a hidden value or a file).
It must be configured as Included in exports.
All such properties are included in the export as columns following the “Organisation” or “System”, depending on whether they are organisation of system level properties. Their columns are named using a prefix of “Organisation” or “System” followed by the property’s key value included in parentheses.

Apply search filters
When the dashboard’s detailed display is active, it offers also a set of filters that can be used to select the displayed conformance statements. These can be enabled by clicking the Search button from the table header.
Doing so will expand the table header to present the available filter controls.
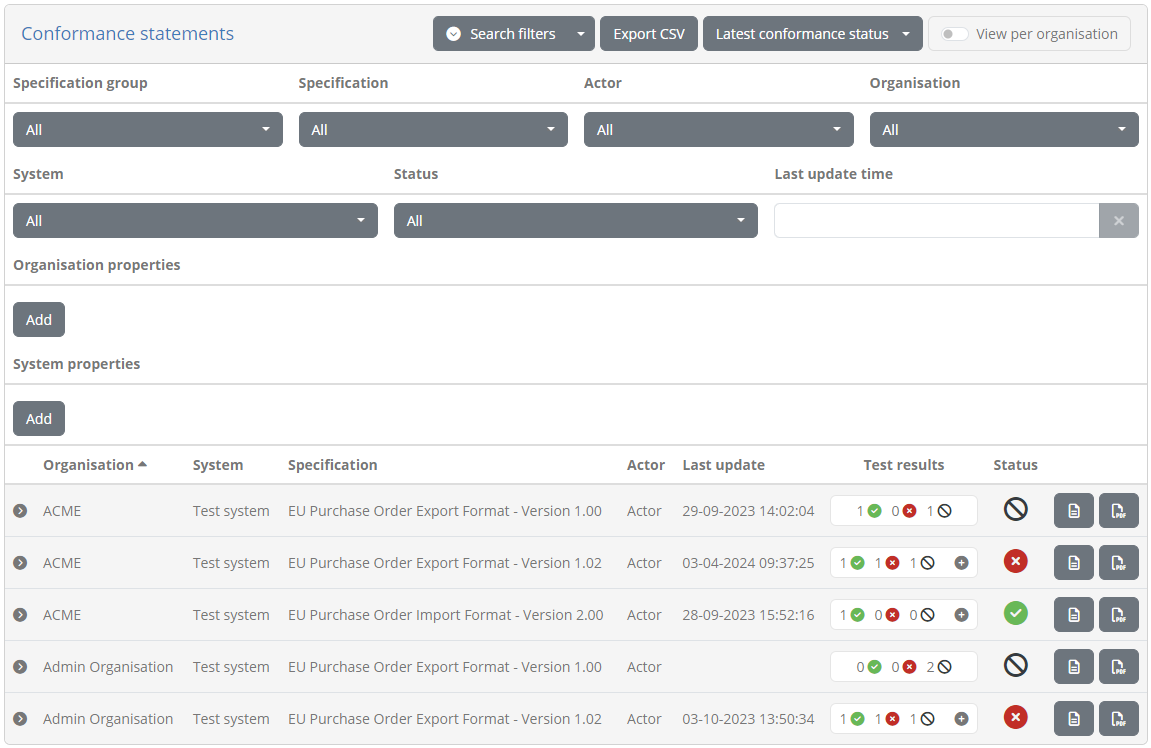
The controls that can be used for filtering are:
The relevant organisation and system.
The relevant domain (only in case your community is not linked to a specific domain).
The relevant specification group, specification and actor.
The conformance status.
The last update time for the conformance statement’s status.
Custom organisation and system properties defined for the community.
Most filter controls are defined as selection choices. Multiple selected values across these controls are applied as follows:
Within a specific filter control using “OR” logic (e.g. selecting multiple specifications).
Across filter controls using “AND” logic (e.g. selecting a specification and an organisation).
Note additionally that selecting dependent values serves to limit the filter options that are presented. For example if a given organisation is selected, the systems available for filtering will be limited to that organisation to already exclude impossible combinations.
Regarding organisation and system properties, these each present an Add button that, once clicked, will display a list of the available properties, a field or selection list to provide the filter value, and controls to confirm or cancel the filter. Multiple property filters can be added with the following semantics:
Values provided for the same property are applied using “OR” logic.
Values provided for different properties are applied using “AND” logic.
The presented conformance statements are automatically updated whenever your filter options are modified. The filter panel may also be collapsed and expanded by clicking again the Search button. In addition, you may click the caret to the right of the button to select from its options to either refresh the current results, or to clear all applied filters.

Conformance statement report
The conformance statement report provides an overview of the conformance testing status relevant to a specific conformance statement. It can be generated to include only an overview or include also the results from its individual test cases. It is available in both XML and PDF formats.
When the dashboard is presented either per-organisation or in list view, you generate reports by clicking the option button on the right and selecting Download report or Download report as XML.


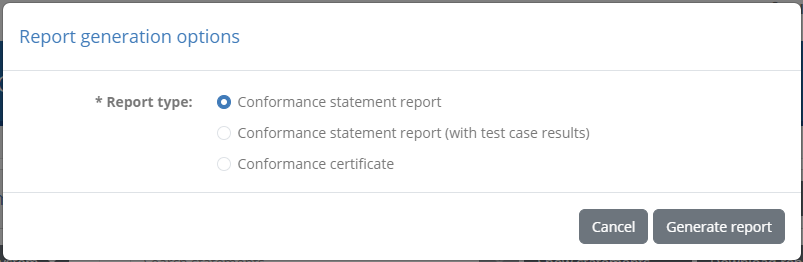
If you select to download a PDF report, you will be prompted for the type of report you want to generate:
The conformance statement report (the default), for the report including the status overview for the conformance statement.
The conformance statement report (with test case results), to also include detailed test results.
The conformance certificate (discussed in Conformance statement certificate).
When generating an XML report you will see a similar prompt including only the first two options (conformance certificates are not available in XML).
In both cases, once you select the report type and click the Generate report button, the produced report will be downloaded. Clicking on Cancel closes the popup to return you to the previous screen.
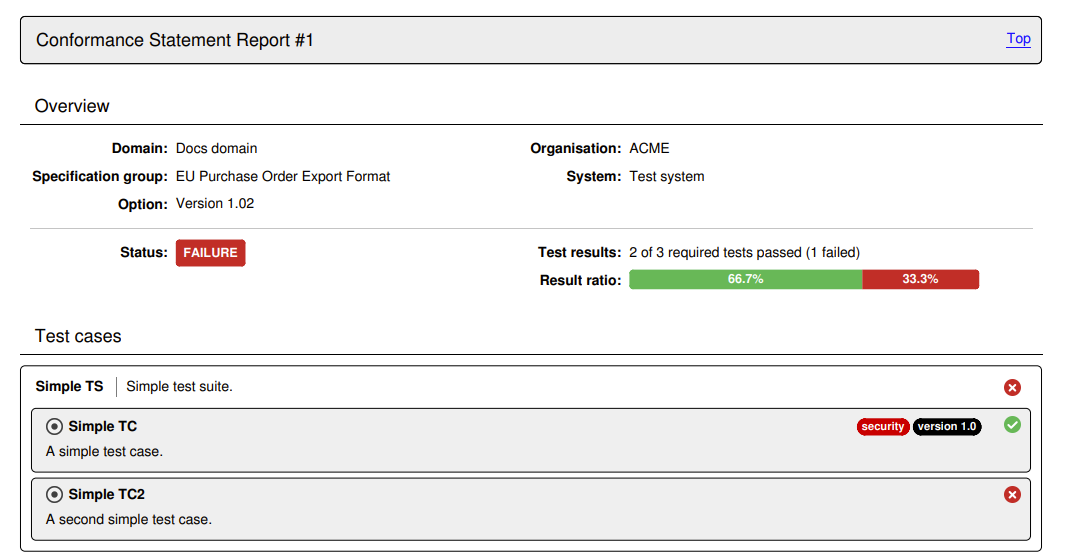
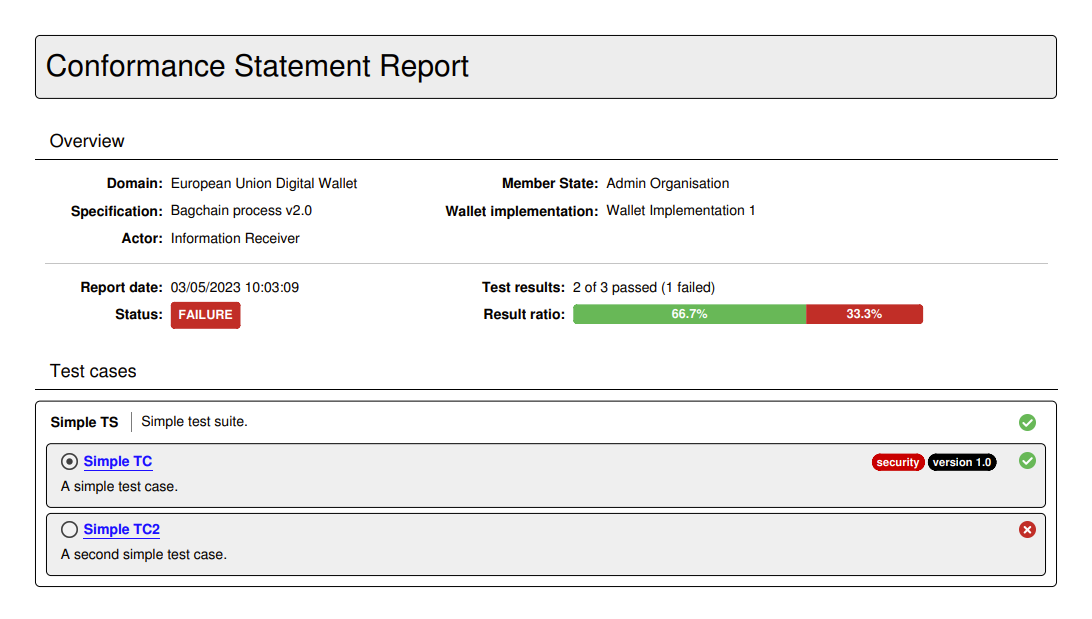
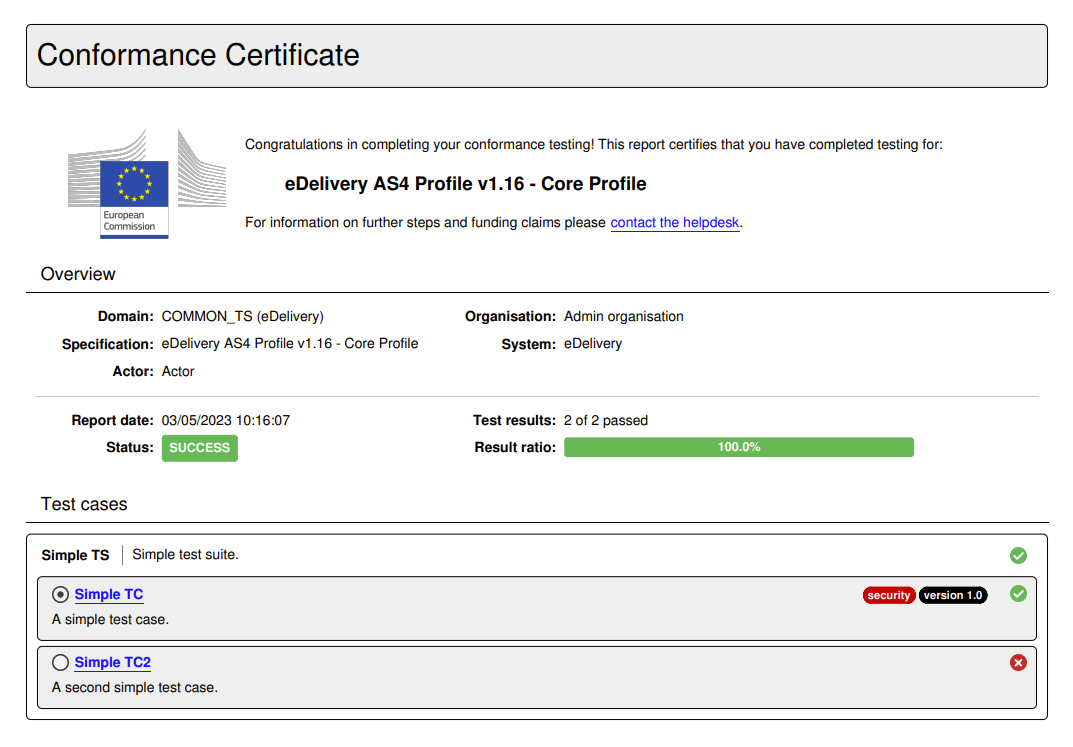
The following sample illustrates the information included in the conformance statement PDF report’s overview section. Specifically:
The information on the domain, specification and actor for the selected system.
The name of the system’s organisation and the system itself.
The date the report was produced, the number of successfully passed test cases versus the total, and the percentage of results (successes, failures and incomplete tests).
The list of test suites displaying per test suite its name, description and status.
For each test suite, the list of test cases, displaying similarly each test case’s name, description and result. The test case name is also prefixed with the test’s overall sequence that, in case test case steps are included, is a link to jump to its detailed report.
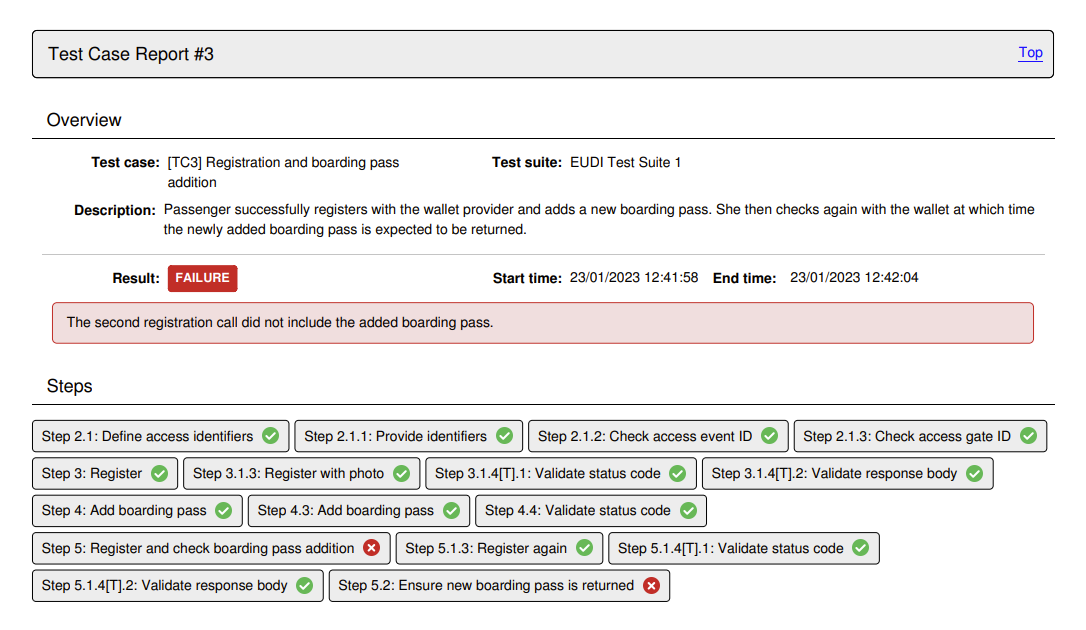
In case the option to add each test case’s step results is selected, the report includes a page per test case displaying its summary and the result of each test step. The test case’s title includes its reference number listed in the report’s overview section, and provides also a link to return to the listing of test cases.
Note
Detailed report size: The detailed conformance statement report presents each test session and individual step in a separate page. If the conformance statement contains numerous test cases, each with multiple test steps, the resulting detailed report could be quite long.
Producing the report in XML is an interesting alternative if you want to use it for machine-based processing or further customisations. The format of this report is defined by the GITB Test Reporting Language (GITB TRL). The following XML content is a sample of such a report:
<?xml version="1.0" encoding="UTF-8"?>
<ConformanceStatementReport xmlns="http://www.gitb.com/tr/v1/"
                             xmlns:ns2="http://www.gitb.com/core/v1/"
                             xmlns:ns3="http://www.gitb.com/tbs/v1/">
   <metadata>
      <reportTime>2024-04-02T14:13:18.267+02:00</reportTime>
   </metadata>
   <statement>
      <definition>
         <party>
            <organisation>
               <name>ACME</name>
            </organisation>
            <system>
               <name>Test system</name>
               <version>v1.0</version>
               <description>A system for test purposes.</description>
            </system>
         </party>
         <domain>
            <name>Docs domain</name>
            <description>A demo domain for documentation purposes.</description>
         </domain>
         <specificationGroup>
            <name>EU Purchase Order Export Format</name>
            <description>Specification to define the data export format for EU Purchase Order Exports.</description>
         </specificationGroup>
         <specification>
            <name>Version 1.02</name>
            <description>Version 1.02 of the EU Purchase Order Export Format.</description>
         </specification>
         <actor>
            <name>Actor</name>
            <description>Order supplier.</description>
         </actor>
      </definition>
      <summary>
         <status>FAILURE</status>
         <succeeded>2</succeeded>
         <failed>1</failed>
         <incomplete>0</incomplete>
      </summary>
      <lastUpdate>2023-09-29T19:00:01.000+02:00</lastUpdate>
      <testOverview>
         <testSuite>
            <metadata>
               <ns2:name>Simple TS</ns2:name>
               <ns2:version>0.1</ns2:version>
               <ns2:description>Simple test suite.</ns2:description>
            </metadata>
            <result>FAILURE</result>
            <testCases>
               <testCase>
                  <metadata>
                     <ns2:name>Simple TC</ns2:name>
                     <ns2:version>1.0</ns2:version>
                     <ns2:description>A simple test case.</ns2:description>
                     <ns2:tags>
                        <ns2:tag name="security" foreground="#ffffff" background="#d20000">Test cases linked to security issues.</ns2:tag>
                        <ns2:tag name="version 1.0" foreground="#ffffff" background="#000000">Test cases introduced in version 1.02.</ns2:tag>
                     </ns2:tags>
                  </metadata>
                  <result>SUCCESS</result>
                  <lastUpdate>2023-09-29T19:00:01.000+02:00</lastUpdate>
               </testCase>
               <testCase>
                  <metadata>
                     <ns2:name>Simple TC2</ns2:name>
                     <ns2:version>1.0</ns2:version>
                     <ns2:description>A second simple test case.</ns2:description>
                  </metadata>
                  <result>FAILURE</result>
                  <lastUpdate>2023-10-02T17:09:32.000+02:00</lastUpdate>
               </testCase>
            </testCases>
         </testSuite>
         <testSuite>
            <metadata>
               <ns2:name>Simple test suite</ns2:name>
               <ns2:version>1.0</ns2:version>
               <ns2:description>A simple test suite.</ns2:description>
            </metadata>
            <result>SUCCESS</result>
            <testCases>
               <testCase>
                  <metadata>
                     <ns2:name>Test case 1</ns2:name>
                     <ns2:version>1.0</ns2:version>
                     <ns2:description>A simple test case.</ns2:description>
                  </metadata>
                  <result>SUCCESS</result>
                  <lastUpdate>2023-09-28T15:52:14.000+02:00</lastUpdate>
               </testCase>
               <testCase optional="true">
                  <metadata>
                     <ns2:name>Test case 2</ns2:name>
                     <ns2:version>1.0</ns2:version>
                     <ns2:description>Description for the second simple test case.</ns2:description>
                  </metadata>
                  <result>SUCCESS</result>
                  <lastUpdate>2023-09-28T15:52:16.000+02:00</lastUpdate>
               </testCase>
            </testCases>
         </testSuite>
      </testOverview>
   </statement>
</ConformanceStatementReport>
Note
You can also define custom formats for any kind of XML report. This is managed as part of the community’s report settings.
Conformance statement certificate
The conformance certificate is a PDF report similar to the conformance statement report, that is meant to be delivered to the organisation linked to the conformance statement as a proof of its test results. It extends the base report by allowing you to selectively include its sections, include a custom text and also add a digital signature for integrity control and non-repudiation. These customisations are done for each generated certificate on the basis of defaults that are configured as part of the community’s report settings.
When the dashboard is presented either per-organisation or in list view, you generate a certificate by clicking the option button on the right and selecting Download report.
Once you select the Download report option, you will be prompted for the type of report you want to generate:
The options available are:
The conformance statement report (the default), for the report including the status overview for the conformance statement.
The conformance statement report (with test case results), to also include the detailed test case results.
The conformance certificate.
Selecting the conformance certificate option will display the customisation options for the certificate, starting from the values already configured for the community (see Edit report settings). You may override all settings, including the custom message that is presented here with the defined placeholders replaced using the information from the selected conformance statement. The only option that cannot be overridden at this point is the digital signature configuration.
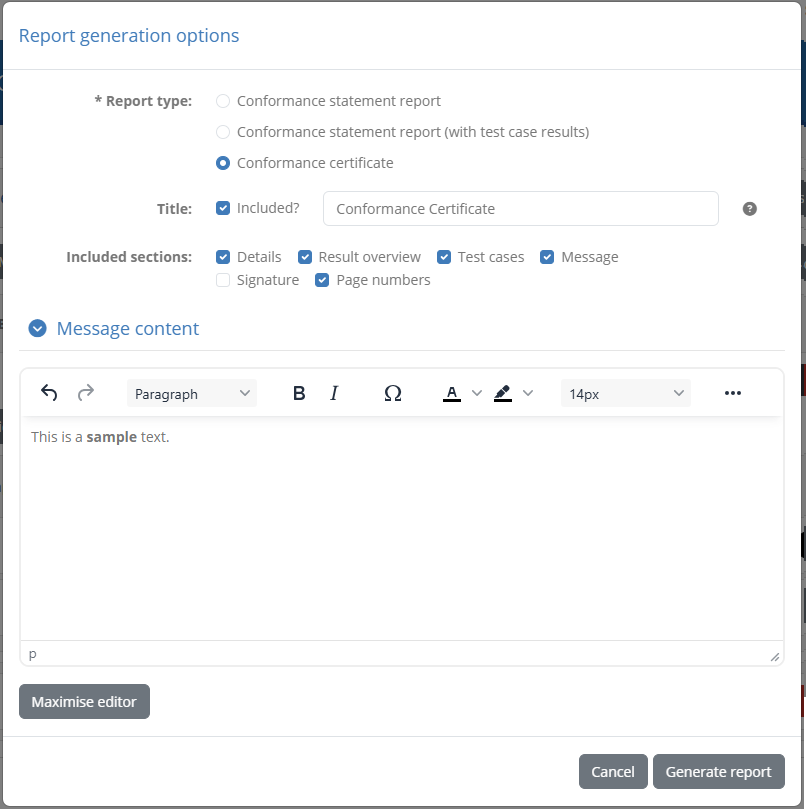
In case you have defined an elaborate custom message, acting for example as a full cover page for your certificate, it may be difficult to view and edit it in the editor. For this purpose you are provided with the Maximise editor button that when clicked will expand the editor to take up the full screen.
Once you have selected the report type and adapted your settings you can click the Generate report button to download the produced report. Clicking on Cancel closes the popup to return you to the previous screen.
The following example is a sample conformance certificate. It can significantly resemble the conformance statement report with its overview section drawing from the same information as a normal report. In this example however, a custom message for the recipient organisation is also included:
Conformance snapshots
The statements listed in the conformance dashboard correspond to the current status of your community and testing setup. It is possible to take a readonly snapshot of this status that you can later on consult to review the conformance testing progress of your community at previous points in time. You may want to do this to record an overview at specific milestones of your project, or simply to track detailed testing progress over time. You could also find such snapshots useful to provide further versioning for your test configuration over what is normally possible, by defining snapshots as named and readonly version milestones. Regardless of their eventual purpose, these snapshots are referred to in the Test Bed as conformance snapshots.
You can review and select a given snapshot through the relevant control on the statement listings’ header. This is by default set to Latest conformance status indicating that you are viewing the current status.
To create a new snapshot or manage your existing ones, expand the snapshot button and select option Manage conformance snapshots.

Doing so presents you with a popup listing your existing snapshots, presenting for each its label and timestamp, the latter used also to sort the entries to display the most recent snapshot first. As a first entry an entry is also included matching the latest conformance status. Above the listed snapshots you also have a simple search filter you can use to filter the displayed entries, as well as a control to toggle between internal and public labels for the snapshots.
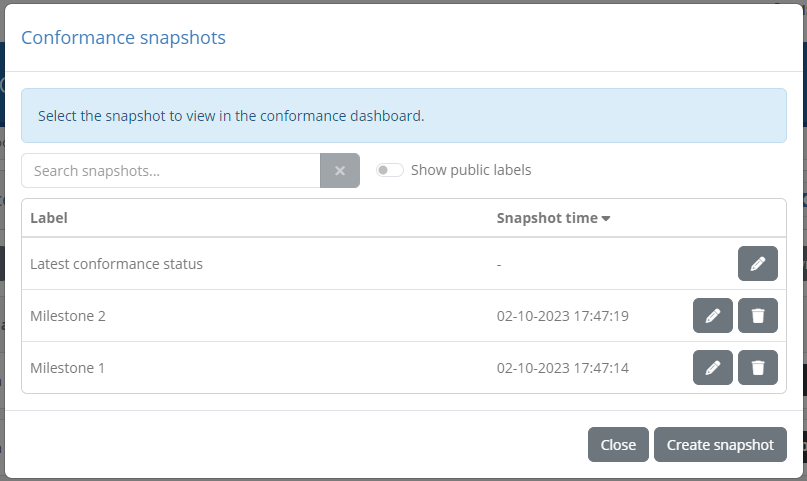
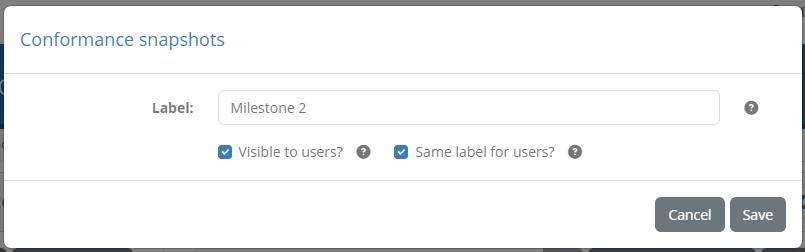
Each listed snapshot has an option allowing you edit and delete it. Editing a snapshot allows you to replace the snapshot’s label, but also to specify whether it is visible to organisation users, and if so, whether it will presented with a different label. This information is also what is requested when you create a new snapshot by clicking the Create snapshot button from the popup’s footer.
When viewing an existing snapshot you may also view and copy from here the snapshot’s API key, which you would need if you need to refer to a snapshot when using the Test Bed’s REST API.
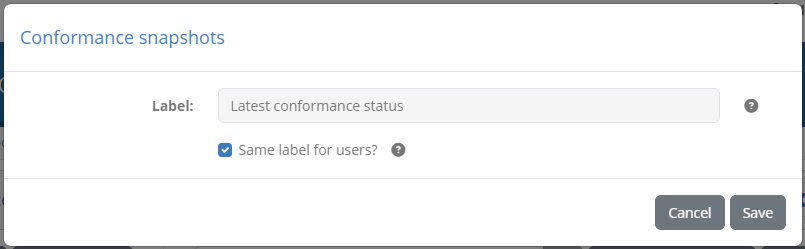
The default snapshot entry corresponding to the latest status is always present and visible to organisation users. However, you may still edit it to set a specific public label.
To view a specific snapshot you click its corresponding row. Doing so will close the popup and populate the conformance dashboard with the information from the snapshot. This is highlighted for you by displaying the snapshot’s label in the statement panel’s header.

With the snapshot selected, you may proceed to review its statements, use search filters and carry out all actions as you would on the current conformance status. Given that the snapshot’s data is fully readonly, it is possible that related information is changed or even deleted. The snapshot always displays information reflecting the state at the time of the snapshot. In case of currently deleted information (e.g. a deleted test suite or organisation), references are displayed with the only difference being that navigation controls to view the deleted data’s details will be unavailable. Finally, it is interesting to note that conformance badges are also part of the snapshot’s data so that if a badge is subsequently changed, the snapshot will still refer to the previous badge.
To have the conformance dashboard revert to the current status, select the Latest conformance status option from the snapshot button on the statement panel’s header.